So far, we’ve had two successful drone building events at TheLab.ms makerspace. We built large 450mm quadcopters at the first class. They’re big enough to fly line of sight, and the components are large and easy to work with. They’re also big enough to carry a payload. That could be a camera on a gimbal, or it might be a smaller drone attached to a payload release mechanism!
At the second build class, we assembled copies of the PH145—my own 3D printed nylon quadcopter. It is a 145mm quadcopter with 3” propellers. It is a bit on the heavy side, and it pushes the limits of those small propellers. It is a sturdy little drone, and it was a great drone for learning to FPV. The heavy-duty prop guards help, because it bounces off obstacles and recovers well.
Brian and I decided that it was time to build a racing-style quadcopter.
UPDATE: We’ve built six or seven of these quads so far. Brian Beverage wrote about his experience build one of TheLab.ms’s FPV racing quadcopters.
- I Built a Quadcopter! at Brian’s Blog
- Weaponizing the DIY 450mm Quadcopter at Brian’s Blog
- My 3D Printed Quadcopter – The PH145 Drone
- My First Drone Build! at brianbeverage.net
Why a racing quad?
We’ve both learned a lot over the past year. Brian suggested that we do another build of the PH145, but I didn’t want to get on board with that. Components for a 5” quad are more readily available, and the prices are much better. A 5” racer is an improvement over the PH145 in almost every way. It will be more efficient, much faster, and it will cost $100 less to build.
We also thought about building another 450mm drone. The build process is easy, because everything is so big. They’re efficient, so it is easy to get a 10 to 15 minute flight time out of them. Those big props also allow for carrying a fairly sizable payload.
Racing quads are fun and cool. That alone is enough reason to build one. They aren’t as easy to assemble as the 450mm quads, but they’re not much trickier than the PH145.
A racing drone won’t have the payload capacity of a big 450mm drone, but I’m certain you could still attach one of Brian’s payload release mechanisms. It may not lift a liter of water as comfortably as Brian’s 450, but it should still be quite capable!
The bottom line is that a 5” racing quad is the most popular form factor. People want to fly them, and parts are easy to find!
Is it still a racing quad when you use budget parts?
I wanted to call this build “My First Racing Quad.” If you’re new to FPV quads, you’re going to crash, and you’re going to crash a lot. We wanted everyone’s initial investment into the hobby to be relatively low, and we wanted to make sure that repairs didn’t cost too much. Most of the parts in TheLab.ms’s quadcopter kit cost less than $10. The frame costs less than $20, and the flight controller is less than $25.
These budget parts are not as good as premium parts. The Tiger Motor F40-II motors on my Shuriken X1 are priced at around $25 each. They’re a bit smaller than the motors we chose for TheLab.ms’s build, but they are more powerful, more durable, and more efficient. Is it worth using premium motors on your first racing quad? I don’t feel that it is. I still can’t fully utilize all the thrust of my X1!
It may be difficult to win races with the cheap parts, but you can definitely participate. I’m not a racer. The flying I do would be considered freestyle or proximity flying. You don’t need ridiculous motors to have fun doing this! In fact, the purpose built freestyle quads tend to be heavier and use smaller motors.
When you’re just starting out, it doesn’t matter. You’re going to be breaking things, and you’re going to be happier replacing a $10 motor. I’ve broken lots of motors and a few cameras. You will, too!
The parts list
Stew from UAVFutures was a major influence on our parts list. I had already picked out motors, escs, and a flight controller. I believe I was narrowing down frame options when I remembered that Stew has an excellent $99 quadcopter build video. He chose a lot of the parts I had already picked out, so I used his video to finish out my list.
Stew used some extremely low end parts to fit his build into $99. I wanted our build to have an on-screen display, so we used a different flight controller. We also upgraded our camera, video transmitter, and motors.
The total cost for our parts from Banggood.com comes it at around $155. The kit we’re selling at TheLab.ms also includes a $22 battery. TheLab.ms is selling the kits for the class for $200.
I’m going to explain why we chose each part. I’m going to start with the motors and work my way in from there.
- Stew’s $99 FPV Drone Build at YouTube
The simplified parts list
These are the parts we used. They were all acquired from Banggood.com.
- 4x Racerstar 2306S 2700KV motors
- 4x Racerstar 20A ESCs
- OMNIBUS F3 Pro flight controller
- Matek power distribution board (PDB)
- TS5823S VTX
- Eachine 1000TVL camera
- DYS RP-SMA RHCP antenna
- XT60 battery cable
- KingKong 5040 propellers
- Lisam LS-210 frame
- Infinity 4S 1500 mAh graphene LiPo
Racerstar 2306S 2700KV motors
Stew’s build uses the Racerstar 2205 motors. These motors are common in budget racing drone builds. The 2205 motors were my first choice until I discovered Racerstar’s 2306S motors.
They’re bigger motors, and they don’t even cost $1.00 more. Bigger isn’t always better, so I did some research.
I’ve read a lot of bad things about Racerstar motors in general. I expected this, though, because they’re cheap and you get what you pay for. We bought than 40 of the 2306S motors. I’ll report back once we’ve used all of them.
I did see a video from Kabab FPV on YouTube. He seems to think the 2306 Racerstar motors are made from thicker or better aluminum than the 2205 Racerstar motors. He seems like a knowledgeable enough guy, so I’m taking his word for it.
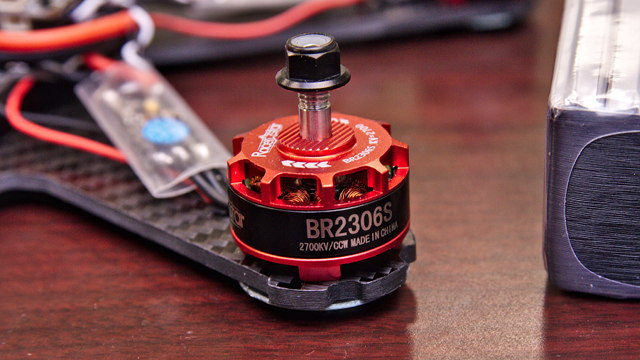
The Racerstar 2306S motors have a ridged protrusion on top that the 2205 lacks. I like this feature a lot. It should help keep the props locked in place.
I’ve already flown one of TheLab.ms’s racing quads, and I am pleased with the motors. They’re got a good amount of punch, and the drone feels smooth. I didn’t do any crazy freestyle flying, because the drone belongs to one of the members of our makerspace, and the rates are set much lower than I’m used to.
The Racerstar 2306S motors have more punch than I expected. They’re not as efficient as the T-Motor F40 motors on my Shuriken X1, but that was to be expected. TheLab.ms’s drone can fly gently for five or six minutes. If I fly my Shuriken X1 like that I can manage seven or eight minutes. I usually push the X1 hard enough that I only get three or four minutes out of a battery. I can’t wait to see how long TheLab.ms’s drone can stay in the air when we push it that hard!
I’m glad we chose the Racerstar 2306S. They’re working well, and they are huge. They look really mean!
- 4x Racerstar 2306S 2700KV motors at Banggood
Racerstar 20A ESCs
Stew’s build uses a 4-in-1 ESC module. I’m not a big fan of these. They require less soldering, and they’re easier to work with. The problem is that if you burn out one ESC, then you have to replace the entire module!
How often do ESCs burn out? I’m not sure, but two of my friends had to replace an ESC last month. Using four separate ESCs will keep the repair costs lower.
All budget ESCs are similar enough. We chose 20 amp ESCs, because our Holybro Shuriken X1 drones max out at less than 90 amps. That’s only 22 amps per motor, and we don’t expect the Racerstar motors can draw as much power. The highest we’ve seen so far on TheLab.ms’s drone is 65 amps, so the 20 amp ESCs should be plenty.
We definitely wanted to use ESCs that support DSHOT. DSHOT is a digital protocol that the flight controller uses to communicate with the ESCs. With the old analog protocols, you had to calibrate your ESCs. DSHOT eliminates this requirement, so there’s one less thing for new folks to have to deal with!
- 4x Racerstar 20A ESCs with DSHOT at Banggood
Omnibus Pro F3 flight controller
The Omnibus Pro F3 meets all our requirements and it is inexpensive. Most importantly, though, I used it recently in a build of my own, so we knew what to expect from it!
It has an integrated Betaflight OSD module. This is a seemingly minor but important upgrade over the MWOSD module most of us have been using. You can configure the Betaflight OSD from the Betaflight Configurator app, and the OSD has access to more settings than MWOSD.
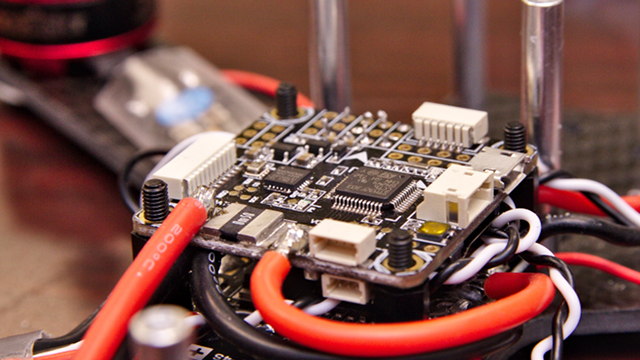
The Omnibus F3 Pro also includes a current sensing circuit. This allows the flight controller to monitor your amp draw and keep you appraised of how many mAh you’ve consumed—this is like the fuel gauge for your drone.
I’m excited that we get to have an OSD and current sensor on an F3 flight controller for only $22. I’m disappointed with how convoluted the wiring needs to be to support the current sensor. I probably should have found us a flight controller with an integrated PDB.
- OMNIBUS F3 Pro Flight Controller at Banggood
Power distribution board (PDB)
There’s not much to say about the PDB—they’re all boring and quite similar. We chose a PDB with a 5v and 12v regulators. It also has pads for distributing power to our ESCs.
- Matek PDB at Banggood
The Lisam LS-210 carbon fiber frame
We picked an inexpensive frame with lots of room for components. The Lisam LS-210 frame is usually priced at $14 to $17 dollars. The frame is the piece of our build that I’m the least excited about.
It is a unibody frame. That means that when you break an arm, you have to replace the whole thing. Fortunately, the entire Lisam LS-210 frame costs about as much as a pair of arms for my Shuriken X1. Unfortunately, it’ll be more work when you have to repair an arm!
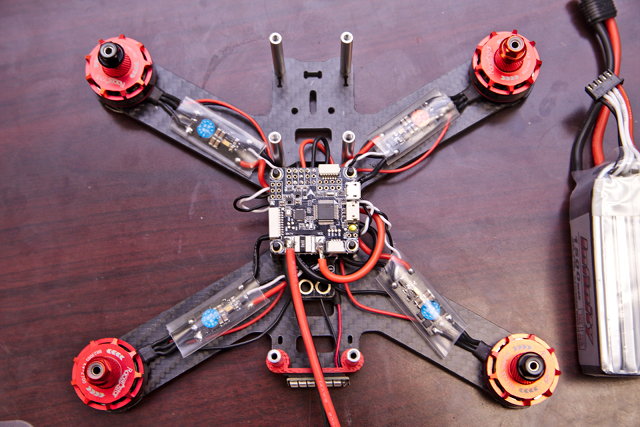
I am a fan of modern, compact frames. The Lisam LS-210 is a bigger, older style frame, but it is good for a first-time drone builder. There’s a lot more room in the middle of the frame, so you don’t have to work as hard to fit all your components!
We wanted a frame with a top mounted battery, and the Lisam LS-210 is a good fit for that. We’ve busted three or four batteries so far on our Shuriken X1 quads. You’re much more likely to hit the ground with the bottom of your drone, and when your battery is down there, it absorbs most of the impact. That’s not good for a beginner!
- Lisam LS-210 Carbon Fiber frame at Banggood
A 200mw video transmitter and a cheap but usable camera
Stew had to use a tiny camera and a low-power video transmitter to keep his build under $100. I have micro drones with similar cameras and VTX units, and I wouldn’t recommend anyone use those tiny, cheap parts unless they are building a micro drone!
I use a Runcam Eagle 2 on my racing quads. It is a fantastic camera, but its price tag is too high for a first-time build. We chose the Eachine 1000TVL CCD camera. They’re usually available for $10 or $12. I would be surprised if there’s actually a CCD sensor inside this camera.
NOTE: The above video was recorded earlier this year on my PH145 drone using the same Eachine 1000TVL FPV camera.
I’ve used several of these Eachine cameras. They’re not nearly as good as a $40 Runcam Eagle 2 or a $25 generic HS1177 CCD camera, but they’re definitely quite usable. I’ve smashed one of these directly into a tree at high speed, and I was pleased that the replacement camera only cost me $12!
We wanted to use a 200mw VTX module with a circular polarized antenna. There are dozens of different yet nearly identical VTX modules available from Banggood.com. I don’t recall precisely why we chose this particular module, but it seems to work well enough.
- Eachine 1000TV FPV Camera at Banggood
- TS5823S VTX at Banggood
1500 mAh 4S Infinity graphene LiPo battery
We are including a battery with each racing quadcopter kit. We chose the 1500 mAh Infinity graphene battery from Banggood.
The 1300 mAh version of this battery was one of the first drone batteries I ever bought. I’ve tried other, more expensive brands, but I’ve been slowly phasing those out. Every 4S LiPo that I carry in my drone bag is now an Infinity graphene battery. I have a mixture of standard and race version of the 1300 and 1500 mAh batteries.
I’m definitely a fan of these batteries. They don’t sag as much or as quickly as the more expensive batteries that I used to use. When I’m running Racekraft 5040 propellers, my $30 Venom 75C 1300 mAh would trigger a low-voltage warning on my Shuriken X1 on full throttle punch outs almost immediately after take off.
The $20 Infinity Graphene 1300 or 1500 mAh won’t trip the low-voltage warning until I’ve flown enough to consumed 600 to 800 mAh. In my opinion, these batteries are a fantastic value!
- 1500 mAh Infinity Graphene 4S LiPo battery at Banggood
Kingkong 5040 Tri-Blade Props
We ordered a whole mess of Kingkong 5040 props from Banggood. They seem quite durable, and they’re quite inexpensive.
People are extremely opinionated about props. I’ve heard good things about these Kingkong props, and they seem like a great starter prop.
I buy all my props from Amazon—I don’t plan ahead well enough to wait for props to arrive from China! I run Racekraft 5051 props, and they cost almost three times as much from Amazon, but they usually arrive within two days.
- KingKong 5040 Props from Banggood
Why should I build a racing quad?!
There are a lot of really nice bind-n-fly racing drones, and some of them are cheaper than our racing drone kit at TheLab.ms. You don’t have to build a quadcopter. You absolutely can buy a drone that arrives at your door fully assembled.
The fully assembled racing drones are fantastic. Most of my own drones were fully assembled at the factory. It is often cheaper to buy a ready to fly drone than it is to buy similar components to build your own!
There is still a lot of value in building a quadcopter—especially when it is your first quadcopter! If you’re new to FPV, you are going to crash, and you’re going to crash a lot. When you crash, you break things. When you break things, you have to fix things.
If you buy a drone off the shelf, you won’t know how anything works. You won’t know how to fix it. When you build your own quad, you’ll know exactly how it fits together.
If you build our drone kit at TheLab.ms, you’ll probably be able to repair it. If you can repair a drone from TheLab.ms, you’ll also be able to repair my Shuriken X1—like most racing drones, it has very similar components!
I don’t think I can build a quadcopter!
If you can build a computer, you can build a quadcopter. The concepts are similar. You choose components, make sure they’re compatible, and connect them together. There’s a bit of soldering involved in building a drone, but it is fairly straight forward.
At TheLab.ms, we are trying to eliminate some of the complications. You don’t have to worry about which parts are compatible. You don’t have to figure out how correctly wire all the components into the flight controller. If you’re not proficient at soldering, there will be people in the classroom to help you out!
I don’t want to build a quad! What should I buy?
I can understand why you wouldn’t want to build a quadcopter. It is a time consuming process. There are plenty of bind-n-fly quadcopters to choose from. Many cost less than our kit. Quite a few of those bind-n-fly racing quads not only cost less than our kit, but they’re made with better parts—at TheLab.ms, we just can’t reach those economies of scale!
If you’re on an extreme budget, you can’t go wrong with the Eachine Wizard X220. You can find the Wizard bundled with everything you need to get flying for less than $200. The bundle includes a battery, a simple balance charger, a FlySky receiver, and a FlySky transmitter. The only thing missing is the goggles!
If you want something with a little more pep, I don’t think you can go wrong with the BFight 210—especially if you’re using a Taranis FrSky transmitter. The folks at Gearbest sent me a free BFight 210 to review, and I’ve been flying it more often than my Shuriken X1 so far. It is good deal lighter than either the Eachine Wizard or my Shuriken X1, and it is fun to fly!
The BFight 210 is still a budget racing drone, and it isn’t without problems, but those issues are relatively minor. The BFight 210 usually costs around $180, but I’ve seen it go on sale for around $150.
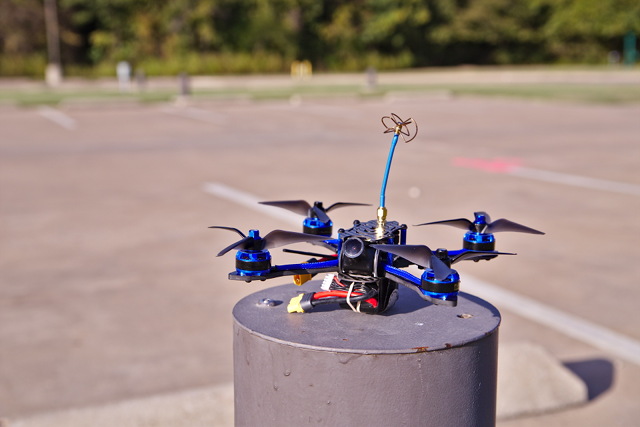
If you’re not on a limited budget, my first instinct would be to recommend the Holybro Shuriken X1. Several of us have been flying them for more than six months, and we all love the X1. The electronics are starting to become outdated, but it is still an amazing drone. It is extremely sturdy and ridiculously powerful—too powerful for a beginner!
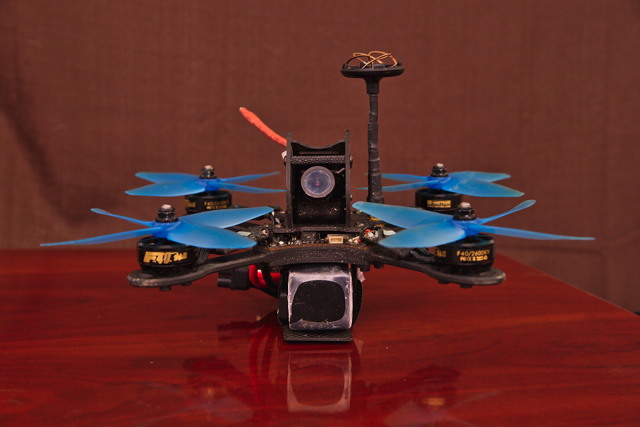
The Shuriken X1 is getting harder to find, because it has been replaced by a newer model—the Holybro Kopis 1. We’ve all been drooling over the Kopis 1, but none of us have bought it yet. It isn’t a straight upgrade over the Shuriken X1—it is more of a lateral move, but with cutting edge electronics. The Kopis 1 is less powerful than the X1, but it is a good deal lighter.
If my Shuriken X1 exploded today, I would immediately order a Kopis 1 to replace it. The Shuriken X1 and Kopis 1 both sell for around $250 to $300.
NOTE: I haven’t personally flown the Eachine Wizard X220 or the Holybro Kopis 1.
- Eachine Wizard X220 at Banggood
- Holybro Kopis 1 at Gearbest
- BFight 210 FPV Racing Quadcopter at patshead.com
- Three Months Flying The Shuriken X1 at patshead.com
Why isn’t everything included in TheLab.ms’s kit?
TheLab.ms’s quadcopter kit includes almost everything needed for the drone to fly. It includes a battery, but it doesn’t include a receiver. Why didn’t we include a receiver?
The receiver allows your transmitter to communicate with your quadcopter. The receiver has to be matched to speak the same protocol as your transmitter.
TheLab.ms’s kit also leaves out the transmitter, FPV goggles, and LiPo battery charger. These are all rather personal items, and their prices vary quite drastically.
If you want to go the inexpensive route, you can get everything you need to fly FPV for a little over $100. You’ll do fine and be equipped to have a ton of fun with the cheap gear, but we’re recommending better hardware.
Transmitters, FPV goggles, and battery chargers recommendations definitely deserve their own blog posts. I’ll try to briefly summarize my favorite options.
Transmitter and receiver options
The FlySky i6 transmitter is a great value at around $50. You’ll get both a transmitter and receiver in the box. I’ve flown a quadcopter with this transmitter, and it works just fine. Your range will be more limited, and the sticks don’t feel as smooth as the more expensive options.
Our recommendation is the Taranis Q X7. It is an upgrade in almost every way over the FlySky i6. It can be found for a little over $100 if you shop around. You’ll have to supply your own receiver module. We’re recommending either the R-XSR or the XM-PLUS. b Unlike the Flysky i6, the Taranis Q X7 can be plugged into your computer’s USB port. It will act as a joystick, and it can be used with many different FPV drone simulators. You can do this with the FlySky i6, but you have to buy extra adapters and cables. By the time you buy those cables, you’ve closed a lot of the gap between the price of the QX7 and the i6. I’d rather pay the difference and upgrade to the better hardware!
Until recently, I was flying with a Spektrum DX6. I wouldn’t recommend going that route. I’ve since upgraded to a Taranis X9D Plus. If you’re willing to spend a few extra bucks, it is a nice upgrade over the Taranis Q X7. I find the X9D+ to be more comfortable in my hands. It has a better screen than the Q X7, and it comes with a battery pack and charger.
- FlySky FS-i6 transmitter and receiver at Amazon
- Taranis Q X7 transmitter at Amazon
- Taranis X9D Plus at Amazon
Choosing FPV goggles
I keep hearing the same advice everywhere, and I agree with it. Buy the cheapest goggles you can find. They’ll be more than enough to get you started, and they’ll last you quite a while. I used my cheap goggles for seven or eight months before I decided to upgrade to an expensive set of Fat Shark goggles.
My favorite set of cheap goggles are the FuriBee VR01 box goggles. This blog post is getting long, so I’ll just point you to my review of the FuriBee VR01 goggles.
If you’ve never flown a quadcopter, you shouldn’t be in a hurry to buy FPV goggles. Take your time and do some research. Try on other people’s goggles if you can. The people I fly with at TheLab.ms have an assortment of different goggles and headsets. Most of us are more than willing to let you try out our stuff!
- My Favorite Budget FPV Headset at patshead.com
- Fat Shark Dominator V3 FPV Goggles at patshead.com
Choosing your battery charger
Chargers range in price from $20 to $300 and beyond. I’m using one of the $20 chargers. It is an imitation B6 balance charger—often referred to as a “four button” charger. I didn’t know what I was looking for at the time. I was willing to buy a genuine IMAX B6 charger, but I didn’t know how to verify that they were genuine. I didn’t want to spend $45 on a fake, so I purposely ordered a knock off, and it works just fine.
LiPo batteries are dangerous. You might burn your house down.
- Imitation B6 Balance Charger at Amazon
- Genuine iMAX B6 Balance Charger at Amazon
Conclusion
I’m excited about the racing quadcopter we assembled at TheLab.ms. It is an awesome starter drone—reasonably priced and inexpensive to repair. It may not be as fast as my Holybro Shuriken X1, but if this is your first drone, I’m certain you’ll find our quad to be super fast!
If you’re near Plano, TX and want to get into FPV racing or freestyle, you should definitely come out to TheLab.ms! Our community will be happy to help you get going. You can come build our quadcopter, or we can help you choose a prebuilt drone. Either way, you’re definitely welcome to come fly with us!
- My First Drone Build! at brianbeverage.net