I don’t know if I am really properly beating on this thing as hard as I can, but I am doing my best with the hard drives I have available!
People in the homelab community tend to have an aversion to USB storage, and I definitely didn’t have a ton of confidence in it the past. I had my own issues with RAID arrays built from USB hard disks ten to twenty years ago, but I have had great success with external USB hard disks on both my off-site Raspberry Pi and my NAS virtual machine over the last four years, so I thought it was time to try out a beefier piece of external USB storage.

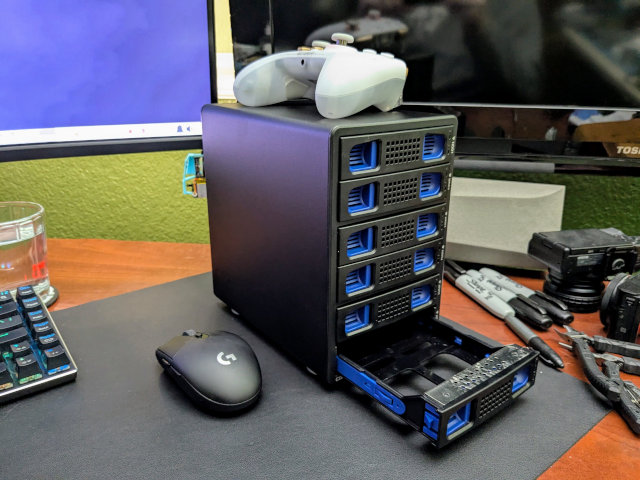
I imagine that everyone’s distaste for USB storage is based on outdated information and old experiences. I wound up ordering a Cenmate 6-bay USB enclosure for $182. The tl;dr is that it is doing a fantastic job. It can manage over 940 megabytes per second on sequential reads or writes. It is well built. It is extremely compact and dense. The fans aren’t super loud. The price is fantastic. It handles most drive failure situations gracefully, and when things are less graceful, it doesn’t leave you in a position where you’re likely to lose any data.
I would most definitely trust my own bulk storage to this Cenmate enclosure.
More importantly, I haven’t had the USB device misbehave in any disastrous way. I started writing this blog post after six simultaneous bonnie++ benchmarks had been running for thirty hours on six old 7200-RPM hard disks without a single hiccup.
At this point, I have a few days of continuous successful bonnie++ benchmarks of the mechanical disks, three days of bonnie++ benchmarks against aging SATA SSDs, and seven full days of continuous fio randread benchmarks at an average of 60,000 IOPS.
I did have some trouble with my mechanical disk testing, but every hiccup that I have had is because my collection of aging test hard drives have aged worse than I thought!. At least half of them are dying!
- Did I Accidentally Build The World’s Most Power Efficient NAS and Homelab Combo Server?
- Is A 6-Bay USB SATA Disk Enclosure A Good Option For Your NAS Storage?
- Self-Hosted Cloud Storage with Seafile, Tailscale, and a Raspberry Pi
- Eliminating My NAS and RAID For 2023!
- Cenmate 6-bay USB SATA Hard Disk Enclosure at Amazon
Why use a USB enclosure instead of building or buying a NAS?
This post is about what I have learned about this specific USB SATA enclosure, so I don’t want to go too deep into why I think you should consider using one or more USB enclosures in your homelab. I will endeavor to keep this part short!
Price is a good reason. The cost of my $140 Trigkey N100 mini PC and my $182 6-bay Cenmate enclosure maths out to $54 per 3.5” hard drive bay. That is less than half the cost per drive bay of a NAS from UGREEN or AOOSTAR, and both companies are selling their NAS offerings at extremely competitive prices.
You can assemble a 6-bay NAS for yourself using a Trigkey mini PC with an N150 CPU, 16 GB of RAM, a 512 GB NVMe for less than $350. The whole setup takes up just over six liters of space. How much you want to spend on the six mechanical hard disks to fill that up is your choice.

We pushed around 10 TB of reads and writes to the six SSDs with 3 days of continuous bonnie++ tests, then around 16 TB of random reads over 7 days at an average of over 60,000 read operations per second
Another good reason to use USB enclosures is flexibility. You can buy 2-, 4-, 6-, and 8-bay enclosures all at reasonable prices. You can plug multiple enclosures into a single computer, and if you run out of fast USB ports, you can plug one enclosure into the next. You can connect all your external enclosures to a single server, or you can split them up between mini PCs.
There isn’t even a rule that says you can only use a USB hard drive enclosure with a mini PC! Maybe you’ve already have a purpose-built NAS, but you are running out of space. You can always plug in an external USB enclosure to add more disks, but you should make sure your operating system will allow it. You could make sure your most important data is on the internal storage, while relegating the new USB enclosure to backups and scratch data.
- Is A 6-Bay USB SATA Disk Enclosure A Good Option For Your NAS Storage?
- Trigkey N100 Mini PC at Amazon
- Cenmate 6-bay USB SATA Hard Disk Enclosure at Amazon
The density of a mini PC with a Cenmate enclosure is hard to beat
I knew from the dimensions that there wasn’t a ton of empty space inside a Cenmate enclosure, but I didn’t understand just how dense it would be until I loaded it up with 3.5” drives and picked it up. That was the moment that I understood in my gut that my setup packed a lot of storage into a small volume.
A few days ago, we were talking about a ridiculous build where someone crammed ten 3.5” hard disks and an N150 mini PC into a mini-ITX gaming case. The Reddit post seems to be gone, so I can’t look up the exact specs, but it sure looked like it was packed to the gills!
A Jonsbo N4 case is 19.6 liters and holds six 3.5” disks.
If you measure the length, width, and height of the space my Trigkey N100 mini PC stacked on top of my 6-bay Cenmate enclosure, you will find that it takes up just 6.3 liters. That is counting the void left behind that mini PC as occupied space.
My setup is 1/3 the size of a Jonsbo N4 case with the same number of 3.5” drives.
I’m not saying that your NAS build needs to be this compact. I just think it is neat that I may have accidentally built the most compact 6-drive NAS in our Discord community!
My little trick for installing 2.5” SATA SSDs in the Cenmate trays!
Cenmate’s trays are awesome for 3.5” hard drives. The little plastic clips hold the drive in place, and you don’t need any tools to install the drives. Not only that, but a Cenmate enclosure with a few drives installed is heavy enough that you can just push the trays in with one finger, and they solidly clunk into place.

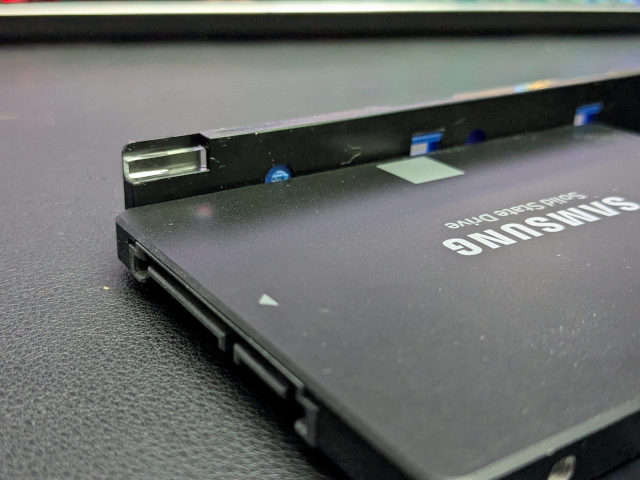
You need to screw 2.5” drives in from the bottom of the tray, but the real bummer is that one of these plastic nubbins interferes with these smaller drives. Cenmate wants you to remove the blue retention bracket when installing 2.5” SSDs. I didn’t want to do that. I would be very likely to lose the brackets!
I took a set of my flush cutters to the one nubbin that bumps into the SATA SSD. I checked. Only having three out of four nubbins does a fine job holding a heavy 3.5” hard disk in place, and once you snip it off there’s no problem installing your SATA SSD.
They should ship like this from the factory.
I am using the word nubbin a lot.
Nubbin.
- Is A 6-Bay USB SATA Disk Enclosure A Good Option For Your NAS Storage?
- Cenmate 6-bay USB SATA Hard Disk Enclosure at Amazon
How mean can I be to the SATA-over-USB connection?
I wrote most of the rest of this blog post almost two months ago. Last week, my friend Brian McMoses stopped by with a stack of seven old SATA SSDs. They range in size from 120 GB to 256 GB. I started out running bonnie++ which winds up being a workload that is roughly half reads and half writes.
I ran those continuous read/write benchmarks for 72 hours. That ate up around 2% of the write lifetime of the oldest drive in my 6-disk RAID 0 array. I hope you will agree with me that destroying SSDs for the sake of enclosure reliability testing is a bummer, and that three days of writes was enough.
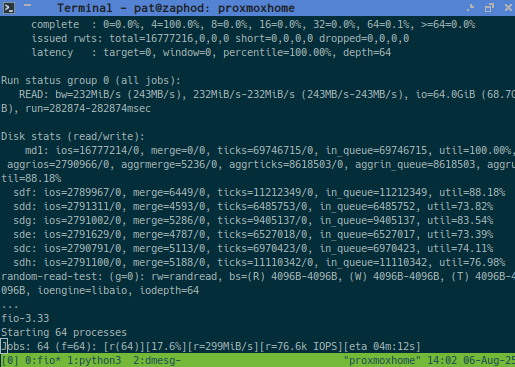
I switched to a read-only randread benchmark using fio. When you start the first test, fio creates a bunch of files and fills them up. Every subsequent run of fio reuses those same files, so I have been doing an average of around 60,000 random IOPS spread across 6 drives on a single USB port for seven full days so far.

I took this screenshot at some point during the sixth day of continuous random read testing
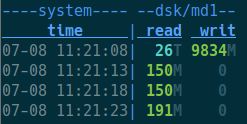
The Cenmate enclosure survived several days at 940 megabytes per second of sequential reads while I was collecting data for the previous blog post. That is one kind of stress for the chips inside the Cenmate enclosure. Now the enclosure is surviving weeks of hammering the USB controllers with 50 times more IOPS than six mechanical hard disks could ever sustain.
I have an extreme level of confidence now that my Cenmate enclosure can handle intense workloads for prolonged periods of time as long as the disks or SSDs are in good working order.
What happens when you have failing disks? I found that out pretty quickly, and we’re going to talk about that soon!
If you trust my judgment, you can stop reading here or skip to the conclusion. I am about to go into great detail about the things that happened while hammering on the Cenmate enclosure with several failing 3.5” hard disks installed. I think the two important observations are that the enclosure’s electronics have been rock solid, and the data on my drives would be safe even when encountering the worst failure mode that I could produce.
- Is A 6-Bay USB SATA Disk Enclosure A Good Option For Your NAS Storage?
- Cenmate 6-bay USB SATA Hard Disk Enclosure at Amazon
What kind of problems am I running into?!
I had a good list of reasons for choosing a 6-bay enclosure. Six disks is a good count for a RAID 5 array that doesn’t dedicate too large a percentage of your storage to parity data. Six big disks in a RAID CAN exceed speed of the Cenmate’s 10-gigabit USB connection, but they can only do that on towards the first third or half of the disk. That felt like a reasonable balance between value and a small bottleneck.
There was an even more important reason for my decision. I was pretty sure I had six old but usable 4-terabyte hard disks in my closet.
I was wrong. One of my old disks was completely dead. Two were making clunking sounds while generating lots of read errors. Others were quietly but very regularly encountering errors. The biggest bummer is that the 12-terabyte disk that I expected to be problem free is now the only disk left in my test that is encountering read errors.
THESE ARE HARD DISKS WITH PROBLEMS. This is not a problem with the enclosure, the SATA chipset in the enclosure, or the USB connection. I just didn’t have six good disks on hand.
My batch of test hardware is now was down to 4-terabyte drives, one flaky 12-terabyte drive, one 500-gigabyte drive, and one 400-gigabyte drive. These are the drives I had when I managed to make my mdadm RAID array kick drives out of the array.
My plan was to do all the angry benchmarking against a RAID 5 array, but that would be limited to the performance of the slowest drive. The 12-terabyte drive can manage 250 megabytes per second while the 400-gigabyte drive is limited to around 80 megabytes per second.
It is a good thing Brian brought over some SATA SSDs for me to use for further testing!
I am glad that my drives aren’t perfect, because it let me test interesting failure modes!
I didn’t even consider that these failure modes would be interesting. I have three unique things happening with at least three different drives. I won’t post every line from dmesg, because sometimes they are numerous.
My 12-terabyte drive is reporting read errors, but bonnie++ is able to power through them, because they wind up being correctable.
1 2 3 4 5 | |
Sometimes when there is a recoverable read error, that individual USB SATA controller is reset. The matching /dev/sdf device doesn’t go away. Nothing bad happens. There is just a little blip in the connection. I assume this reset happens due to the drive being unreponsive while attempting to repeatedly read the bad sector. The filesystem stays mounted, and the benchmark keeps chuggin’ away.
One of my 4-terabyte disks had an unrecoverable read error. The bonnie++ process acknowledged the I/O error.
1 2 3 4 5 6 7 8 9 10 11 12 13 14 15 16 17 | |
This is a little different than the recoverable read error, but doesn’t change much in practice. Had these drives still be in an mdadm RAID array, the drive experiencing this error would almost definitely be kicked out of the RAID.
The first bad drive that I pulled was the problematic one. It somehow manages to make all six drives disconnect from the mini PC’s USB controller. I started that day with sdc through sdf, but after the reset I had sdg through sdj. The connection didn’t just get reset. The USB enclosure was detected as a brand new device.
1 2 3 4 5 6 7 8 9 10 11 12 13 14 15 16 17 18 19 20 21 22 23 24 25 26 27 28 29 | |
I pulled that drive and drew a big, fat question mark on its label. This is the worst problem I was able to coax out of the Cenmate enclosure, and I am hoping that the question-mark drive will let me recreate this problem again in the future.
NOTE: As I am writing this, I am wondering what would have happened if I were using disk ID labels instead of lazily building my temporary mdadm devices using /dev/sdc through /dev/sdg. Would mdadm realize that the new devices match the old devices? I will have to try that next month after the randread testing is completed!
The worst failure mode isn’t that bad
The group of people today who need five nines of uptime and the group of people who can even make use of slow, mechanical disks don’t have a much overlap.
I don’t know about you, but my RAID of slow, mechanical disks it there to keep me from having to waste time restoring dozens of terabytes of data when I have a hardware failure. It isn’t a big deal if my backup target isn’t available over the weekend. Losing access to my Jellyfin library for an evening isn’t a huge problem.
Sitting down to spend a few hours of my time performing a restore and making sure I actually restored everything that was necessary is a bummer. Wondering whether or not I ACTUALLY did a good job restoring everything over the next three weeks is even worse.
Restoring from backup and getting a machine back into production at work can be a stressful task, and the job isn’t always complete when you think it is.
I will only lose a few minutes of my own time if my hypothetical stack of six 20-terabyte SATA drives in my Cenmate enclosure go offline due to a weird USB reset and drive redetection cycle. I had everything back in five minutes when I encountered the problem. I powered off the enclosure, used mdadm to stop the RAID 5, powered the enclosure back up, and my RAID 5 was detected again a few seconds later. A lazier fix would have been to just reboot the server.
This could be a serious problem if I was serving customers and this was the only copy of their data. I can’t imagine a scenario where I would be serving information to the world from mechanical hard disks in 2025.
As far as I can tell, this type of failure is difficult to trigger. I have at least four failing hard disks here, and only one of them has managed to make this happen, and it only happens after it has been throwing read errors for several minutes. It is a rare problem, you can probably see it coming, you can easily prevent it from happening again, and it is easy to recover from.
I feel that this is acceptable, especially if you are aware that it can happen.
How does this thing actually work?!
The layout of the USB devices that show up when you plug the Cenmate 6-bay enclosure in is interesting!
1 2 3 4 5 6 7 8 9 10 | |
The device at the top of the tree is a 10-gigabit USB hub. The usb-storage device you see is a USB SSD that I plugged into the Cenmate enclosure’s daisy-chain port. Then there are two USB attached SATA (uas) devices that correspond to two of my 3.5” SATA hard disks.
The next branch in the tree is another 10-gigabit USB hub that has the other four hard drives attached.
I didn’t even notice that the Cenmate enclosure wasn’t using the usb-storage driver until after plugging in that additional USB SSD!
How is the power consumption?
I have the Cenmate enclosure plugged into a metering smart outlet that is connected to Home Assistant.
It sits at an extremely frugal 0.2 watts when no drives are plugged in. During the 6-drive benchmarks, the enclosure eats up 1.33 kWh per day. That works out to an average of 55 watts, which is roughly 9 watts per drive.
I prefer to track power usage over an entire day to get a nice, clean average, but I don’t have that kind of data with fewer drives. The instantaneous readings do start at around 9 watts with one drive installed, and they go up by about 9 watts every time you click another drive into a bay.
This means you don’t have to be conservative and buy a smaller enclosure if you’re power conscious. You can buy an oversized enclosure and add drives as time goes by and your needs grow.
The fully-loaded enclosure does spike to nearly 120 watts when you flip the power switch and all six drives spin up. The included 12-volt power brick says it maxes out at 108 watts. I am not terribly concerned about this, because the spike past 108 watts ends so quickly that you’ll miss it if you blink.
Conclusion
I am more than pleased enough with the results so far, so I will be working on setting the Cenmate enclosure up for long-term use. I don’t need six disks’ worth of storage, but I am certain I can make good use of one or two bays in the immediate future, and it will be handy to have some spare bays around if I ever need to sneakernet some data around. This will have to wait a few weeks. I’d like to see at least a month of fio random IOPS testing go by without a hiccup.
I am extremely curious at this point about what you are thinking! Have you thought about using a USB SATA enclosure? Do you have fear, uncertainty, and doubt caused by the earlier days of USB storage like I did? Are you already using a USB enclosure? How has your experience been? Let us all know about it in the comments, or join the Butter, What?! Discord community and tell us chat with us about how things are going!
- Did I Accidentally Build The World’s Most Power Efficient NAS and Homelab Combo Server?
- Is A 6-Bay USB SATA Disk Enclosure A Good Option For Your NAS Storage?
- Self-Hosted Cloud Storage with Seafile, Tailscale, and a Raspberry Pi
- Eliminating My NAS and RAID For 2023!
- Cenmate 6-bay USB SATA Hard Disk Enclosure at Amazon