I was over at my friend Brian Moses’s house for pizza last night, and as soon as I walked in the door, he handed me one of the NanoKVM units that he bought during Sipeed’s crowd-funding campaign. I ate my delicious pizza, hurried home, and immediately dug out a microSD card to flash with Sipeed’s boot image.
I have been a huge fan of the Pi-KVM for years. Aside from the huge price difference between a NanoKVM and a Pi-KVM setup, I do have one big complaint about my Pi-KVM, but we will talk about that later.

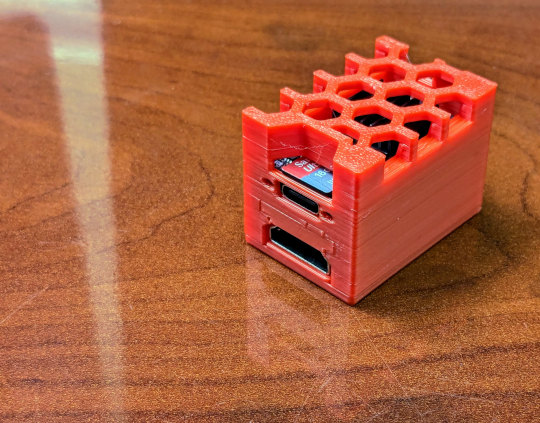
This case fits well but is a little tight. I would stretch it on the long axis by about 0.5 mm if I had to print it again. I assume there are slight differences between the earlier units and the production run.
I am most excited about the NanoKVM’s price. We were using USB HDMI capture cards to put together our early Pi-KVM kits. The entire NanoKVM Lite doesn’t cost all that much more than the cheapest HDMI capture cards, and you don’t have to buy an expensive Raspberry Pi to plug the capture card into.
You just spend around $30 on a NanoKVM Lite, and you have a zippy little IP KVM.
- Pi-KVM: an inexpensive KVM over IP at Brian’s Blog
- My Networking and NanoKVM Pouch For My Laptop Bag
- An Inexpensive HDMI-to-USB Capture Device That Works With Linux
- Sipeed NanoKVM at Aliexpress
- Sipeed NanoKVM at Amazon
What is an IP KVM?
KVM stands for keyboard, video, and mouse. An IP KVM gives you remote access to a computer as if you were sitting at a local USB keyboard. You can pick which kernel you want to boot from Grub. You can enter the BIOS and change settings. You can even connect a virtual USB disk image to load a fresh operating system.
Brian and I talked about the Pi-KVM and what an IP KVM is at length in this very old episode of “The Butter, What?! Show!” It is an older episode, so it isn’t as well polished!
The fancier devices, like the full-size $60 NanoKVM, can be connected to your server’s power and reset buttons.
The goal is often to never use your KVM. It is just there for when something goes wrong.
My initial experience with the NanoKVM
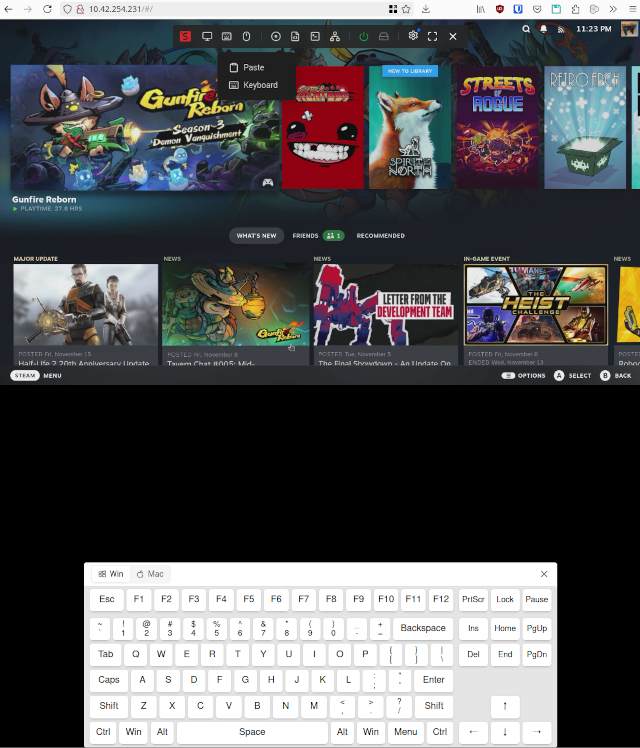
I plugged in my fresh microSD card, connected the NanoKVM’s HDMI and USB ports to one of my Intel N100 mini PCs, plugged the NanoKVM into my 2.5-gigabit switch, and I was ready to go. I was watching the DHCP server on my router for a new IP address to show up. I punched that into my browser, logged in with the default credentials, and the KVM interface was right there.
I did have to upgrade the software before the KVM parts actually started working. That seemed weird because I downloaded the latest disk image. The update only took a minute or two, and after that, I was clicking around on my Steam gaming mini PC via my network.
I don’t have a way to measure the latency accurately, but it feels more than acceptable.

My first successful connection to my Steam mini PC via the NanoKVM interface
I was excited to see that Tailscale is an option in the menu on the NanoKVM. I just had to click through a few messages before the interface gave me a Tailscale URL to authenticate my NanoKVM to my Tailnet. It probably took less than a minute to go from clicking that Tailscale button to connecting to my NanoKVM via Tailscale.
The hardware in the NanoKVM is quite underpowered. It does a good job doing its KVM duties, but the latency sure builds up when you add Tailscale’s encryption. I wouldn’t have any trouble using this IP KVM at a remote location via Tailscale in an emergency, but I would prefer to only use it just long enough to get proper network access back!
- It Was Cheaper To Buy A Second Homelab Server Mini PC Than To Upgrade My RAM!
- Upgrading My Home Network With MokerLink 2.5-Gigabit Switches
- Using an Intel N100 Mini PC as a Game Console
My problem with the Pi-KVM
This might be a problem unique to my own older Pi-KVM. I don’t have the $200 Pi-KVM hat. I have a $12 USB HDMI capture card that has to be plugged into the correct port, and I have a little USB-C power and data splitter board.
That means I need a power brick with a USB-C cable to connect to my splitter. I need a second USB-C cable to power the Raspberry Pi, then I need a third USB-C to USB-A cable to connect the splitter to the server.

Meme gif from yarn.co
This isn’t terrible, but the labels on the splitter board aren’t great. It is easy to use when you plug things in on a regular basis, but what about when Brian asks you to plug a Pi-KVM into his off-site NAS 18 months after the last time you used your Pi-KVM? You will have no idea what goes where, and you’ll be running back and forth between the server and your laptop, repeatedly checking whether you got things right or not.
The NanoKVM solves this problem so well. It gets power from the server’s USB port, so you don’t even need to carry a power supply, and it is ridiculously obvious where you need to connect the HDMI and Ethernet ports.
I didn’t have to reference any documentation to plug my NanoKVM in last night, and I won’t have to reference any documentation when someone has a problem in six months.
Why not just buy an enterprise server or motherboard with built-in IPMI?!
Brian and I talked about this a lot when the Pi-KVM was brand new, and we definitely discussed it on The Butter, What?! Show! on more than one occasion, but what is IPMI?
Among other neat features, modern IPMI implementations include IP KVM and remote power on and restart functionality. You can basically have what the NanoKVM provides built right into your motherboard.
The trouble is that motherboards with IPMI are expensive. We were excited about the Pi-KVM when it came out because you could buy a Pi-KVM and a consumer-grade motherboard for around the same price as the least costly motherboards with integrated IPMI. The exciting part about the Pi-KVM was that you don’t lose your remote access hardware when you buy your next server, so you don’t have to pay the IPMI tax again. You can just move your Pi-KVM to the next machine you buy.
The NanoKVM is an even better value. Instead of buying a $450 motherboard with integrated IPMI, you can buy a $100 or $200 motherboard and add your own remote KVM access for $30 to $60. Not only does that wind up saving you money, but you will get to use that NanoKVM on your next motherboard as well!
- Sipeed NanoKVM at Aliexpress
- Sipeed NanoKVM at Amazon
The NanoKVM is priced well for your Mini-PC homelab!
I have migrated from a single large homelab server to a short but growing stack of mini PCs. I currently have three mini PCs running at home, and any single one of those mini PCs is about as powerful as the aging server that they replaced, yet all those mini PCs combined use less than half the electricity of the old server. It is pretty awesome!
There was no way I would ever consider putting a Pi-KVM onto each of those mini PCs. A working Pi-KVM unit costs MORE than any one of those mini PCs. Even a single Pi-KVM with a 4-port KVM switch box attached would cost more than any single mini PC in my homelab.
The NanoKVM Lite is around $30. I wouldn’t be opposed to plugging one of these in to each of my three $150 mini PCs, though I am not excited about adding all those extra cables to my home setup. It would be way cleaner to just walk to the network cupboard with a NanoKVM when there is an emergency.
- My First Week With Proxmox on My Celeron N100 Homelab Server
- Can You Save Money By Changing the CPU Frequency Governor on Your Servers?
- Pi-KVM: Controlling a 4-port KVM and setting up Tailscale
I want more NanoKVMs!
I am not convinced that I want to add three thick cables to my homelab for every mini PC. That will add to the clutter so fast, but these are so inexpensive that I am considering other weird uses where I would never want to leave a dedicated $300 Pi-KVM.
When I was setting up the NanoKVM and messing around with my spare Trigkey mini PC, I immediately realized how handy it would be to have a permanent NanoKVM wired up in my office. I just want a dedicated space in the corner with power, Ethernet, and the NanoKVM where I can drop a new or problematic PC, server, or laptop so I can work on it from the comfort of my desk.

The physical device doesn’t even need to be at my desk. It can be sitting on the other side of the room. How cool would it be if I could install Proxmox on a new machine from the keyboard at my desk without having to finagle a Pi-KVM or run cables across the room?!
One for my office. One to leave partially wired in the network cupboard. One for my laptop bag. One for my emergency network pouch. There are all sorts of places where these would be handy, and they cost so little that I COULD put one in all of these places!
- Sipeed NanoKVM at Aliexpress
- Sipeed NanoKVM at Amazon
I have some concerns!
First of all, I have no idea which parts of the NanoKVM are open-source. It does seem as though much of the project is open now. The firmware image I downloaded came from a repository on Github that says it is licensed under the GPL version 3. I assume that is correct, but my NanoKVM wouldn’t display any video until I hit the button to download an update. Maybe that means some core part of the KVM stack is still closed-source? This isn’t a huge concern to me at this point, but I plan to keep a closer eye on this as I figure things out.
There are people losing their Tailscale connection when Tailscale gets updated, and there are other who are having their Tailscale client killed by the OOM killer. The NanoKVM only has 128 megabytes of RAM, so this isn’t surprising, but it is extremely concerning.

I thought it would be fun to have Omnigen put me in a datacenter with a NanoKVM. Look at the size of that thing!
I’d like to be able to deploy these NanoKVM devices remotely where they can only be accessed via Tailscale. I will be in big trouble if Tailscale decides to crash shortly before an emergency! You might want to leave a NanoKVM running in an accessible location for a few months before you commit to hosting one off-site.
I also noticed that the NanoKVM accepts root logins via SSH using a password on the Ethernet interface. The default password is root, and it isn’t tied in any way to the web interface’s admin password. The web interface and documentation doesn’t make it obvious that this password even exists. I disabled password logins via SSH, but that breaks the web interface’s terminal access.
This is an easily solvable problem, but it is also a huge gaping hole. How many NanoKVM devices are plugged in right now with an open SSH port and an obvious root password?
Conclusion
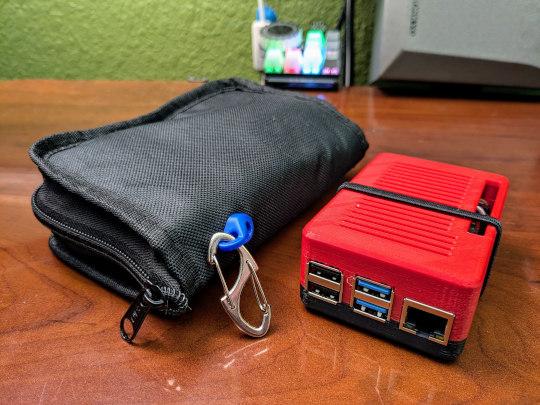
I am excited! My Pi-KVM kit, a.k.a. my portable crash cart, is now a fraction of the size. I was able to squeeze the NanoKVM Lite, an HDMI cable, a network cable, a USB cable, and a few odds and ends into a pouch that is only twice as big as a Raspberry Pi. I am probably down to one third of the size and weight of the old kit, and the whole thing is a about one tenth the price of either a TinyPilot or Pi-KVM build. How awesome is that?

My entire NanoKVM pouch with an HDMI cable, network cables, and all sorts of adapters vs. just a Raspberry Pi 5!
I think Sipeed has a little ways to go on their software with regards to both security and reliability. I can tighten up the security and the firewall, but I need a Tailscale client I can trust if I am going to rely on a NanoKVM at a remote location. I am confident they will get there.
I want to hear what you think! Are you as excited about a $30 IP KVM with a built-in Tailscale client as I am? Are you going to be ordering a few? How many do you think you will need, and what will you be using them for? Let me know in the comments, or join our Discord community to chat about it. We have a few NanoKVM users in there already, and several more waiting for orders to arrive!
- My Networking and NanoKVM Pouch For My Laptop Bag
- Sipeed NanoKVM at Aliexpress
- Sipeed NanoKVM at Amazon