In days that have long gone by, I used to carry all sorts of useful gear in my laptop bag. At the time, I was working a job where I would spend most of my time at my desk, some of my time in meetings, but also a not insignificant amount of time fiddling with things in our ice-cold datacenter. I would actually make use of the tools and gadgets fairly regularly.
Then 9/11 happened, the TSA sprung into existence, and I had to be careful to remove things like my Swiss Army CyberTool from my laptop bag before flying.
Side B of my network and NanoKVM pouch. This is the more interesting side!
Fast-forward twenty more years, and I don’t often need all the cool tools and gear that I used to carry, but I can’t stop myself from wanting to carry them. Not only do I want to tote around everything I might possibly need, but now I use two or three different laptop bags.
When I ride my wheel to the park, I might take my small shoulder bag that only has room for the essentials, and I don’t want extra gear weighing me down. When I take my laptop in the car, I am way more likely to take my bigger backpack that has room for everything I could possibly need, and the car doesn’t care if I pack an extra five pounds.
Should I buy two of everything and keep both bags well equipped? Should I weigh the giant bag down with every possible piece of gear? I’ve decided this is a bad idea. Some of the equipment that I carry isn’t exactly cheap, but I also don’t want to fill the bag any more than I have to, because I often grab my laptop bag when I want to also carry something that ISN’T my laptop. Having a big empty pocket in my bookbag to stick a PlayStation 4, a bag of CNC-cut parts, or a pair of pants is handy!
- The Sipeed NanoKVM Lite Is An Amazing Value
- My New Travel Router: The GL.iNet Mango N300
- I Bought The Cheapest 2.5-Gigabit USB Ethernet Adapters And They Are Awesome!
Pouches seem like the best option
You can use a 3D printer or a CNC router to make awesome hard cases with intricate slots that perfectly fit all your tools, toys, and connectors. The trouble is that when you make things exactly the right size, then they may only fit that one specific version of an item. If you lose your mini screwdriver, or you upgrade your gigabit Ethernet USB dongle to 2.5 gigabit Ethernet, your new device might not fit in your toolkit anymore.
You can squeeze just about anything you need into a pouch. I believe I chose a pouch that is a little too small for my extra networking gear. I probably should have bought the slightly bigger pouch.
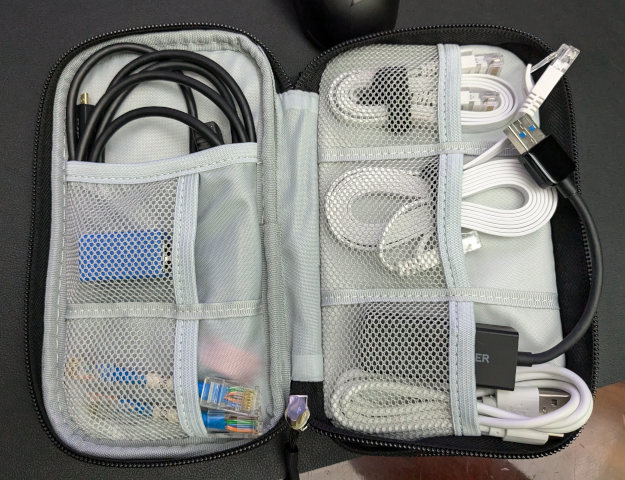
This is Side A. This is where the cables and couplers live.
If you underpack your pouch, the air doesn’t take up much space. That means you can probably squeeze it into a smaller space inside your backpack. A CNC-machined case made out of hardwood always takes up the same amount of space no matter how much stuff you put inside.
My pouch weighs in right around 18 ounces. That doesn’t seem like a ton of stuff, and it wouldn’t weigh down my small laptop bag all that much. This would have seemed like absolutely no weight at all a decade ago, but this pouch weighs half as much as my entire 14” 2-in-1 laptop. Why lug it around when I don’t need it?
My plan was to pack two separate pouches!
I planned to pack a NanoKVM pouch to replace my massive Pi-KVM kit, and I planned to pack something that I was calling my networking pouch.
If the latter pouch just had a long flat-pack Ethernet cable and a 2.5-gigabit Ethernet USB dongle, I would have just put one of each in both my laptop bags. I was also including a travel router, extra cables, power for the GL.iNet Mango router, and my smallest USB battery bank. That stuff alone grew into a bulky enough assortment that I didn’t want to duplicate it for both laptop bags.
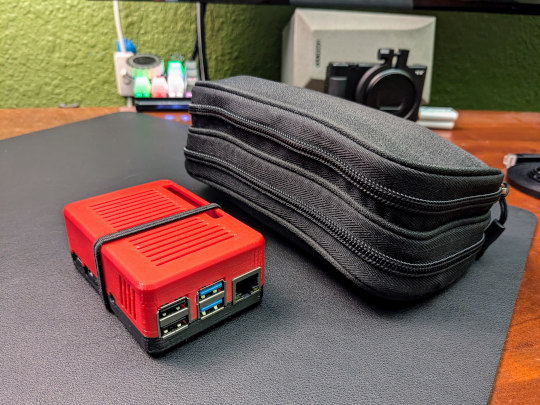
The new pouch is quite a bit bigger than the pouch from the NanoKVM blog, but it holds so much more gear now!
It made sense to me to separate out the NanoKVM, but then I realized that the NanoKVM is ridiculously tiny compared to what I needed to carry to use a Pi-KVM. I also recognized that there would be a lot of cable overlap between these two kits, and I was also excited about the idea of being able to add WiFi to the NanoKVM using the Mango router in a pinch.
One bigger pouch seemed smart, and this kit would be way more useful to anyone who needs to borrow it!
- The Sipeed NanoKVM Lite Is An Amazing Value
- My New Travel Router: The GL.iNet Mango N300
- Pi-KVM: an inexpensive KVM over IP at Brian’s Blog
Where do you get an organizer pouch?
I don’t know about you, but I have all sorts of zippered containers tucked away in my closet. So many toys, gadgets, and headphones come with nice storage and travel containers that I never use.
I was using the large zippered pouch that came with my awesome Amazon box teardown tool to hold my bulky Pi-KVM kit. Two decades ago, I started using the little pouch that came with a Norelco shaver to keep network converters, USB adapters, and other small things from spilling out into my laptop bag.
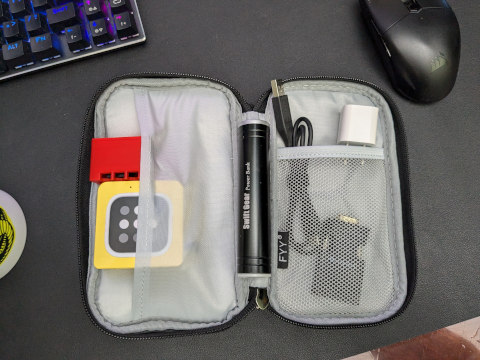
The Mango and NanoKVM sure didn’t want to stay put in that giant pocket! Yuck!
There are handy containers everywhere. When I started organizing my network-only toolkit, I was using a pouch that came with a diabetes blood sugar testing kit. It was actually a fantastic size! The trouble was that it didn’t have enough pockets or straps to hold all my stuff, so I was just kind of stuffing it all in there. When you just stuff things into the pouch, everything wants to fall out when you unzip it!
I wound up buying a $9 BAGSMART organizer from Amazon. I chose it because of the size of the pockets inside, and it was two inches taller but maybe an inch thinner than the pouch I was already using. This worked great as my network-only pouch, but there wasn’t nearly enough room to add a NanoKVM and a thick HDMI cable.
Then I found a pouch that was roughly double the size: same length, same width, but it has two zippers. I chose the “small” model, because the dimensions were almost identical to my BAGSMART pouch. That and the photos made me believe the pockets would be roughly the same size. They aren’t even close. While the BAGSMART pockets were big enough to fit the GL.iNet Mango, the new pouch’s pockets weren’t even close.
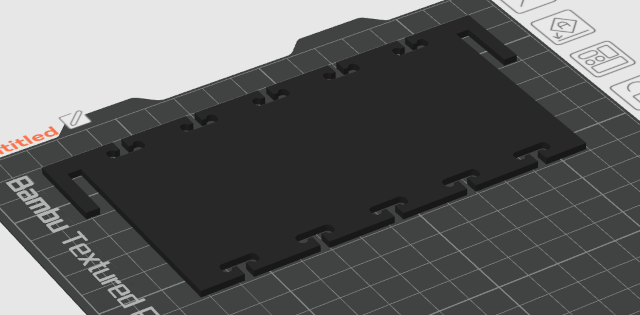
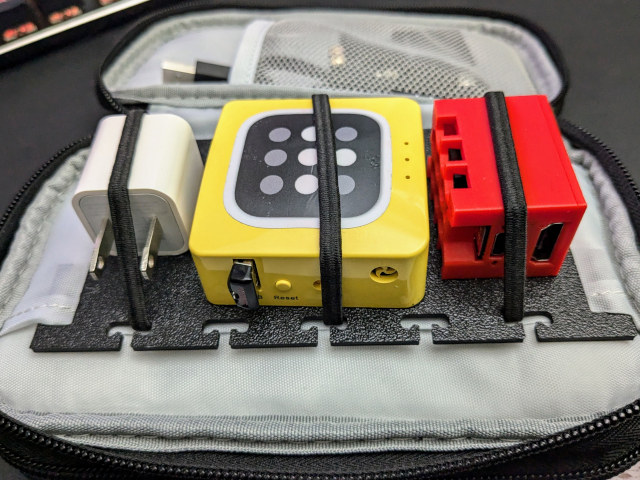
My 3D-printed gear rack. The little ears on the sides slide into the large pocket to keep the whole thing in place.
Maybe stepping up to the “medium” organizer pouch would solve this problem, but I was already committed. I borrowed a design idea from Earthling EDC, and I 3Diprinted a gear rack that I could strap the Mango, the NanoKVM, and my smallest USB power adapter to. This is great for me, but it might be better for you to just buy the bigger pouch!
What is in my pouch?
Should we just start with a bullet-point list?
- Sipeed NanoKVM Lite
- a GL.iNet Mango travel router
- a tiny 5-volt USB AC power adapter
- a small USB battery bank
- a USB-C 2.5-gigabit Ethernet adapter
- a USB-C to USB-A cable (for NanoKVM)
- a USB-A to Micro USB cable (for the Mango)
- my thinnest HDMI cable
- one HDMI coupler
- one 5’ flat-pack Ethernet cable
- one 10’ flat-pack Ethernet cable
- one RJ-45 coupler
- a 3” crossover cable
- a 3” rollover cable
I know I will never use the crossover or rollover cables again. I have had them in my laptop bag for nearly 20 years, and they used to come in handy all the time. I can just plug them into one of the RJ-45 couplers, and I can use any available network cable as a long crossover or rollover cable.
Just about every network device has supported automatic MDI-X for a long time, so I couldn’t even guess when I last needed to use a crossover cable. I don’t think I have seen a rollover serial port in just as long, and I may never see one again. Neither of these cables take up much space.
I imagine the use case for the pair of Ethernet cables would be obvious. Carrying two cables is handy. That way, I can plug my laptop into the router, and I can plug the router into the wall. I could also use one of the handy RJ-45 couplers if I need 15’ of reach.
Flat-pack network cables are awesome at home or on the road. They take up less space in your bag, but they’re also easier to tuck in along the edge of a room if you have to run a cable across your home office.
There are some extremely thin HDMI cables on Amazon, but I haven’t tried them. I believe the HDMI cable that I packed in my kit shipped with the Steam Link. It isn’t quite as thin as the newer cables on Amazon, and I have to admit that I am tempted to tidy up my bag a bit with a new cable, but Valve’s HDMI cable is thin enough that it isn’t taking up a ridiculous amount of space.
Why carry a travel router? And why the GL.iNet Mango?
This entire pouch would be so much smaller and simpler if I didn’t pack the travel router, but this little OpenWRT router is one of the coolest little network tools that I own!
The Mango is one of the cheapest and smallest OpenWRT routers out there. The diminutive size is awesome for this pouch, but sometimes cost is just as important. I used to wind up leaving a lot of things behind. You might replace somebody’s bad network cable with one you have in your bag. You may give away your USB flash drive full of operating system installers just so someone can sneakernet some data. There’s a good chance I will leave a cheap bit-driver set behind for someone who doesn’t have any tools.
I figure that there is a good chance I might leave my travel router behind. I might leave it for friends to use, or I may leave it behind for more nefarious purposes!
I bought my Mango on a whim for $20 a few years ago. It is pretty underpowered. It only has 2.4 GHz WiFi, the LAN and WAN Ethernet ports are only 100 megabit, and it only has enough horsepower to run Tailscale’s encryption at about 8 megabits per second.
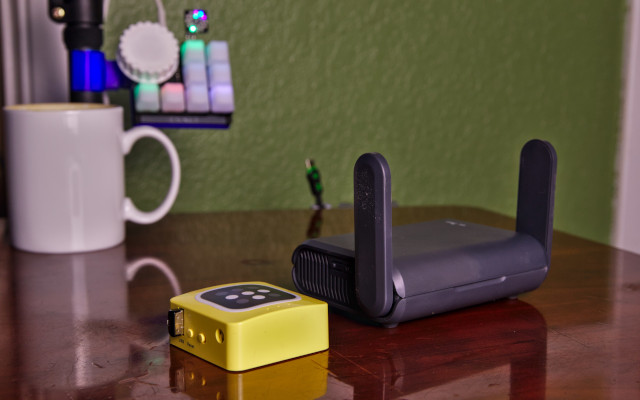
Just the gl.iNets Mango and Slate AX for size comparison
That last part is the exciting bit. I can plug this into a network jack at an undisclosed location. I could power the Mango with my USB power bank, connect it to the Starbuck’s WiFi, and connect to it remotely via Tailscale to use as a jump host or an exit node.
I can set up an impromptu WiFi network so I don’t have to stay close to the wall. I can loan it to a friend if they remote access to their own network. In fact, I have the admin credentials, WiFi password, and subnet information printed on the bottom of the router. That makes it easy to hand the Mango over to someone else who might need to use it.
The convenient interface that GL.iNet puts in front of OpenWRT is a delight. It takes one or two clicks to do things that would take dozens of clicks in OpenWRT’s LuCI GUI, but they still give you access to LuCI on the advanced tab.
Shoehorning Tailscale onto the Mango was a bit of a challenge. It just doesn’t have enough flash storage on board to even store the binaries! I wound up storing Tailscale on a petite USB flash drive. That wound up being handy. I can just pull the drive out if I don’t want the router to be able to connect to my Tailnet, and I used the remaining 15.8 gigabytes on the flash drive to store ISO images that are all bootable using Ventoy.
The NanoKVM does not have a WiFi chip. This is probably the best reason I had to combine the NanoKVM stuff into the same pouch as the GL.iNet Mango. I can always plug the NanoKVM into the Mango, then configure the Mango to bridge to either nearby WiFi or my phone. That would allow someone remote access to the KVM without needing to find an RJ-45 jack.
Should you buy a GL.iNet Mango?
Probably not, but maybe! You can often find the Mango on sale for $23, but you can usually find the much more modern SFT-1200 Opal router on sale for $31.
I like my Mango. The Mango is still cool, and it is still usually $10 cheaper than the Opal!
My Mango is less than a quarter the size and weight of the Opal, but it is old and slow. The Opal could easily handle router, firewall, and probably QoS duties for my home’s 1000/1000 fiber internet connection. I also bet that pair of external antennas attached to the Opal’s much more modern WiFi chipset offer better range.
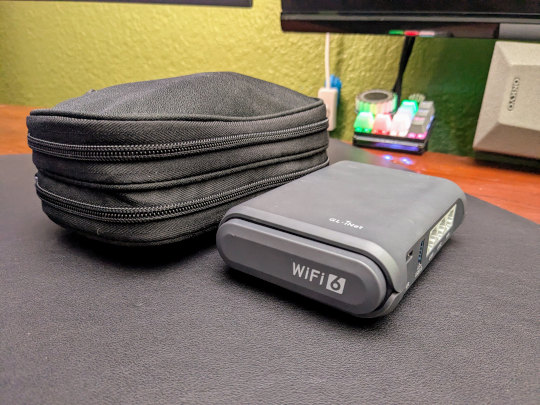
My Slate AX next to my network pouch as a stand-in for the Opal that I don’t own!
The Opal is an upgrade by every measure except size and weight, and those upgrades over the Mango are worth way more than the extra $10 you have to pay for one.
I don’t have an Opal SFT-1200 here, but I do have a similarly sized Slate AX GL-AXT1800. The Slate would take up an entire half of my pouch, and it wouldn’t even be able to close correctly. I feel like this would be a very different and much larger kit if I were to upgrade it to the Opal.
Do you even need a network kit like mine at all?!
Most people don’t. Almost everyone is always going to just connect to WiFi, and if they can’t connect to WiFi, then they are going to just give up. That describes me in 99% of situations.
You are here reading this blog post, and you are still reading. You might do the sort of work that requires you to crawl around under desks, hang out in wiring closets, or spend time in heavily air-conditioned server rooms. I suppose the last one doesn’t happen much anymore, and that makes me a little sad.
If you do this sort of stuff all the time, then your laptop bag is already packed with the tools you need. Maybe you are like me, and you used to need these sorts of items regularly, but now you only need them occasionally. Your pouch may not look exactly like mine, but I bet it is a good idea to separate things into their own container just so you don’t have to carry them around all the time.
Separating these things out into their own pouch is also handy because I can easily lend them to a friend or coworker.
Conclusion
Pouches are awesome. I think that’s the most important thing I have to say here. As long as the things inside aren’t delicate, they are a great way to stuff more stuff in your bookbag.
I am still tempted to create a custom hardwood tool case for my laptop bag with perfectly machined slots for all my important tools. It would be a delightful project for my CNC machine, and it would be so much fun to show something like that off, but it would only be able to hold a particular set of tools.
I think that you should build out your own networking toolkit pouch, but I don’t want you to copy mine! I would like to see you pick and choose the tools you will actually use, and I would love to hear what you equip your toolkit with!
Did I pick out a good set of tools for myself? Or did I miss something important? Is there an awesome device, cable, or tool that I should have included in my NanoKVM and networking pouch? Tell me about it in the comments, or join our Discord community and tell us about the tools we are missing out on!