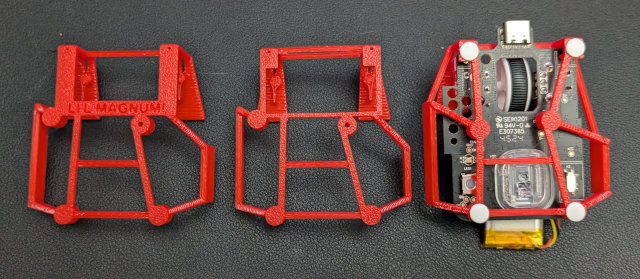
This won’t just be advice on how to successfully print a solid Li’l Magnum! mouse mod that feels right. I will also talk about things you will need to go along with your Li’l Magnum! like PTFE skates and grip tape.
There is a good chance that you can download one of my models, load up some filament, use the default settings, and have yourself a usable mouse. Your mouse will probably be two grams heavier than the one on my desk, and it might feel a little stiff.
- Li’l Magnum! Fingertip Mouse Mod in my Tindie store
- Li’l Magnum! Fingertip Frame for VXE Dragonfly R1 Pro at MakerWorld
- Li’l Magnum! Fingertip Frame for VXE Dragonfly R1 Pro at Printables
- Li’l Magnum! Fingertip Frame for VXE Dragonfly R1 / R1 SE at MakerWorld
- Li’l Magnum! Fingertip Frame for VXE Dragonfly R1 / R1 SE at Printables
The Li’l Magnum! is tuned for PLA filament
PLA isn’t optimal, and it wasn’t my first choice. It is what I started prototyping with, and I quickly learned that PLA is more than up to the task. I tested one of my Li’l Magnum! prints in PLA to over 1,000,000 clicks, and it felt brand new after testing.
I ran off a test print in ABS, and it came in at 2.6 grams. That is 0.6 grams lighter than my PLA mice! Unfortunately, the ABS mouse was fragile along the layer lines, and the side grips felt spongy. My PETG test mouse wasn’t quite as light, but it had similar rigidity problems.

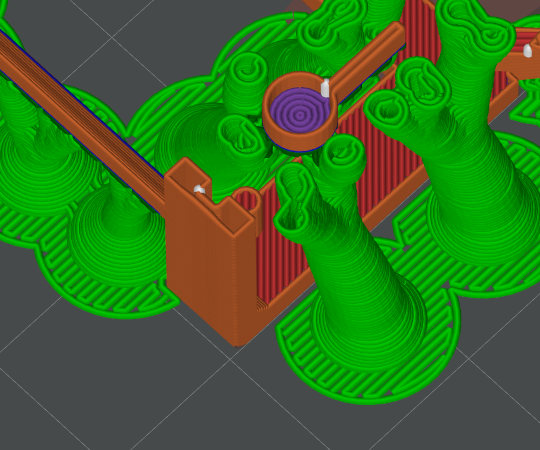
As you can see, the vertical arms of the paddles are printed completely hollow with a single wall, but there is a cutout in back to force the front and rear walls to touch and melt together.
These problems are fixable. We could dial the grips and button paddles up to two perimeters. We could make the front springs wider. The bummer is that these changes would chew up most of the 0.6 grams of weight savings.
Everyone who owns a 3D printer can print PLA, and they can probably even print PLA very well. Maybe we could save 0.3 grams by tweaking the design and switching to ASA, but then fewer people would be able to easily print their own Li’l Magnum!.
- VXE Dragonfly R1 Series mice at Aliexpress
- VXE Dragonfly R1 Series mice at ATK.store
Layer height matters!
All my test prints have been run using a modified copy of Bambu’s default 0.16-mm layer profile. That means the first layer is 0.2 mm, and every layer after that is 0.16 mm. Why is this important?
The tolerances that allow the clicks to feel good are pretty tight. One extra layer, and the buttons don’t like to release. One layer too few, and the clickers have a ton of pretravel.
I dialed everything in using the same print profile. If you use either a 0.1-mm or 0.2-mm profile, then some of your layers will be rounded differently than mine. That means your button engagement might be off by 0.06 mm. Maybe it doesn’t matter. Maybe it feels horrible.

Iterating on the front end of the Li’l Magnum! to reduce the weight by 0.25 grams without losing any rigidity in the button feel
This may be particularly important if you are printing a Li’l Magnum! for your VXE R1 SE. The lens holder has to be just right. One layer too high, and it is way too tight. One layer too low, and the lens flops around.
Getting other settings wrong will just give you a slightly heavier mouse. Getting the layer height wrong might result in a mouse that just doesn’t feel right.
I learned when I was trying to dial in the height of the lens for the VXE R1 SE that my math in OpenSCAD is susceptible to rounding problems. I want to correct that, but for now I am just excited that we have a working 21-gram fingertip mouse that people can use.
What print settings should I tweak for the best possible Li’l Magnum!?
Uploading a 3MF to MakerWorld is on my to-do list, but it isn’t at the top. I thought it was better to write these words first because there are a lot more details to talk about than the print settings. Even if people were relying on the print settings I upload to MakerWorld, that wouldn’t be much help to people who don’t own Bambu Lab printers, and this should be documented anyway.
First of all, the Li’L Magnum! is meant to be printed with a single perimeter using PLA. That is what I tested. The click feel relies on the springiness of those long arms running up the front of the mouse, and I dialed in the width, thickness, and shape of those arms to feel right with one perimeter and zero infill.

I have lowered both the top and bottom shell count in Orca Slicer to 3. I also set the top and bottom shell thickness to 0. Orca Slicer will use the larger of the two values, and we want the larger value to be 3.
I have been using lightning infill. The percentage doesn’t matter, but it is important to set your minimum sparse infill threshold to something very low. I have mine set to 1. If you don’t do this, the slicer will make the button arms solid. That is heavy, and they will be quite stiff!
NOTE: I am working on an update to the Li’l Magnum! that eliminates some of the chunkiest parts of the front end. Those are the parts that need the lightning infill. I have been printing those test parts successfully with zero infill.
You need to have tree supports enabled. I DO NOT disable supports for bridges. Most of the bridges print fine without supports, but I wind up with misshapen button plungers every time I disable supports on bridges. Orca Slicer winds up treating the button plungers as bridges, so they don’t come out flat enough on the bottom.
We could probably use a support enforcer to fix that, but I am sticking with the lazy fix for now. I don’t want to have to worry about adjusting the location of support enforcers every time I make tweaks to my OpenSCAD source code!
Smooth or textured PEI
I have been using Bambu Lab’s textured sheet on my Bambu A1 Mini. My brain says that a smooth finish would be better for the undercarriage of a mouse, and I have been tempted to use one of my prismatic rainbow build plates.
I don’t know how much it actually helps, but it has been really easy to remove the 6-mm PTFE skates from my textured mice. The skates are cheap, but I have printed and used more than 50 prototypes. I would have run out of skates quickly if I couldn’t move them from one mouse to the next.
If you plan on iterating the fit of your Li’l Magnum! using the customizer, then it might not be a bad idea to stick with a textured bottom surface like I have been using.
- Bambu A1 – Can Your 3D Printer Pay For Itself In 2024?
- The Bambu A1 – Do I Regret Buying an A1 Mini a Month Ago?
What should I check after a print?
First of all, be careful removing your supports. I have gotten the hang of it, and I can do it rather quickly without damaging anything now. Be especially careful because the trees supporting the front bracing bar will probably be connected to the trees holding up the buttons and the button plungers. Separating those from each other with cutters makes things go a lot easier.
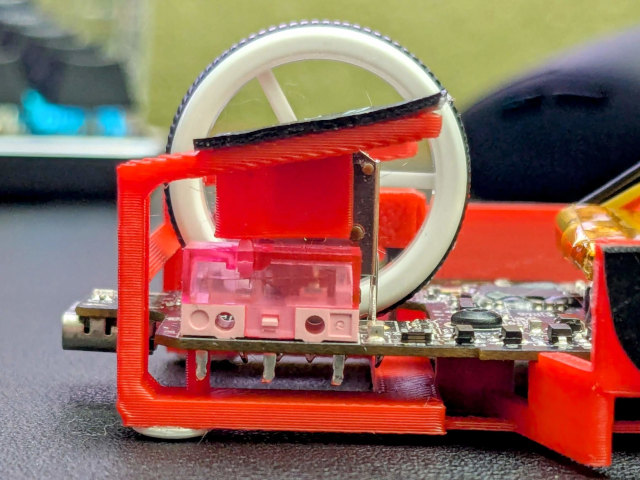
The only thing you have to watch out for is the bottom of the plungers. They need to be quite flat to engage smoothly with the buttons. Every now and then I have to trim a booger off the back of a plunger, and I have had to hit one with a file on two or three prototypes.

It doesn’t take much of a PLA booger on the plungers to mess up the engagement with the microswitch!
It is a good idea to do some test clicks to make sure everything feels right before you actually screw the PCB in place.
I haven’t had a loose button in a long time, but I only have one of each PCB to test here. Your PCB or microswitches could be slightly different than mine. The plungers should be touching the microswitches. You can use one or two layers of electrical tape as shims to bring the switch closer to the plunger.
There is a tiny support pillar under each switch. You should put a tiny square of tape on the PCB directly above that pillar. It doesn’t have to be electrical tape.
- Ultralight Fingertip Gaming Mice – Two Weeks With My 21-Gram L’il Magnum
- Can We Compete With The Zeromouse For Under $25?
- Li’l Magnum! 22-Gram 3D-Printed Fingertip Mouse Mod For The VXE Dragonfly R1 and R1 SE
The lens holder
The thin strips of plastic holding the lens up are thin for a reason. They are meant to put upward pressure on the lens, so they should flex slightly. That is why most of the lens holder starts a few layers higher than the build plate.
This was challenging to dial in well, and it is the reason my test print in purple silk PLA didn’t go well.
The lens holder will be slightly bowed out. Mine measure about 0.2 mm off from being flat. Your PTFE skates will have no trouble keeping that bowed section up off the mousepad.
You will need four 6-mm PTFE skates
I don’t think you need premium skates. The heavier your mouse, the bigger the difference your skates and mousepad will make. At 21 grams, I suspect that it would be difficult to tell the difference between cheap and premium skates.
I picked out a pack of 120 PTFE skates. I figured I would need plenty of extra skates, and they happened to be 30% off the day I was ordering. There are smaller packs of what look like identical skates on Amazon for around $5. There are also options that look a little more premium for a few bucks more.
I really don’t think it matters what you buy. A slipper skate on a 100-gram mouse makes a huge difference. A Li’l Magnum! doesn’t have much inertia to overcome.
I put one skate on each of the rear standoffs, and one skate under the front of each button.
- 120 Dot Ice Mouse Skates at Amazon
- 40 PWNAGE Mouse Skates at Amazon
- 40 Hystar Polished Mouse Skates at Amazon
Do you need grip tape?
I plan to expand this section in the future. I have ordered a couple of sheets of grip tape from Aliexpress. I am hoping to find something comparable to the VXE R1 Pro’s grip tape that I can cut with a laser cutter or the drag knife on the CNC machine. I think it would be neat if I can precut tape to exactly the right size and shape!
The grip tape that ships with the VXE R1 Pro is fantastic. It is slightly puffy and soft, and it has a weird and tacky feel to it.
I have used my Li’l Magnum! without grip tape, and I have used it with grip tape everywhere my fingers touch. I like it either way, but I have gone back to running mine without any grip tape.
The only place where I appreciate grip tape at all is the thumb grip. It is nice to have a little padding there to keep the corner from digging into my thumb, but it hasn’t been digging into my thumb lately. I think my muscle memory has finally started to understand that I don’t have to hold on to the Li’l Magnum! very hard at all. At any rate, this problem could be solved with a slight tweak to the model!
The buttons get a bit of texture from the layer lines, so they don’t really need extra grip.
I don’t think you need grip tape at all, but it is definitely going to be up to your personal preference.
Conclusion
The Li’l Magnum! is a demonstration of balancing gaming performance with accessibility to the maker community. By tuning the design for PLA and customizing slicer profiles, we’ve created a durable, extremely lightweight mouse that anyone with a 3D printer can bring to life. From dialing in layer heights to optimizing perimeters and infill, every tweak serves a purpose: ensuring crisp clicks, minimizing weight, and preserving that necessary amount of springiness.
The Li’l Magnum! project thrives on collaboration. Every test print, adjustment, and shared tip brings us closer to refining what’s possible with desktop manufacturing.
Ready to dive deeper? Whether you’re troubleshooting a print, sharing your mods, or geeking out over filament choices, our Discord community is the place to be. Swap stories, get real-time advice, and help shape the future of the Li’l Magnum!. Together, we’re building more than a mouse—we’re crafting a toolkit of knowledge for lightweight, open-source mouse hardware.
Let’s keep iterating, sharing, and clicking—one lightweight masterpiece at a time.
- Li’l Magnum! Fingertip Mouse Mod in my Tindie store
- The L’iL Magnum! Fingertip Mouse Is Now Customizable on MakerWorld!
- Ultralight Fingertip Gaming Mice – Two Weeks With My 21-Gram L’il Magnum
- Can We Compete With The Zeromouse For Under $25?
- Li’l Magnum! 22-Gram 3D-Printed Fingertip Mouse Mod For The VXE Dragonfly R1 and R1 SE
- Li’l Magnum! Fingertip Frame for VXE Dragonfly R1 Pro at MakerWorld
- Li’l Magnum! Fingertip Frame for VXE Dragonfly R1 Pro at Printables
- Li’l Magnum! Fingertip Frame for VXE Dragonfly R1 / R1 SE at MakerWorld
- Li’l Magnum! Fingertip Frame for VXE Dragonfly R1 / R1 SE at Printables
- VXE Dragonfly R1 Series mice at Aliexpress
- VXE Dragonfly R1 Series mice at ATK.store