I’m very happy with the cocktail cabinet that we built. It was a lot of fun to build and it is even more fun to play!
I made a few less-than-optimal choices in the design of this cabinet. I’m not going to call them mistakes (except maybe the choice of monitor). I’ve had a chance to visit an arcade or two since the cabinet was finished. I was worried that seeing a bunch of real arcade machines would make me disappointed in our work.
My feelings while visiting those arcades were actually quite the opposite! In most ways, our cabinet looks much, much better than the majority of real, old-school arcade machines. The most noticeable difference is the lack of artwork on our cabinet. This was our choice and it fits in with everything else in my office much better this way.
Here’s a list of some of the things I might have liked to do differently.

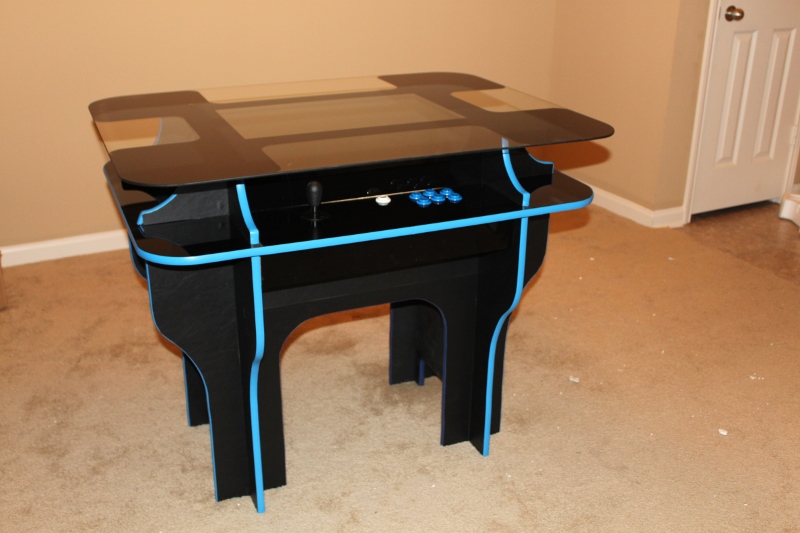
The buttons are fine, but the joysticks…
When I was shopping for parts, I primarily had the Mortal Kombat series of games in mind. The HAPP joysticks I chose seem very much like what I remember from my days of playing Mortal Kombat II back in high school. They have the right shape and feel. You can even get Raiden to teleport by pulling the stick towards you and letting it fly out of your hand, just like on the real cabinet.
The HAPP joysticks aren’t terribly precise, and the quality of each of the four joysticks I bought varies quite a bit. My player-one controller likes to make an odd clunk when you push it to the left… It will engage the switch, feel like it is at the end of its throw distance, then it will clunk and move a tiny bit more. All of them do this sort of thing some of the time, but not nearly as often as player one.
I haven’t actually played much Mortal Kombat. I’ve spent more time playing modern indie games than I have spent playing actual old-school arcade games. These big, imprecise joysticks with their longer throw aren’t very well suited to anything besides Mortal Kombat and other similar games.
I would definitely choose a different joystick.

The table is too tall
I wanted an adult-size cocktail table with a bit of leg room. We got the controller height right—there’s about an inch of knee clearance under the control box when you sit down at the table. I miscalculated on the amount of vertical clearance we needed between the control panels and the glass tabletop.
I was aiming for 5 ½” of clearance. We ended up with 5 5/8” of clearance. That’s 1/8” more than we were hoping for, and that ended up being almost 2” more than is really necessary. That would put the cabinet at a more usable height of 32 inches instead of the 34 inches we ended up with. Most tables and desks are 29 to 30 inches. Our cocktail cabinet is approaching counter top height, which is usually about 36 inches.
If we had to, we could probably squeeze a half-inch or more out of the depth of the control panel boxes, too.

Quarter inch glass is a bit thin but it works
I’m very glad that we went with glass. If we went with plastic it would have had to be very thick to be rigid enough to work with our design. To use acrylic we would have had to support it from underneath with wood or particleboard, and that would have made the table even taller.
The quarter inch piece of glass we used was surprisingly inexpensive. Our 32” by 42” piece of glass with rounded corners cost less than $60 from a local shop. A thick enough piece of plastic would have been way more expensive and we would have had to radius the corners ourselves. Definitely check your local glass retailers because this was way less expensive than the glass we were finding on the Internet. All the good Internet prices were on certain pre-cut sizes. We had ours cut to exactly the dimensions we wanted.
The thin glass has made me nervous on more than one occasion. When I saw someone sitting at the end with their elbows on the table and putting a bit of weight on it, I couldn’t believe how much the glass was flexing. With our large surface we probably should have gone with 3/8” glass.

Some molding problems
We have a pair of ninety-degree bends in the t-molding at each control panel. The problem is that there is only about an inch of molding after the bend. You can see it popping out a bit in the above picture. We ended up having to glue some of these small sections in. If I had anticipated this problem I would have eliminated it from the design.
I’m also unhappy that I have one seam where I have a single piece of molding circling the entire cabinet at the control panels. The seam is in the center of the player-four seat, and I currently have that side up against the wall. I don’t like knowing that it is hiding back there, though. Unfortunately, I don’t think I could have designed this one away. That single ring of light blue molding is one of my favorite features of the cabinet.

Stick on vinyl…
The sticky-back vinyl looks and feels great. In my opinion, it is too expensive and it is much too time consuming to apply it. Due to the high shipping costs, the vinyl was over 20% of the total cost of the cabinet (and I almost goofed up; we barely had enough to cover the cabinet).
It also took a very long time to cover the cabinet. The cabinet build took us a very large number of hours. I think if we did it again, most of the steps would take half the time, but not on the vinyl. You have to be very meticulous when you put it on, and trimming all the edges perfectly takes a lot of time.
I would like to try using melamine board on the next cabinet. It is only a bit more expensive than particleboard, but even if we had to paint it we’d save a ton of time compared to using vinyl.

Choose the right display
I already wrote about the problems with my choice of monitor, it only has a good viewing angle from three sides. If I build another four-player cocktail cabinet I will probably use a 26” or 32” LCD television. However, because of the asymmetric vertical viewing angle of an LCD monitor we are probably getting a better view right now at the player-three seat than we would with even an IPS display.
I’m not sure if I would build another four-player cabinet. Most of the time we play one or two-player games. With the size of our table it is more convenient to play single player games from the player one seat with the screen split with MAME’s cocktail mode.
Outside of MAME and MESS, this isn’t an option. All the other games have to face the player three seat. This means that all native games are effectively limited to one player.
A trackball would have been useful…
I really should have included a trackball. I thought it would be a bad idea to put one underneath a sheet of glass and in such a small, enclosed space.
I’ve been playing more native games on the cabinet than emulated games. Most native games require a mouse for something, even if it is only to start a new game. I’ve been doing a reasonable job cheating at this, but it is a pain in the neck.


