Cocktail Arcade Cabinet Build: Postmortem - The Things We Got Right

I think I’ve had the arcade cabinet up and running for a couple of years now, and that has given me plenty of time to kick the tires. I’m very, very happy with how the project turned out. Everyone who sees it seems to be genuinely impressed with it, and I most definitely agree with them. We did a lot of things right, we did a lot of things wrong, and we made a lot of things harder than they needed to be.

Arcade cabinet joystick close up

The blackened plexiglas and glass

This is easily one of my favorite things about the cabinet. It looks great. You can paint the underside of acrylic or glass any color and it will look awesome—smooth and shiny.

We planned on blackening the surface glass and the acrylic control panel covers. We liked the way it looked so much that we also used it in two more places. We used it to cover the rear “wall” of each control panel and we also used it to put a shiny face underneath the control panels to hide the wiring.

Dry fitting cocktail arcade cabinet panels

Giving the cabinet legs

Most cocktail cabinets are boxes with a screen on top. They don’t allow much room for your feet. This wasn’t a problem at the Pac-Man table when I was seven years old. These days I’m around six feet tall, and standard cocktail cabinets don’t leave me much room for my size twelve Rockports

The small cut-outs on the player-one and player-two sides are just high enough to fit your foot under. It probably would have worked out just fine if we made shorter cut outs like that on all four sides.

I’m also very happy that we planned correctly and had just enough legroom under the control panel wiring. Twenty-four inches is just enough clearance to fit my knees under there while sitting in a standard-size dining room chair; we haul those chairs in here pretty frequently.

Completed cocktail arcade cabinet with the lid off

Over sized control panels

We made sure to leave plenty of room in front of the buttons to rest your palms. We’re not kids anymore, and we have adult-sized hands. I didn’t want to end up having to rest my hands on the edge where the panel meets the t-molding!

The button layout

I’m pretty happy with the compromise we came up with for our button layout. We have two rows of three buttons. The center column of buttons is set about a half-button width higher than its neighbors.

They’re about straight enough to comfortably play Street Fighter-style games while putting the bottom-center button in an almost natural position for blocking in Mortal Kombat games.

We also tried to get the buttons about as close together as we could. That makes them a little more comfortable than most real arcade layouts.

The color scheme and the shape

I am really happy with the light blue molding on a black cabinet. I felt that the table would look out of place in my office if we added a bunch of arcade-style artwork to it, but I still think it would look right at home in an eighties arcade.

The LCD panel

I’ve already talked about the problems we had with our choice of LCD panel, which make the player-three seat basically unusable. That is a problem that wouldn’t affect every cabinet, and even in a cocktail cabinet it can be fixed by using an LCD television instead of an LCD computer monitor.

The LCD is lightweight, and it left us with a ton of room in the cabinet for computer hardware. Having a 1080p display is great for playing more modern games, and a widescreen display is perfect for split screen two-player console gaming.

Surprisingly, the speakers in the monitor are adequate. I doubt an audiophile would agree with that statement, but they are reasonably loud, and they definitely sound good enough for pre-1995 gaming.

Up close while applying the sticky-back vinyl

Sticky-back vinyl!

I also included sticky-back vinyl in my list of things we got wrong, but I’m still very impressed with how the vinyl turned out, even if it was a time and money sink. It is holding up pretty well, except that bumping the table around has caused the carpet to slowly peel the vinyl away from the bottom in some spots. I’m sure we can fix that with some adhesive, but you wouldn’t even know it was happening unless you were down there on the floor with it.

The vinyl looks very nice and it has a nice texture. It makes things feel a little more real.

A simple, slotted wooden cage for 7 hard drives

Home office upgrades

This table takes up 42” by 32” of floor space in my home office. If it only played arcade games I might find it a bit harder to justify its use of the space.

I ended up using all the guts from my old home file server to drive the cabinet. Along with those guts came a RAID 6 array made up of five 1 TB hard drives. That gives me about 3 TB of usable space. That isn’t a ton of space by today’s standards, but it was when I originally bought the drives. I have room in the drive cage that we built to hold one more drive.

Connecting a wall-mounted LCD TV to the arcade table has also greatly increased its usefulness.

Upgrading from Autojump to Fasd

I’ve had my eye on fasd for quite a while now. It does everything that autojump does and more. It didn’t look like it would be hard to use fasd in autojump’s place, but I am inherently lazy; I wouldn’t have been using Autojump if I weren’t, and I wasn’t in a hurry to switch, since Autojump had already bubbled all of my favorite directories to the top of its list

Shortly before I began my never-ending shell cleanup, I started having problems with autojump. It started showing me a Python stack trace every time I jumped. It was still mostly working, so I didn’t worry about it; I figured fixing it could wait until I started cleaning up my shell environment.

What do fasd and autojump do?

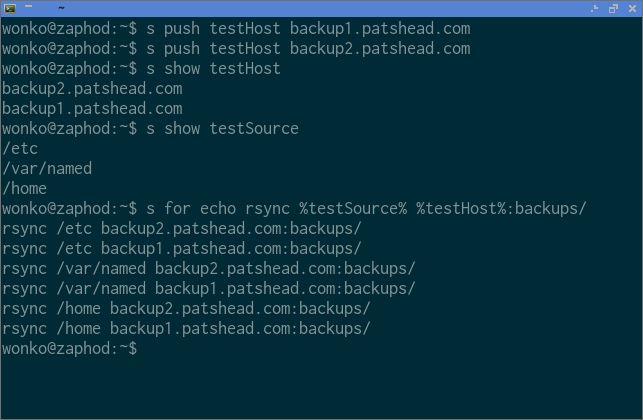
Autojump keeps track of the directories that you cd into, and how often you cd into them. Later, you only have to type a small part of those often-used directories to change into them:

1
2
wonko@zaphod:~$ g cfg
wonko@zaphod:~/Steam/SteamApps/oknowton/Team Fortress 2/tf/cfg$

Fasd keeps track of directories, just like autojump. In addition to that, it also keeps track of files, and it provides some interesting tab completion options for accessing those remembered files. For example, appending ,,f before hitting TAB will limit completion only to recent files:

1
2
wonko@zaphod:~$ emacs ,medic.cfg<TAB>
wonko@zaphod:~$ emacs /home/wonko/Steam/SteamApps/oknowton/Team\ Fortress\ 2/tf/cfg/medic.cfg

fasd and my go command

I’ve been using one of the ultimate tools for the lazy, a go command, for almost two years. A go command tries to infer your intent based on what it is given as an argument. If the argument matches a directory within the current directory, it will act just like the cd command. If the argument matches a file in the current directory, it may call xdg-open in order to open the file using the correct program; my particular implementation opens anything that might be a text file with a text editor. If all else fails, my go command hands things off to fasd.

My own go command very nearly worked without modification. My go command is fairly smart, and it won’t attempt to use features that aren’t available. Autojump sets up a function for the j command, while fasd sets up an alias. I was checking for the existence of the alias. Just to be on the safe side, I am now checking for both.

Retraining this old dog

I have been using fasd for almost two months now, and I rarely remember that I have these fancy, new comma prefix and suffix completion helpers. I’d be surprised if I’ve managed to remember to use them more than a half dozen times.

I’m much more likely to use my old autojump work flow, where I would “jump” to a directory before working a file. If I’m lucky, I’ll be trained by this time next year.

Repairing a PlayStation 3 with the Yellow Light of Death (YLOD)

Update June 19, 2013: The YLOD has struck again! During the first month after its resurrection, Retro City Rampage, Quantum Conundrum, and played enough Just Cause 2 to get the last few, monotonous trophies. Then I left town for about three months, and in that time it was mostly used for watching Netflix and Hulu. Then, a few days after I got back, the PS3 died again. I finally got around to repairing it tonight. PlayStation Plus just gave me a free copy of Saints Row: The Third, among other games, so I’m impatiently waiting for that to slowly download. We’ll see how long the repair lasts this time. I attempted to pop the heat spreader off of the GPU, but it is on their pretty good. I didn’t want to really hork things up at one in the morning, so I just pointed the heat gun at it again.

Early in December, my PlayStation 3 died. When I tried to turn it on, it would beep and flash a bunch of red lights at me before powering back off. For some reason, this is referred to as the “yellow light of death,” even though the yellow flash is barely perceptible.

I was able to successfully repair my older, 60 GB PlayStation 3. All I needed was a heat gun, some thermal paste, and rubbing alcohol. The only thing I didn’t have on hand here was the heat gun.

The PlayStation 3 cracked open Automotive Dielectric grease: Pretty good CPU thermal compound

The working hypothesis

There are easily dozens of YouTube videos and websites making similar claims. They claim that the PlayStation 3 CPU or GPU is just running too hot and the solder joints are being damaged by this excessive heat.

They recommend applying heat to the CPU and GPU to “reflow” these weakened solder joints. I don’t have much confidence in this particular hypothesis. Wikipedia claims that the solder typically used on chips like these in a reflow oven has a melting point of between 211 and 220 ˚C.

That is more than double the typical safe operating temperature of most CPUs and GPUs. The PlayStation 3 would crash or shut itself off long before ever reaching those kinds of temperatures.

The heat gun fix still works

I did it myself. It absolutely works. You should be able to follow along with Gilsky’s YouTube video and fix your own PlayStation 3. The most complicated part is disassembling the PlayStation 3. It was much easier than I expected, significantly less complicated and puzzle-like than the PlayStation 2.

Why does the heat gun fix work?

I have my own hypothesis, and I only found two clues to support my thinking. Here’s one of them:

Can you see all that thermal goop between the GPU and the “heat spreader”? I’m pretty confident that this stuff is the problem. I remember older thermal compounds that used to ship with OEM AMD CPUs ten years ago. They shipped with a thin layer of a pink or gray material on the heat sink.

That material was very similar to what ships with the PlayStation 3, and I’ve had problems with it in the past. I’ve had computers that were in warmer environments slowly melt that gummy stuff away. I wouldn’t be at all surprised if the same thing is happening in the PlayStation 3.

I believe that when you heat up the CPU and GPU, that cheap, gummy thermal compound is softened up quite a bit, maybe even partially liquefied. To abuse some existing terminology, the heat gun is likely “reflowing” the thermal compound, allowing it to once again make more complete contact with the CPU/GPU and the “heat spreader.”

Dielectric grease? What kind of thermal compound is that?

I’ve been using dielectric grease from the auto parts store in lieu of “proper” thermal paste for many years. I have computers that have been running 24/7 for over three years that have automotive dielectric grease on their heat sinks. They’ve never given me any problems at all.

I once saw a chart comparing the thermal transfer properties of various brands of CPU thermal compound, and that chart included dielectric grease. Unfortunately, I can’t find that chart anywhere now. My memory tells me that dielectric grease performed within a few degrees Celsius of the best performer.

It is also ridiculously cheap. I probably paid less for my 85g tube than I would have paid for a tiny 3.5g syringe of Arctic Silver thermal compound.

How Long Does It Take to Make a Latte with an Espresso Machine?

When I first started thinking about upgrading from my Moka Express pot to a proper, if low-end, pump-driven espresso machine I was worried that the whole process would be complicated and take a long time. I’m very happy that I decided to go ahead with the upgrade. It isn’t complicated at all, and it doesn’t take a long time.

If you asked me a few weeks ago, I would have told you that the process takes about five minutes. Since then, though, I’ve timed the whole thing with a video camera. I didn’t rush; I just went about my business just like I normally would. I wasn’t that far off; it takes just over six minutes go from turning the machine on to being finished, cleaned up, and drinking my coffee.

I do things just a little differently…

Most people empty out the portafilter after they are finished pulling their espresso. I leave it in there and clean it out the next time I use the machine. This means I get to start drinking my latte sooner, and it also saves me a bit of time, since I clean out the portafilter while waiting for the machine to heat up.

What I hope qualifies as a latte

I pull a double shot of espresso, then I steam and foam about six or seven ounces of milk until it almost doubles in volume. I combine them in a large mug, and I mix in four big old teaspoons of sugar.

I’m not certain that this officially qualifies as a latte. With this volume of foam it probably ends up somewhere in between a cappuccino and a latte. I don’t really care what it actually is; I just know that it tastes quite good.

My cheap little espresso machine

I don’t have a fancy, high-end machine. I have one of the least expensive pump-driven espresso machines you can find. It is a Mr. Coffee EMC50. I’m told that these cheaper machines with “pressurized portafilters” make it easy to “consistently pull mediocre shots of espresso.” I’ve never used a high-end espresso machine, so I’m not really certain how much better the espresso they make can taste.

I do completely agree with the first part of that statement; almost every shot I pull tastes equally good. For all I know, though, “good” is really “mediocre.” This machine most definitely makes a better tasting, less bitter coffee than my old Moka Express pot.

The Books I Read in 2012

I am not entirely certain how comprehensive this list is. I’ve never bothered to keep track of the books I read, but I recently read an article telling me that 13% of Americans claimed to have read 11 to 20 books in the past 12 months. This made me curious as to where I might fit into these statistics, so I did my very best to figure out just what I managed to read this year.

I had a lot of trouble trying to decide which books I actually read early in the year and which ones I had read towards the end of 2011. I definitely read all ten books in this list last year. I have a suspicion that I read one other Discworld book, but I am pretty uncertain. I wish I knew for certain because I would have really liked to make it into the next bracket!

These should be, more or less, the books I read during 2012 in something close to the order in which I read them:

The surprising books from StoryBundle.com

Four of the books that I read last year came from StoryBundle.com’s first bundle, the “Big Bang Bundle.” I bought the bundle because I thought it was an excellent idea, but I didn’t actually expect to get around to reading any of it. The list of books that I want to read is already rather daunting. Fitting in more books from authors I’d never heard of didn’t seem like something that would happen.

After finishing up Kim Stanley Robinson’s “Red Mars,” I decided to give one of the StoryBundle.com books a try. It seemed to take no time at all to breeze through Joseph Lallo’s “Bypass Gemini,” especially reading it right after “Red Mars.” I enjoyed it enough to buy the sequel, “Unstable Prototypes.”

All the books that I’ve read so far from the “Big Bang Bundle” have been excellent. The folks at StoryBundle.com claim that they read all the books and choose the best ones to include in their bundles. I really like the idea of buying a set of curated novels.

I will be looking forward to their next Sci-Fi bundle!

Cocktail Arcade Cabinet Upgrade: Part 3 - The Conclusion

The physical aspects of this upgrade project have been finished for quite a while now. This write up has just been on hold waiting for me to borrow a better camera than the one in my old Samsung Galaxy S phone.

Not much has really been done since my last update aside from the PVC pipe that is now hiding the wires. For that, I just took a length of ¾” PVC pipe that I already had and slit it right down the middle using a friend’s table saw.

Here is a collection of photos progressing from the earliest stages of the build right up to the present:

Four panels temporarily assembled Holes drilled for joysticks and buttons All the vinyl and most of the t-molding is applied The completed cocktail arcade cabinet Arcade cabinet joystick close up The finished cabinet with its new wall mounted TV

This is most definitely cheating

I don’t know if I should be allowed to call this thing an arcade cabinet anymore, but I am very happy with the results! I would have never thought to hang a TV on the wall behind my arcade cabinet in my previous home office: the layout of the room was all wrong.

Why not just build an upright arcade cabinet?

This whole project originally started because I was in need of some sort of table for my office. I could have just bought a cheap table or desk from Ikea. We most certainly could have built our own basic table out of wood, but I’ve always wanted my own arcade machine.

This ended up meeting both of my needs and it even gave me a place to hide my home file server. A purpose-built NAS box would probably be more power efficient, but now I have a ton of extra space to add more drives!

Grand Theft Auto: San Andreas Three quarter view of rRootage Psychonauts The current WahCade menu Mortal Kombat II

More than just arcade games

Now I have a screen that you can see while sitting comfortably on the other side of the room. I can watch movies and television in my office now. I had my BluRay copy of Super Troopers playing on there in the background while I was setting things up.

I can also play games from across the room using a gamepad. It would feel a little silly playing Super Mario Bros. on a television connected to an arcade cabinet, though. That would almost fit into a “yo dawg” meme

I started looking through my older Humble Bundles for games that require analog gamepads. So far I have only installed Psychonauts on the arcade cabinet, and it definitely feels like it was made to be played with an analog gamepad. Shank was previously a failure: my arcade cabinet just didn’t have quite enough buttons. Shank and Shank 2 both exist on the Playstation 3, so I’ll bet there’s enough buttons for either on a gamepad.

I bought the full Grand Theft Auto collection a couple of years ago on Steam. I have GTA 3, GTA Vice City, and GTA San Andreas all up and running at 1080p, and they look so much better than they ever did on the PlayStation 2. I tried to get Grand Theft Auto 4 up and running, but it ran like a slide show. I’m not sure if my CPU is just too underpowered for the game, or if it just runs poorly under Wine.

Playstation 2

I also installed PCSX2, a PlayStation 2 emulator, and I ripped a few of my games. Chris was excited about the possibility of playing her Final Fantasy X at 1080p with antialiasing. Unfortunately, my arcade cabinet’s CPU just isn’t fast enough. The best it could muster was 35 frames per second, which is a bit better than half speed. It was about the same speed at 1920x1080 and 640x480, so my graphics card is probably not the bottleneck.

Some final thoughts

I think this was a solid, inexpensive upgrade for both the arcade cabinet and my office. I don’t expect to watch many movies in here, but it is nice to have the option.

zsh-dwim: Most Recent Remote File Completion

Progress on zsh-dwim has been pretty slow lately. It didn’t take long to mine my shell history dry, and I have been having some difficulty coming up with new ideas. That is, until I came across a post on Reddit asking about a good way to find the most recently edited file on a server for the purpose of pulling a copy down over scp.

This idea seemed useful enough to be worth pursuing.

Wouldn’t this be better server by a tab completion?

Maybe it would, but I’m quite pleased with how shoehorning this functionality into zsh-dwim worked out. I’m very happy with the way the progression from “ssh” to “scp” to “scp with latest file” is working with just a couple of presses of the zsh-dwim key.

When the command line reads “scp patshead.com:” and I press control-u, zsh-dwim queries the patshead.com server looking for the most recently modified (non-hidden) file in my home directory.

Some New Years Resolutions For 2013

I’m pretty sure only one item on this list counts as a resolution. They aren’t life-changing in any way. Most of them are just small tasks that, for one reason or another, never make it to the top of my to-do list.

Generate new personal crypto keys

My GPG key was created on March 26, 2005. It should have expired a long time ago, but I never set an expiration date. The ssh key I use isn’t much newer than that… I should have done this a very, very long time ago.

This time around, I plan to put a reasonable expiration date on the GPG key!

Rework my persist system

My shell environment clean up ended up hitting a bit of a road block. When I built my little persist system to version my configuration files, I did it there, right in place. I manually created the git repository that persist stores my configuration files in, and I manually integrated that into my Prezto directory structure.

I haven’t had the gumption to tear that all back out and build some sort of installer script for persist. This is not only holding back my clean-up progress, it is also preventing me from writing more about it!

Continue working on zsh-dwim

I am still pretty excited about zsh-dwim and I most definitely plan to keep adding new features to it. A recent post on Reddit has inspired me a bit, but I haven’t quite figured out how, or even if, this fits into zsh-dwim.

Build a web interface for the arcade cabinet

This plan doesn’t have a lot of depth at the moment. Two things happened at about the same time that planted the seed for this idea. My friend Brian gave me a couple of his spare NFC tags right around the time that I was setting up my arcade table’s external monitor.

While configuring games to output correctly to the second monitor, I realized that the arcade cabinet is rapidly running out of “extra” buttons to use. I wanted a simple and intuitive way to switch some games between two player, mirrored cocktail mode and a single player mode using the external display.

I’m thinking that I can add some NFC tags and QR codes to the arcade cabinet that would point you directly to the arcade cabinet’s web interface. This way, anyone could use his phone or tablet to control the display or to kill a misbehaving game.

Buy fewer games for my arcade cabinet, spend more time playing them instead

Not long after completing my arcade cabinet, I learned that playing new arcade-style indie games are much more interesting than replaying old, emulated arcade and console games. I decided to set a goal of buying one game for the arcade cabinet every month.

That was over two years ago, and in that time I’m certain I’ve bought more than two dozen games. More than half of the Humble Bundles have included a platformer. I’ve bought a few of the Indie Royale bundles, but some of the games that looked interesting in these bundles just don’t work on Linux under Wine. More recently, I’ve had some luck with IndieGameStand.

Early on, I was worried that I wouldn’t be able to meet this goal. Today, I just have too many games to play. I spend too much time installing new games that I never get around to playing and not enough time playing the games I already have.

HP DV8T Core i7 Laptop Can Be Upgraded to 16 GB of RAM

One of my friends recently upgraded his desktop computer, and he very nearly dragged me along with him. I was very close to joining him with a similar upgrade, but the performance increase just wasn’t going to be big enough. I was starting to feel like I was missing out on the fun, so I investigated the possibility of upgrading my laptop from 8 GB to 16 GB of RAM.

6384 MB of RAM: The BIOS's printf needs a %5d memtest86+ showing all 16 GB Windows 7 task manager showing 16 GB

I just want to note here that the model number printed on the sticker on my i7-720QM laptop just says “DV8T”. My parents’ i5-450M laptops both say “DV8T-1200”.

I didn’t find any information that I thought was terribly definitive. I found this forum post saying that his DV8T may or may not be working properly and that his BIOS only saw 6 GB of RAM after the upgrade. There are other similar laptops with Intel 720QM processors that ship from the factory with 16 GB, so I figured there is a good enough chance that it would work in mine as well.

I ended up buying two 8GB sticks of Patriot brand RAM at my local Fry’s. It was about the same price as Amazon, but I figured it would be easier to return in the event that my laptop didn’t like it. The part number on my RAM’s packaging matches the RAM at Amazon, but it differs slightly from what memtest86 displays.

Did it work???

At first, I sure thought it failed. I went straight into the BIOS and saw the dreaded 6 GB of RAM mentioned on the HP forum

So I booted right up into my operating system, a 64 bit Linux system. It seemed to see the full 16 GB of RAM just fine. I didn’t think of a quick way to consume and exercise 16 GB, so I restarted the computer and fired up memtest86. Memtest86 detected everything just fine, and I watched it walk through a few tests on all 16 GB. It seemed pretty happy, but I did not run an exhaustive test.

Does it work with Windows 7?

I don’t have Windows 7 installed on my laptop, but I do happen to have a 64-bit “Windows 7 Enterprise Trial” installation disc. I booted off the disc and worked my way through the recovery options until I found a command prompt. Once I found a command prompt, it was a simple matter of remembering the file name of the “Task Manager” executable.

“Task Manager” shows that all 16 GB of RAM is available. I took a picture of the “Task Manager” window and added it to the gallery.

Why does the BIOS see 6 GB?

The BIOS doesn’t actually see 6 GB of RAM. It displays 6384 MB of RAM. That is 240 MB more than 6 GB. It looks to me like the dopefish that wrote the BIOS said “9999 MB ought to be enough for anyone,” and truncated the field down to four characters. If you don’t want to do the math yourself, 16GB would be 16384 MB.

Other HP DV8T laptops

Shortly after I purchased my DV8T, I ordered one for each of my parents. Their DV8T laptops do not have quad core Intel i7 chips like mine. They have Intel Core 2 Duo i5-450M chips. That makes them very different beasts. I have absolutely no idea if the Core 2 Duo i5-450M of the DV8T will support 8 GB memory sticks.

I finally tested my parents’ i5-540M DV8T-1200 laptops

I was previously mistaken in saying that my parents’ dual core DV8T laptops were using Core 2 Duo processors. They are in fact using i5-450M processors.

The DV8T-1200 with the i5-540M will not support more than 8 GB of RAM. The machine did boot and run just fine with the two 8 GB sticks of RAM installed, but the BIOS and operating system only saw half of it.

The conclusion

I’ve been running with 16 GB of RAM now for a few days without any hiccups. I feel it was an inexpensive and worthwhile upgrade. Extra disk cache never hurts, and now I have a little more breathing room when I need to run a handful of virtual machines.

I Got a Set of Joulies for Christmas!

I received a set of Joulies as a Christmas present from my old friend Brian, and I have to say I am pretty excited about them! I haven’t had them long enough to perform any real, proper science on them, but this has already been done with both positive and negative results, so I’m not too worried about it.

What I am interested in is whether or not they improve my daily coffee drinking experience. I have had them long enough to tentatively say that, yes, these are improving my coffee drinking experience.

The Joulies and their burlap sack The Joulies hiding in my latte The Joulies uncovered

My usual latte routine

I usually fill my mug with water and put it in the microwave for 60 seconds while I am making my latte. The “warming tray” on my espresso maker is basically useless, so this keeps everything from immediately cooling down when it hits the mug.

I know that I am technically supposed to steam the milk to about 140 degrees. I don’t do that. I know about how warm it needs to feel in the pitcher so that when I mix everything together in the mug it will be immediately ready to drink.

The problem with this arrangement is that I have to drink all 10+ ounces relatively quickly. I’m often forgetful and end up with about one third of a mug of cool, less tasty coffee.

What did I change?

I am still fine-tuning my process a bit, but I think I am nearly there. I am now nuking the mug full of water for 80 seconds, and I am steaming the milk until it is hot enough that the pitcher is uncomfortably warm to the touch.

A few months ago, my friend Brian and his wife brought us back a couple of mugs from Colorado. One of those mugs is quite huge. It easily holds a double shot of espresso, an entire pitcher of steamed milk, a copious amount of sugar, and all five Joulies.

In the past, if I steamed the milk to this more extreme temperature, it would take forever for it to cool off enough to be drinkable. Now, even in combination with the extra 20 seconds of microwave time, I am able to start drinking as soon as I walk upstairs to my desk.

I’m also able to take my time sipping at my tasty beverage, and I haven’t had any large amounts of left over coffee in my mug yet. I’ve only had them for five or six days now, though, so we’ll see if this keeps up!

Should I put the Joulies in the mug first?

The Joulies website seems to recommend putting the Joulies in the mug first and then pouring in the coffee. I use an espresso machine, so I don’t do this. I have to imagine that pulling a shot of espresso directly on top of the cold Joulies would instantly cool off the espresso.

I just drop them in like ice cubes after I have everything else mixed together.

Joulies are a lot like ice cubes

More like heavy, sinking ice cubes. If you slosh your mug around you can hear them clinking around, just like ice cubes. Joulies also make it a little big harder to drink the last of the coffee because they want to slide out of the mug and into your face when you get to the bottom of the mug.

I may not be leaving behind a full third of a mug’s worth of coffee anymore, but I am certainly missing out on a little bit every time now.

Storing the Joulies

The first time I used my Joulies, I rinsed them and wiped them clean, then I just dropped them in an empty mug. They were still a bit wet the next day. Since then, I have been putting them back into the little burlap storage bag they came with. Even if they’re still wet when I put them in, they are always dry by the next day.

Performance in an insulated mug

I sent Chris off to work this morning with a latte in our leak-proof Nissan travel mug. When I make her a coffee like this, I try to pull the double shot as close to her departure time as possible. The timing wasn’t right for that today, so I ended up making her coffee about an hour before-hand.

As always, I filled the thermos with hot water—much hotter than usual—to warm up the inside while I made the espresso and steamed the milk. I also steamed the milk to a higher temperature than I normally would.

I got this instant message from her after she got to work:

Chris: You would never know the coffee was sitting around an hour. :–)

The pair of Joulies must have done their job lowering the temperature of the coffee, since she didn’t complain about how much hotter I made it today. Then I received this message over an hour later:

Chris: These joules are DA bomb

We haven’t used any science yet, but she seems convinced that they are helping. Maybe I’ll have to be sneaky and leave the Joulies out some time and see if she notices!