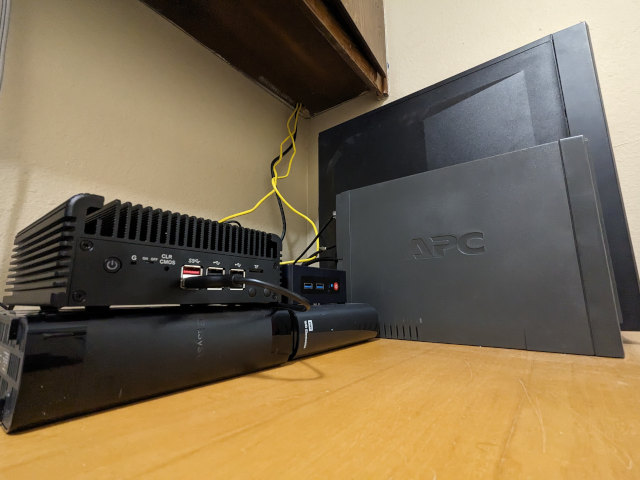
I have had Proxmox running on my Intel N100 mini PC for at least a week so far. It hadn’t been doing any real work until I migrated my first virtual machine over from my old homelab server last night. It is officially doing some important work, so it feels like a good time to write more words about how things are going. I wouldn’t be surprised if I have everything migrated over besides my NAS virtual machine before I write the last few paragraphs.

I managed to get through migrating all but one virtual machine before I got half-way through writing this. I am procrastinating on that last one, because it will involve plugging my NAS virtual machine’s big storage drive into my mini PC server. There is a little extra work involved in moving the drive and mapping the disk to the correct machine, and I can’t just boot the old machine back up if things go wrong. I figure I should finish my latte before attempting this!
- Pat’s Mini PC Comparison Spreadsheet
- Is A 6-Bay USB SATA Disk Enclosure A Good Option For Your NAS Storage?
- The Sipeed NanoKVM Lite Is An Amazing Value
- Proxmox Datacenter Manager Is Exactly What I Needed
- Mighty Mini PCs Are Awesome For Your Homelab And Around The House
- Do All Mini PCs For Your Homelab Have The Same Bang For The Buck?
- Choosing an Intel N100 Server to Upgrade My Homelab
- I Added A Refurbished Mini PC To My Homelab! The Minisforum UM350
- Using an Intel N100 Mini PC as a Game Console
- CWWK Mini PC 4-port router (Intel N100)
- Beelink EQ12 Mini PC (Intel N100)
- It Was Cheaper To Buy A Second Homelab Server Mini PC Than To Upgrade My RAM!
- Tips For Building a More Power Efficient Homelab or NAS
- Proxmox On My New Acemagician Ryzen 6800H Mini PC And Jellyfin Transcode Performance
Using the Proxmox installation ISO was probably the wrong choice for me
It is probably the correct choice for you, but I had to work hard to get things situated the way I wanted. I have a lot of unique requirements for my build:
- LUKS encryption for all the VM storage
- Mirroring the VM storage on the NVMe to the slow HDD with write-mostly flag
- Setting aside space on the NVMe to
lvmcachethe slow USB HDD
I have been deleting, recreating, and juggling partitions like a madman. Tearing things down to put a RAID and encryption underneath the Thin LVM pool was easy, and I left behind around 200 GB for setting up lvmcache down the road while I was doing it.
I was slightly bummed out that the Proxmox installed set aside 96 GB for itself. That is 10% of my little Teamgroup NVMe, but storage is cheap. I got more bummed out when I learned that this is where it was going to store my LXC containers and any qcow2 files I might still want to use.

This was a bummer because I can’t resize the root filesystem live. I wound up biting the bullet, booting a Debian live image, and resizing the root volume. That left me room for some encrypted space for containers and qcow2 files.
This would have been easier if I just installed Debian myself, set up my file systems, RAID, and encryption, then installed Proxmox. If I did that, I would have for sure also mirrored the Proxmox root partition to the USB hard disk as well!
I almost thought I painted myself into a corner that would be difficult to weasel out of on at least two occasions while playing musical chairs with these volumes.
The important thing is that I got things set up how I wanted.
- Torture Testing My Cenmate 6-Bay USB SATA Hard Disk Enclosure
- Using dm-cache / lvmcache On My Homelab Virtual Machine Host To Improve Disk Performance
- Should You Run A Large Language Model On An Intel N100 Mini PC?
Importing my old qcow2 virtual machines into Proxmox
I have always had the option of using LVM volumes for my virtual machine disk images. I am not sure if we had thin volumes when I set up my KVM host with my AMD 5350 build in 2015, but I could have used LVM. I chose not to.
LVM has less overhead than qcow2 files, but qcow2 files are extremely convenient. You can copy them around the network with scp, you can duplicate them locally, and virt-manager could only snapshot your machines live with qcow2 images and not with LVM-backed disks in 2015. The first two are handy. The last one was important to me!
Pulling those qcow2 files into Proxmox was easy. I would set up a fresh virtual machine with no ISO image mounted and a tiny virtual SCSI disk, and I would immediately delete the disk. I mounted my qcow2 storage on the Proxmox server using sshfs, and I just had to run commands like this to import a disk:
1
| |
The sshfs connection had me bottlenecked at around 30 megabytes per second, but I wasn’t in a rush, and I only had 100 gigabytes of disk images to move this way. Mounting a directory using sshfs took a fraction of the time it would have taken me to set up NFS or Samba on both ends, and I only had 100 gigabytes in disk images to move around.
I just shut down one machine at a time, imported their disks, and fired them up on the Promox host.
A few of my machines have very old versions of Debian installed, and they were renaming the network devices to ens18 instead of ens3, so they needed their /etc/network/interfaces files updates. No big deal.
One of the disk images I pulled in has 2 terabytes allocated, was using 400 gigabytes of actual storage on the host, but the file system in the virtual machine was now empty. It took almost no time at all to import that disk, and it is taking up nearly zero space on the thin LVM volume, so I would say that the tooling did a good job!
Proxmox does a good job of staying out of the way when it can’t do the job for you
Proxmox and my old homelab box running virt-manager are running the same stuff deep under the hood. They are both running my virtual machines using QEMU and KVM on the Linux kernel. So far, I have only encountered two things that I wanted to do that couldn’t be done inside the Proxmox GUI.
The one that surprised me is that Proxmox doesn’t have a simple host-only NAT network interface configured for you by default. This is the sort of thing I have had easily available to me since using VMware Workstation 1.1 more than two decades ago, and everything I have used since has supported this as a simple-to-configure option.

I understand why someone would be much less likely to need this on a server. You’re not going to bring a short stack of interconnected machines to a sales demo on a Proxmox server. You’re going to do that on your laptop.
I have been hiding any server that doesn’t need to be on my LAN behind virt-manager’s firewalled NAT because I only need to access them via Tailscale. Why expose something to the network when you don’t have to?
I quickly learned that Proxmox’s user interface is reading the actual state of things as configured by Debian. This is different than something like TrueNAS Scale, where the settings in the GUI are usually pushed to the real configuration. I am not a TrueNAS Scale expert. I am just aware that when you manually make changes to a virtual machine outside of Scale’s GUI, those changes can be wiped out later.
This is awesome. I can set up my own NAT-only bridge device, and it will be available and at least partially reflected in the web UI. I haven’t done this yet. I wasn’t patient enough to wait to start migrating!
There was also no way to add a plain block device as a disk for a virtual machine inside the Proxmox GUI. It was easy enough to do with this command:
1
| |
The qm tool has been fantastic so far, and much friendlier than anything I ever had to do with virsh. Once the disk was added by qm, it immediately showed up as a disk in the Proxmox GUI.
Can you tell that I got impatient and migrated the last of my virtual machines to the new box before I got done writing this?!
Proxmox’s automated backup system seems fantastic!
I never set up any sort of backup automation for my virt-manager homelab server. I would just be sure to save an extra copy of my qcow2 disks or take a snapshot right before doing anything major like an apt-get dist-upgrade.
The server had already been running for seven or eight years before I had any big disks off-site to push any sort of backups to, and the idea never even occurred to me! If any of the virtual machines had important data, it was already being pushed to a location where it would be backed up. The risk of losing a virtual server was never that high. Having to spend an evening loading Debian and Octoprint or something similar on a new server isn’t exactly the end of the world, and would probably even be an excuse for an upgrade.

When I noticed the backup tab in Proxmox, I figured I should give it a try. I fired up ssh, connected to my off-site Seafile Raspberry Pi at Brian Moses’s house, and I spent a few minutes installing and configuring nfs-kernel-server. I put the details of the new NFS server into Proxmox, set it up as a location that could accept backups, and immediately hit the backup button on a couple of virtual machines. It only took a few minutes, and I had backed up two of my servers off site.
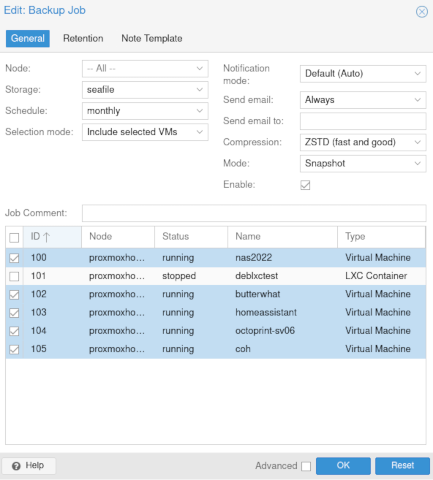
Then I hit the backup scheduler tab, clicked a very small number of buttons to schedule a monthly backup of all my virtual machines, then hit the button to run the job immediately.
I should mention here that before I hit that button, I put in some effort to make sure that the big storage volume on my NAS virtual machine wouldn’t be a part of the backup. Files are synced from my laptop or desktop up to my Seafile Pi, then my NAS virtual machine syncs a copy down. It would be silly to push that data in a less-usable form BACK to the same disk on the Seafile Pi, and even more importantly, there wouldn’t be enough room!
In the settings for each disk attached to a virtual machine in Proxmox, there is a checkbox labeled backup. If you uncheck this, that disk will not be included in backup jobs. I was paranoid. I watched my backups like a hawk until I verified that the job wasn’t filling up my remote storage.
I am not sure how long it took, but my 65 gigabytes of in-use virtual disk space compressed down to 35 gigabytes and are currently sitting on an encrypted hard disk at Brian’s house.
My CWWK N100 mini PC 2.5 gigabit router
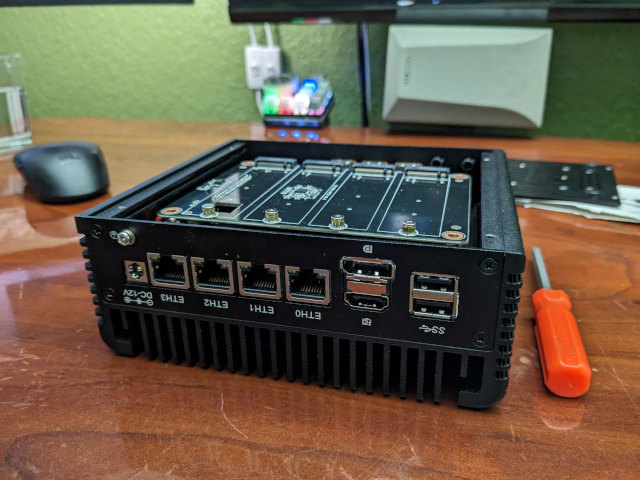
I replaced my very old AMD FX-8350 homelab server with a CWWK mini PC with a Celeron N100 processor. The CWWK is an interesting little box. I already wrote a lot of words about why I chose this over several other mini PCs, so I won’t walk about the other choices here.
The neat things for me are the FIVE NVMe slots, the four 2.5 gigabit Ethernet ports, and that power-sipping but quite speedy Celeron N100 CPU. I did some power testing with a smart outlet, and the entire CWWK box with a single NVMe uses 9 watts at idle and never more than 26 watts when running hard. That worked out to 0.21 kWh per day on the low end and a maximum of 0.57 kWh on the high end.

I need to take readings that include the 14 TB USB hard disk, but it is obvious that this is such a huge power savings for me. The FX-8350 server idles at just over 70 watts, uses 1.9 kWh of electricity every single day, and can pull over 250 watts from the wall when the CPU really gets cranking.
I also currently have a Cenmate 6-bay USB SATA enclosure plugged into my router mini PC, though I am still only testing it for reliability. The enclosure has survived my torture tests so far, is extremely compact, and very reasonably priced. I could fit nearly 160 terabytes of raw storage with my entire setup occupying just over six liters.
It is looking like the new hardware will pay for itself in electricity savings in a little over five years. I would be pretty excited if I knew how to account for the removal of that constant 70 watts of heat the FX-8350 was putting out. We run the air conditioning nine months of the year here, so I imagine the slight reduction in AC use must be reducing that payback time by at least two years, right?
So far, I am only using one of the five m.2 NVMe slots, but I feel like I am prepared for the day when NVMe drives get large enough and inexpensive enough that I can replace my 14 TB mechanical disk with solid-state storage. Flash prices have been increasing a bit lately, though, so it is entirely possible that I have gotten optimistic a little too soon!
- Should You Run A Large Language Model On An Intel N100 Mini PC?
- Torture Testing My Cenmate 6-Bay USB SATA Hard Disk Enclosure
I am disappointed that 16 GB of RAM is going to be enough!
My old homelab box had 32 GB of RAM, and my virtual machines were configured to use a little over 17 GB of that. I am usually a little conservative when I assign RAM to a virtual machine, but I was sure I could steal a bit of memory here and there to bring the total under 16 GB so I could get everything migrated over.

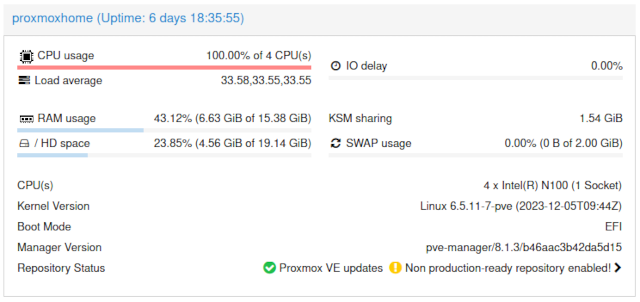
After dialing things back, I am only asking for 7.5 GB of RAM, and I am clawing back over 1 GB of extra RAM via kernel same-page merging (KSM). I managed to wind up having more than half the memory free on my new tiny homelab server.
I was bummed out that my CWWK Intel N100 server only has a single DDR5 SO-DIMM slot, and the biggest SO-DIMMs you can buy are 48 GB. I was always expecting to double the available RAM when I upgraded my homelab server. Now I am learning that I may as well save a bit of cash and upgrade using a much cheaper 32 GB SO-DIMM, assuming I even upgrade the memory at all!
Don’t trust Proxmox’s memory-usage meter!
It is nice that the meter is there, and it is a handy readout for at least half of the virtual machines on my homelab. It is a terrible meter on my NAS virtual machine, and I wouldn’t be surprised if this would wind up causing a novice to buy more RAM that they don’t need.
My NAS virtual machine isn’t REALLY a proper NAS any longer. It is just a virtual machine with a big disk running a Seafile client. It is the third pillar of my backup strategy. Its workload mostly involves writes now, and it doesn’t need much cache. I only allocated 2 GB of RAM to this machine, and that is more than double what it actually needs.
The Proxmox summary screen is giving my NAS a red bar graph, and says it is at 91.68% memory usage. This makes the red bar graph seem a little scary!
If you ssh into the NAS, you will see that it is using 327 megabytes of RAM for processes and 1.5 gigabytes for cache. No matter how much RAM I allocate to this VM, it will always fill that RAM up with cache.
If I didn’t know better, I would be doubling the RAM allocation over and over again, hoping to see the red or yellow bar graph turn green.
It is a bummer that the QEMU agent doesn’t report buffers and cache up to the host. If these memory readings on the summary page indicated how much cache was in use, or even subtracted the buffers and cache from the total, this summary would be more useful.
This isn’t a huge problem.
- Can You Run A NAS In A Virtual Machine?
- DIY NAS: 2024 Edition and the 2024 EconoNAS! at briancmoses.com
Set your virtual machine processor type to host
As long as you can get away with it, this can be either a substantial or massive boost to your AES performance compared to the default of x86-64-v2-AES. If you are going to be live migrating virtual machines between processors with different feature sets, this won’t be a good plan for you. If you are migrating and can get away with shutting down the virtual machine before the move, then you can set the processor type to whatever you like.
The first thing I ran was cryptsetup benchmark. With the processor type set to x86-64-v2-AES, AES-XTS was reaching about 2,000 megabytes per second. With processor type set to host, I was getting over 2,750 megabytes per second. That is nearly a 40% improvement!
My network relies very heavily on Tailscale. I don’t have a good way to test Tailscale’s raw encryption performance, but I hope and expect I am getting a similar boost there as well. I don’t need Tailscale to push data at two or three gigabytes per second, but I will be excited if Tailscale gets to spend 30% less CPU grunt on encryption.
I noticed a much bigger difference when I was running Geekbench. Single-core Geekbench AES encryption was stuck at 170 megabytes per second with the default processor type, but it opened all the way up to 3,400 megabytes per second when set to host. That made me wonder if any other software is as severely limited by the v2 instruction set!
I am collecting better power data!
It takes time to collect good data. I currently have the CWWK N100 and the Western Digital 14 terabyte drive plugging into a Tasmota smart plug. These two devices spend the whole day bouncing between 19 and 24 watts, and averaging out the relatively small number of samples that arrive in Home Assistant won’t be super accurate.
Tasmota measures way more often than it sends data to Home Assistant over WiFi, and it keeps a running kilowatt hour (kWh) total for every 24-hour period. That means I have to set things up a particular way for a test, wait 24 hours for the results, then set up the next test. That also means I will wind up only being able to test every other day if I want to get a full 24 hours with each setup.
I am testing the CWWK N100 and hard disk running under their usual light load now. I want to test both pieces of hardware under load for 24 hours, then I want to measure each device separately. It will take about a week to collect all the numbers, and that is assuming I don’t miss out on starting too many tests on time.
What’s next?
I think it is time to replace my extremely minimal off-site storage setup at Brian Moses’s house with a Proxmox node. I have had a Raspberry Pi with a 14 terabyte USB hard disk at Brian’s house doing Dropbox-style sync and storage duties for the last three years, and it is currently saving me around $500 every single year on my Dropbox bill.
If you’re interested in optimizing storage costs for your homelab setup, I wrote about whether refurbished hard disks make sense for your home NAS server, which explores cost-effective storage options that work well with Proxmox environments.
This seems like a good time to upgrade to an Intel N100 mini PC. I can put a few off-site virtual machines on my Tailnet, take the Pi’s 150-megabit cap off my Tailscale file-transfer speeds, and maybe sell the Raspberry Pi 4 for a profit.
I am also shopping for 2.5 gigabit Ethernet switches for my network cupboard and my home office, but I am also more than a little tempted to attempt to run 10 gigabit Ethernet across the house. This is either a project for farther down the road, or I will just get excited one day and order some gear. We will see what happens.
Somewhere along the line there needs to be some cable management and tidying happening below my network cupboard. Now that all the servers are being replaced with mini PCs, I can eliminate that big rolling cart and replace it with a simple wall-mounted shelf. I may wind up going bananas and designing a shelf that gives me room inside to hide power outlets and cables.
What do you think? Have I made a good sideways upgrade to save myself $60 per year in electricity and maybe almost as much in air conditioning bills? Would an Intel N100 be a good fit for your homelab or other home server uses? Do you think I will manage to make use of all these 2.5 gigabit Ethernet ports and extra NVMe slots? Let me know in the comments, or stop by the Butter, What?! Discord server and chat with me about it!
- Pat’s Mini PC Comparison Spreadsheet
- Is A 6-Bay USB SATA Disk Enclosure A Good Option For Your NAS Storage?
- Proxmox On My New Acemagician Ryzen 6800H Mini PC And Jellyfin Transcode Performance
- The Sipeed NanoKVM Lite Is An Amazing Value
- Proxmox Datacenter Manager Is Exactly What I Needed
- Degrading My 10-Gigabit Ethernet Link To 5-Gigabit On Purpose!
- Mighty Mini PCs Are Awesome For Your Homelab And Around The House
- Topton DIY NAS Motherboard Rundown!
- I Bought The Cheapest 2.5-Gigabit USB Ethernet Adapters And They Are Awesome!
- Upgrading My Home Network With MokerLink 2.5-Gigabit Switches
- When An Intel N100 Mini PC Isn’t Enough Build a Compact Mini-ITX Server!
- Do All Mini PCs For Your Homelab Have The Same Bang For The Buck?
- Choosing an Intel N100 Server to Upgrade My Homelab
- I Added A Refurbished Mini PC To My Homelab! The Minisforum UM350
- Using an Intel N100 Mini PC as a Game Console
- Tips For Building a More Power Efficient Homelab or NAS
- It Was Cheaper To Buy A Second Homelab Server Mini PC Than To Upgrade My RAM!
- DIY NAS: 2023 Edition at Brian’s Blog
- I spent $420 building a 20TB DIY NAS to use as an off-site backup at Brian’s Blog
- CWWK Mini PC 4-port router (Intel N100)
- Beelink EQ12 Mini PC (Intel N100)