I wasn’t sure that I was going to write about this particular project. The finished part is serviceable enough, but it is far from perfect, and I was having a lot of trouble getting behind the desk to take a good “action shot.” The desk and monitors are in the corner of the room, so I thought it was going to require some significant gymnastics to get back there.
I bought some longer DVI cables to clean up my cable management, and I was climbing and stretching to attach one of the cables to the monitor stand and feed it down the vertical mount, and it was a surprisingly difficult task. When I started swapping out the second cable, I realized that I have an articulating monitor stand. All I had to do was swing the monitors out of the way, and I could do almost all of the cable routing from the comfort of my chair!
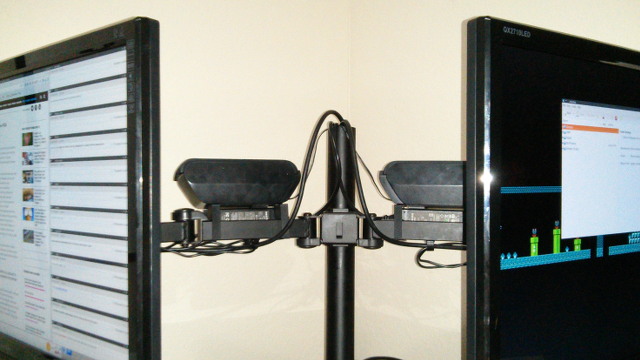
This also let me take a pretty good photo of the new speaker mounts.
The problem
The power adapters for my QNIX QX2710 monitors aren’t a convenient fit for my monitor stand. They are the sort of adapter with a short length of DC power cable attached to a relatively large power brick. That brick has a port that accepts a standard three-prong PC power cable.
I was hoping to hide both power adapters, but the short DC cable just isn’t long enough to follow the entire length of the monitor mount. My interim solution was to tape a power brick to the top of each arm. This works well enough, and they are hiding between the wall and the monitor. Out of sight and out of mind.
I recently acquired a pair of Altec Lansing VS2421 speakers, and I needed to put them somewhere—preferably hidden out of sight. I thought it would be a good idea to kill two birds with one stone, so I decided to make a combination mount for my speakers and power adapters.
The first design
The first design was not only my largest print so far, but it was also a huge failure. A 150-gram failure—that’s almost 10% of an entire spool of filament!
The speakers have a single keyhole-style mounting hole, and I wanted to be able to lay the speakers down on their backs. That single mounting point wasn’t going to be enough to hold them in place, but it was very easy to leave a hole in the bracket to accept an M3 screw. They do also have a small rectangular notch near the bottom, and it was very easy to print a block of plastic that would fit snugly in that space.
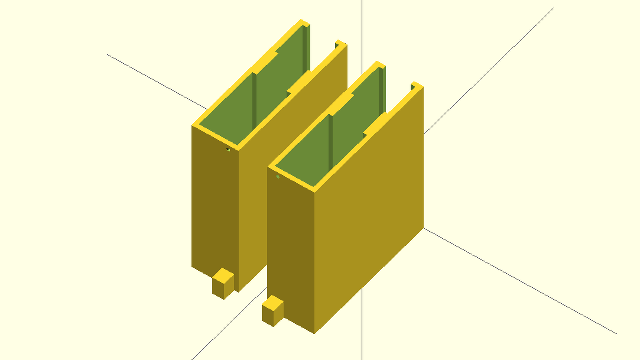
The distance between these two points was going to make for a very tall mounting bracket, taller than anything I’ve ever printed.
I decided that I was going to design a sort of clamp-shaped bracket that would put the power adapter on top of the monitor arm, and the speaker would sit on top of the mount. I thought this would be a good design because the speakers would be closer to the top of the monitors.
The 12-hour print didn’t go so well. I had some layer separation a couple of hours in, but I let it continue to print anyway. I figured it would be alright if the brackets were a little ugly. I just wanted to see if they would work.
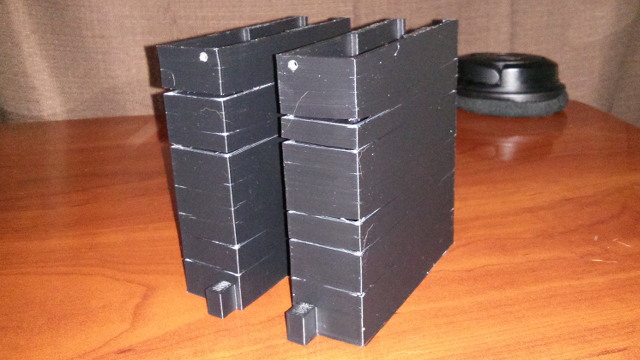
They didn’t work. I don’t know how I measured so badly. The printed part came out to precisely the dimensions I had specified in the OpenSCAD source code, but the channels just weren’t big enough to fit either the power adapters or the monitor arm!
I measured both of them again, and my measurements were all way off! I don’t know how I did that. I measured everything at least twice, so I have no good excuse here.
The second attempt
I decided not to print another big, chunky, solid bracket. It took too long, and it was a waste of plastic. This time, I designed a pair of brackets for each speaker: one S-shaped bracket for the M3 screw, and a second bracket for the rectangular stub.
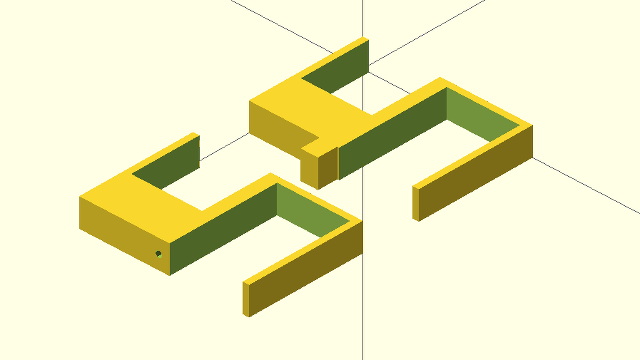
Instead of placing both the speakers and power adapters above the arms, I ended up hanging the power brick directly behind the arms. I noticed when test-fitting the failed brackets that the speakers could impede the travel of the monitors, and this change of layout allowed me to move the speakers back by almost two inches.
This was a simple design, and it only took me about 15 minutes to go from an empty OpenSCAD source file to a working STL file. That even includes the time it took to look up how to create a function in OpenSCAD. I’m pretty excited. It seems like my skills are improving!
I printed two sets of these brackets, and they are currently doing their job.
The brackets aren’t perfect, but they’re good enough
I’m very happy with how the mounting points on the speakers meet up with the brackets. I’m not all that happy about how well they hold up the power adapters.
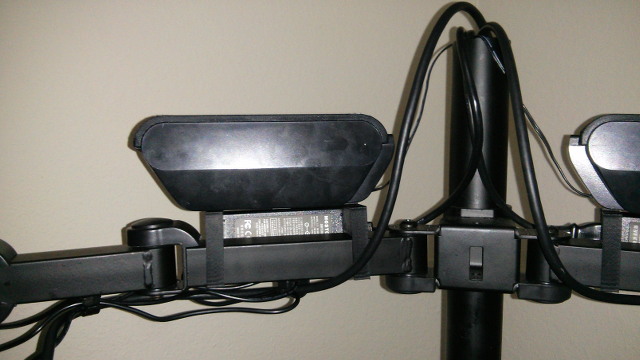
The spacing for the speaker mounts has to be very precise, and those two mounting points barely fit on one section of the monitor arm. I was lazy. I knew that if I made the brackets narrow enough that the same set of brackets would work for both sides. I didn’t want to have to mirror the parts.
This wasn’t the best choice. The brackets are a little too narrow and a bit too far apart to comfortably hold the power adapters. The power adapters only have to be nudged a bit before they start to fall through the center.
I’m not terribly worried about this, though. The cable management keeps things from moving around, and all this stuff is behind the monitors where I’ll never see it.
- Speaker and AC Adapter Brackets at GitHub
- Speaker and AC Adapter Brackets at Thingiverse