I promise. I am not trying to be a 3D-printing blog, but I got a new toy, so this is where my thoughts keep landing right now.
First of all, I do not think you should buy a Bambu A1 Mini as some sort of an investment. Any 3D printer is a fun toy and a useful tool. Sometimes I use mine to solve little problems. Sometimes I solve complicated problems. Sometimes I just print fun things.
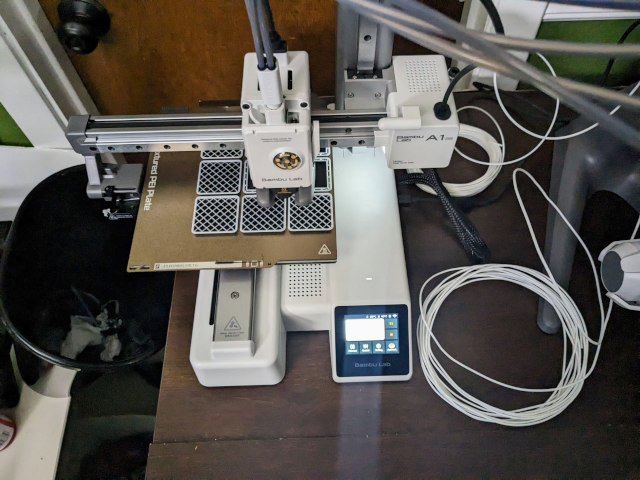
This is my Bambu A1 Mini and AMS Lite using up some old filament samples and nearly depleted spools of filament to print randomly colored Gridfinity bins.
I have owned several 3D printers over the years, but I have only owned my Bambu A1 Mini for about a month. I thought it might be fun to look back over the things I printed in 2023 to see which things would fit on the A1 Mini’s smaller bed, and see how much value I am getting out of owning a 3D printer.
Maybe you are eyeballing the $299 A1 Mini. Maybe you’re wondering what you might be able to use it for. I am hoping that my last twelve months of 3D printing might help you figure out how much value you might get out of your $299.
I am focusing on the A1 Mini, because that is the model I bought. I feel that all of the printers from Bambu Lab are a good value. Each one brings along upgrades that might be valuable to you, but even the smallest and least costly model is a fantastic machine.
Most of these things weren’t even printed on my Bambu A1 Mini, because the printer wasn’t even available when I printed most of these things. Some of these things were printing on my aging Prusa MK3S, but the majority were printed on my souped-up $169 Sovol SV06.
Between things I have designed myself and things I have downloaded, I have a collection of around 150 models from the last year. Some I have printed many times. Some I didn’t use at all. Others I tried and threw away. I am just going to touch on the most useful or awesome things I printed over the last year.
- My Bambu A1 Mini – My First Six Hours of 3D Printing
- The Bambu A1 – Do I Regret Buying an A1 Mini a Month Ago?
- The Bambu A1 Mini – The Best Choice for Your First 3D Printer
- [Marlin Input Shaping, My Sovol SV06, and My Twenty-Minute Benchy][sv06is]
The Umikot Spirograph Espresso WDT Tool
This print is amazing. There is a $475 espresso distribution tool called the MOONRAKER. It is made of brass and glass, and giving the tool around ten quick rotations will touch every millimeter of your portafilter. It is quite cool!
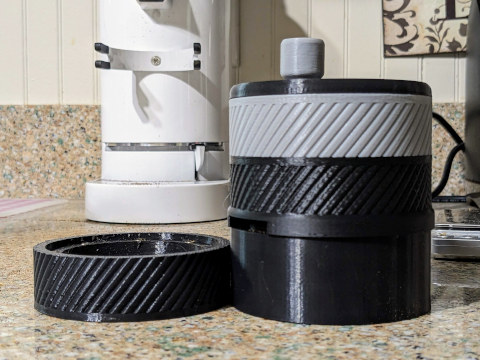
The Umikot tool works the same way. The heart of the devices is a set of interlocking print-in-place planetary gears. You print the parts, add some accupuncture needles, and you have something that works just like the $475 tool!
I use mine twice every single day. It does a fantastic job, and it has definitely improved the consistency of my espresso shots.
It would be fun if I could tell you that this tool alone will pay for your Bambu A1 printer, but I can’t do that. The Umikot tool may do the job just as well as a MOONRAKER, but a printed part made from fifty cents in filament isn’t truly worth $475. It is worth more than fifty cents, for sure, but I have no idea what value to assign to it!
That said, it is a fantastic tool, and you aren’t getting anything quite like it for less than $100.
No-sew backpack clips, straps, and things
These were a new idea last year, but at the time, I was only 3D printing the test parts. All the real parts I was using were made from carbon fiber plates cut on my Shapeoko CNC. Late this year, though, I have had some ideas that didn’t fit in the limits of two dimensions, so I did some testing to make sure 3D-printed parts would hold a good bit of weight. The prints are stronger than I will ever need!
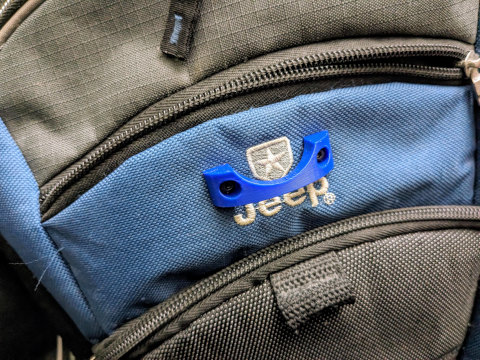
No-sew carabiner hook on one of my old backpacks
These no-sew bits and bobs are my newly updates product in my Tindie store, and they are also available for free on Printables. I didn’t think these were going to go anywhere until I discovered 3-mm leather punches. Now I can send you a leather punch with a template, and it is extremely easy to poke holes exactly where you need them in your bookbag.
I have been attaching extra hooks and straps to all my bags just because it is fun, but there are a few places where these have come in extremely handy. I added a strap to my smallest laptop bag so I can carry a bottle of water when I ride my electric unicycle to the park with my laptop on a warm day. I would be carrying a much bigger and heavier backpack without this modification!
- Adding Hooks or Straps to Your Backpack Just Got a Whole Lot Easier!
- My No-Sew Carbon Fiber Strap For Your Backpack at Tindie
- Cutting Carbon Fiber Sheets on My Shapeoko CNC
Custom speaker mounts for my desk
I put myself into a difficult situation when I rearranged the furniture in my home office. My desk wound up over on the wall with the TV, so it made sense for me to move my monitor a little bit off-center from the corner so that the big TV could be used sort of like a second monitor. This also let me move my podcasting camera a little farther to the right, which was also a nice win!
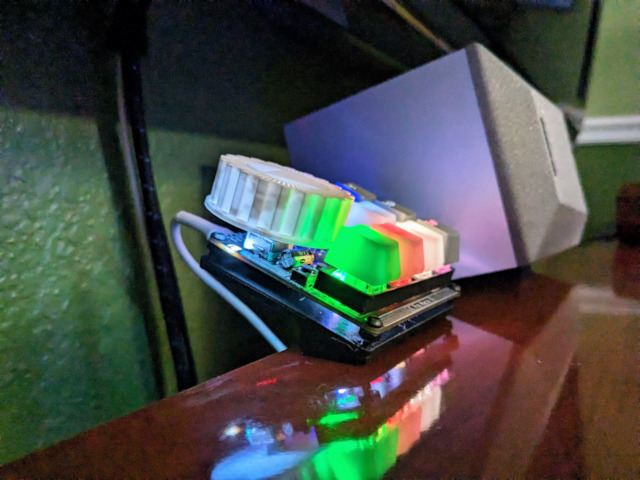
Now I didn’t know what to do with my speakers. There is no longer anywhere symmetrical for me to sit them behind or under my monitor. The TV is low enough to be in the way on my right, and I really didn’t want to waste five inches of depth on my desk on the narrowest side of my corner desk. What on Earth could I do about this?
I wound up designing some screw-clamp brackets for the speakers. My first attempt had fancy compound angles, but I needed different angles for each speaker to keep both pointed at my head, and it wound up looking weird with the speakers not being parallel to the surface of the desk.
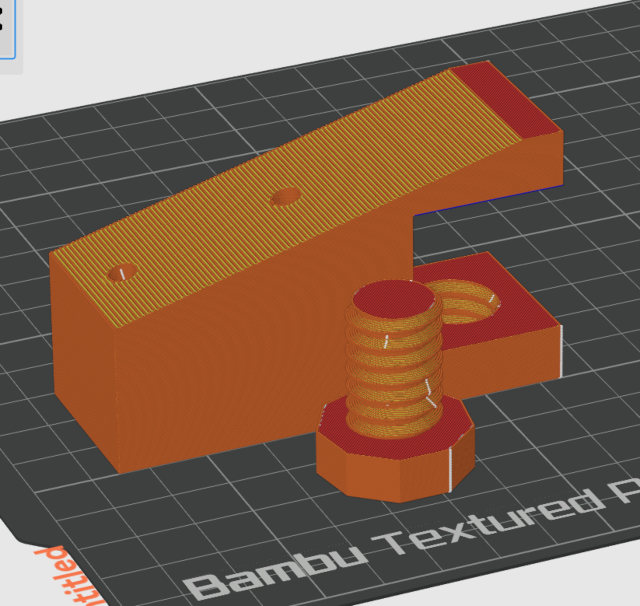
The speakers are positioned nearly equidistant from each other. The new bracket has a 20-degree angle pointing the speakers up towards my ears, but not so far up that the speaker will prevent the TV from pulling out on its articulated mount. The brackets are clamped to the desk with 3D-printed screws.
The speakers are ever so slightly above the surface of the desk, but more importantly, the backs of the speakers are hanging a little over three inches behind the desk. This is saving me a nice amount of space, especially where the desk isn’t as deep on my right!
These simple speaker mounts have a lot of value to me, and I am extremely pleased with how they worked out. I couldn’t just order something from Amazon that could solve this problem so perfectly for me, but I easily put a dollar figure on these mounts.
I feel like these brackets are the prelude to some custom CNC waveguide speakers, but I am in no rush to start working on that project. These aren’t even the speakers I meant to use on my desk. I had them lying around, and I wondered if they would sound right if I wired them in place of my ancient Altec Lansing speakers. I figured they might be a reasonable set of drivers to transplant into an eventual waveguide speaker set, but who knows what I will really wind up using!
PGYTECH-compatible quick-release plates and adapters
These are some parts that I designed for myself, and they aren’t quite fully baked, so I haven’t uploaded them to Printables. My parts are just functional enough to get the job done. There are similar enough things available, though, so you might be able to find something similar to fit your needs.
I have an awesome PGYTECH MantisPod with its fanstasic quick-release ballhead and quick-release plate. I have real, authentic PGYTECH plates on all my cameras, and real, authentic PGYTECH quick-release adapters on my important tripods and my cameras.
The plates are about $15, and the combos with a plate and an adapter are $40. I don’t need a super secure and extremely sturdy adapter to hold my small lights or a GoPro to a tripod. I figured I could either spend $200 to $300 on real adapters, or I could design something compatible to stick on all my small gizmos. I think you already know what I did.
My adapters are sturdier and more effective than I expected. I don’t think I would want to trust a Sony A7S3 with a big lens hanging upside-down from a tripod on one with dozens of people walking around who might bang into it, but I am using the 3D-printed adapters in my vlogging and top-down recording setups, and they are doing a fantastic job.
The real PGYTECH plates and my own plates are also compatible with fake Arca-Swiss style clamp on two of my older tripods, too, which is nice.
VESA camera mounts
This is probably the single most important 3D-printed doodad I am using around the house, and I think it is genius, even if it isn’t something that most people would need. I have my 34” ultrawide monitor attached to a dual monitor mount, and I have some custom 3D-printed parts that let me mount my Sony ZV-1 in place of the second monitor.
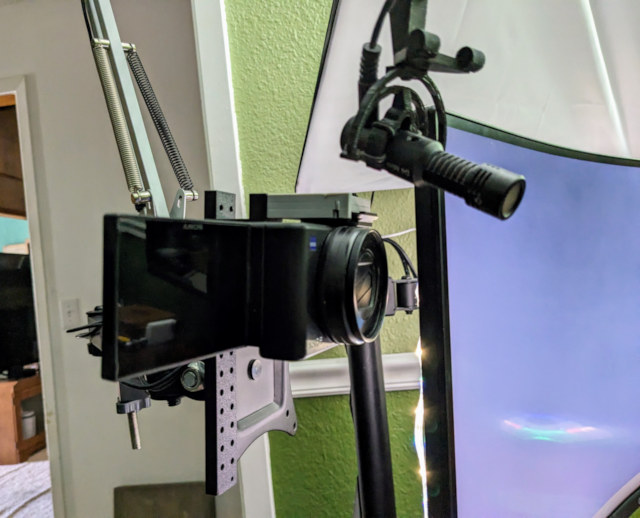
The Sony ZV-1 is hooked up like a webcam, so I can use it when recording podcast interviews. I also record on the camera during those interviews so that I have a high-quality copy of the footage.
My monitor mount’s arms are articulated on only one axis, but I can also muscle the VESA bracket to tilt on two axes. This means I can push the camera out of the way to hide it behind my monitor, but when I swing it out to record, I don’t have to worry about getting the camera at the correct height, pitch, or roll angles. I only have to worry about aiming it left and right. Everything else is ready to go.
This takes so much work out of podcasting, and it means I can show up at least 15 minutes later for every interview!
Organizing my small parts with the Gridfinity storage system
Zack Freedman’s open-source Gridfinity system is fantastic. The concept is great, it is open source, and there is a huge community making all sorts of custom bins to fit pretty much anything you can imagine.
I have a few drawers organized with Gridfinity, and I am constantly improving the organization of my electronics workbench.
One of my favorite features of Gridfinity is how it lets me make use of the third dimension. I have a bin in my camera drawer that holds my Sony ZV-1 and its Ulanzi wide-angle lens. That bin sits on top of another bit that holds spare ZV-1 batteries and memory cards. I like that I can keep important things quickly accessible while still keeping their other accessories hiding underneath.
Whenever I need to test a new printer, a new slicer profile, or a fresh spool of filament I will print off a small Gridfinity bin. More bins will eventually come in handy, and I won’t wind up throwing them away like I would a calibration cube or a Benchy.
This is the only project where I printed things that wouldn’t fit on the Bambu A1 Mini, but the parts I really wanted to print also didn’t fit on my Prusa MK3S. I printed several 4x5 Gridfinity base plates that I had to glue together to fill up my workbench. If I didn’t have the Prusa MK3S, I would have just had to print lots of 4x4 Gridfinity base plates and glue those together instead! Not exactly a huge problem.
A GPU anti-sag screw jack, and a CPU cooler adapter
There’s no shortage of fun, cool, and useful parts you can 3D print for your computer. There are adapters to that let you slot 4 3.5” hard disks in three 5.25” drive bays, or fit two 2.5” SSDs in a single 3.5” drive bay.
I used a 3D printed Wraite Spire adapter to upgrade to a 120-mm fan to quiet my CPU cooler a bit. It didn’t get me where I wanted to go after upgrading from a Ryzen 1600 to a Ryzen 5700X, but it did get a little quieter, and the CPU did benchmark higher!
I also printed a screw-jack for my slightly sagging GPU. I can’t even find the one I printed on Printables, but there are a ton of them! Mine is two simple pieces that thread together allowing you to adjust the length, but there are all sorts of whimsical prints to help prevent a sagging GPU. My little Radeon 6700 XT wasn’t sagging all that much, but I own a 3D printer, so it seemed like a problem I should solve.
You shouldn’t buy a 3D printer to solve either of these problems. You can get a screw jack on Amazon for $9.99, and I bought a pretty awesome CPU cooler with a pair of rather quiet 120-mm fans for $20. Even so, those two purchases would be nearly enough to buy three kilograms of filament.
Magnetic curtain holders
I have to say that I am bummed out, because the excellent clips I am using are no longer available on Printables or anywhere else. The ones I am using are sort of like this set of curtain clips, except that the ones I chose are staggered so that the curtains overlap by half an inch to make sure no light peeks through.
Almost the entire length of the wall behind our couch is either window or a glass door. This is trouble, because if the curtains aren’t just right, then there is a sliver of light cast on the TV during the day.
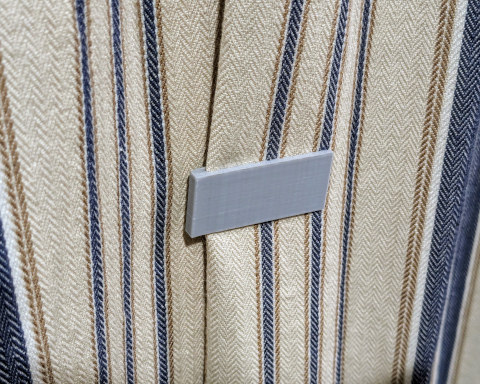
These little clips are fantastic. We just have to pull the curtains close to the correct position, and the magnets pull them right into place. There were three models available for different size magnets, and I stupidly chose the biggest magnets. You really want just enough magnet to hold the curtains shut. I have strong enough magnets that the friction holding the clips on the curtains just isn’t strong enough!
There are 4-packs of similar doodads on Amazon for $12. I am using nine clips. I bet we could have gotten away with six, so it seems safe to say that I saved $24. I did wind up spending half that savings buying a 100-pack of 10-mm magnets, but I have used up more than half of those magnets on another project. There is always a use for more magnets!
Mic adapter for my IKEA Tertial lamp
This isn’t quite a new 3D-printing project, but I did revise my setup this year, so I feel like that counts! I originally uploaded my IKEA Tertial arm lamp C920 webcam mount to Thingiverse in 2015. It has evolved a lot since then, but I am still using parts that I designed in 2015 today.
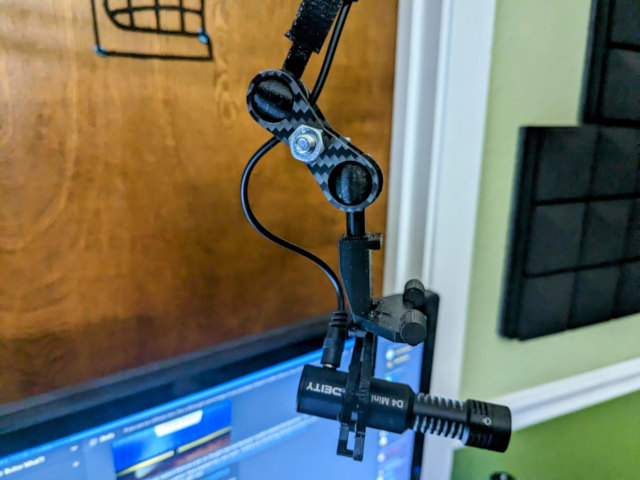
At some point after 2015, I upgraded the mount to use ball joints. Last year, I added a clip to hold my Deity D4 Mini shotgun mic under the webcam. Not long after, I popped the webcam out, but I still had the mount up there. I also upgraded the ball joints with a couple of CNC-cut carbon-fiber plates, because they can be thinner, and I think they look cooler!
I eventually need to get around to deleting the webcam mount that I no longer use! That would make it look even cooler, right?!
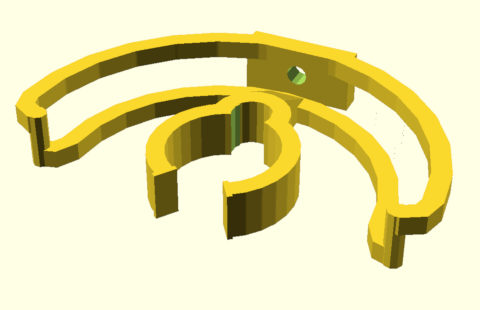
This shock mount was the first thing I designed using the BOSL2 OpenSCAD library
Now that I am down to just a microphone, this is something one could just go out and buy. You can get an Amazon Basics mic arm for $22. You can also get something much nicer like the Elgato Wave Mic Arm for $80.
I was at IKEA one day back in 2015, and I snagged a handful of Tertial lamps for $9.50 each. They are handy lights, they are inexpensive, and I have used two or three as mic or webcam arms.
A small coffee grinder upgrade
I upgraded my espresso setup to a Turin DF64P coffee grinder during the summer. This was a huge upgrade, and I absolutely love this grinder. It has one minor problem that was bugging me: the dial doesn’t give you a good indication of which number it is actually pointing at!
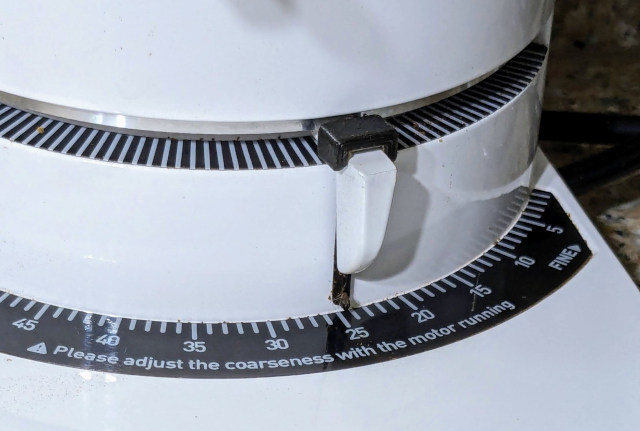
I need to re-print this on the Bambu A1 Mini. The tiny bump at the tip printed a little fuzzy with the 0.6-mm nozzle on my Sovol SV06, and it is collecting brown coffee bits that won’t brush away!
This isn’t a huge inconvenience. I don’t actually count tick marks when dialing in a shot of espresso. It is a bit of a nuisance when I roast another batch of the same beans a month later and want to start tuning from where I left off. If I write 23 on the bag, it would be nice to be able to get back to 23 next time, right?
Some on Printables designed a tiny indicator arrow that hangs onto the adjustment doohickey. Mine wobbled around a little, so I cut myself a tiny piece of double-sided tape to keep it in place.
This is another model that doesn’t seem to be available on Printables or anywhere else any longer!
Hidden tube lights behind my office TV
This solved another problem I caused by my rearranging of my home office. I used to have a floor lamp a few feet from me, and it was reflecting 2,000 lumens down onto my desk from the ceiling. There isn’t anywhere near my desk now for that lamp, so it is on the opposite side of the room having most of its light absorbed by the dark curtain, and I can’t run my video lights. They are quite bright, but they are also pointed almost directly at my face! I have been in sitting here in the dark for a couple of months.
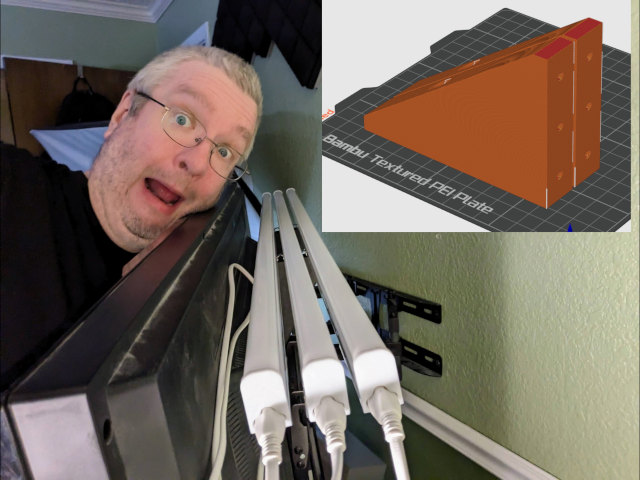
I was shopping around for lighting ideas when I discovered these 3’ 1800-lumen tube lights. I was able to get an 8-pack for $55. That length is just short enough to hide behind my TV, and they come with all sorts of cables and adapters to string lights together in series. You can get them in lengths from 2’ up to 8’. Different brands and models come with different quantities of connectors and switched plugs, so you may have to shop around to be able to meet your needs.
Every one of these style of work light on Amazon claims to be high CRI, but that is definitely not the case. People in my office look a little ill now, because the lights lean towards green and definitely don’t have enough red. The difference is so obvious when I fire up my video lights, but that is fine. I have a bright light from a source that you’ll never see on my video camera, so I am quite pleased.
I designed a simple triangular brackets that bolts onto my TV’s VESA mounts. The brackets each have screw holes to attach the supplied clips for three of the tube lights.
Conclusion
I had an even more exciting year of 3D-printed solutions to problems around the house than I expected, and if you are new to 3D printing I hope you have as much success this year as I had last year. Not every print needs to solve a problem. Not every print needs to provide monetary value.
Even so, it is nice when they do! Being able to repair a broken appliance without waiting a week for parts is nice. Being able to repair something when no one sells replacement parts is even better. My 3D printers have definitely saved the day on more than one occasion.