NOTE: In my attempt to call attention to the problems, all photographs are lit and angled in a way that most highlight any printing imperfections. Just about everything pictured here looks better in person than zoomed in and lit so directly across the layer lines!
I have some complaints. I have run into some disappointments. Even so, I have gotten way more than my money’s worth of an upgrade out of this free firmware upgrade for my Sovol SV06. Let’s start with the good stuff.
If you already have practice flashing Marlin on a 3D printer, then setting up input shaping on your Sovol SV06 will be a piece of cake. The benefits of enabling input shaping are absolutely worth the effort. You can just turn on input shaping, skip the step where you tune the input shaping, dial up your speed and acceleration settings in PrusaSlicer, and you will have no trouble printing a Benchy in under 30 minutes.
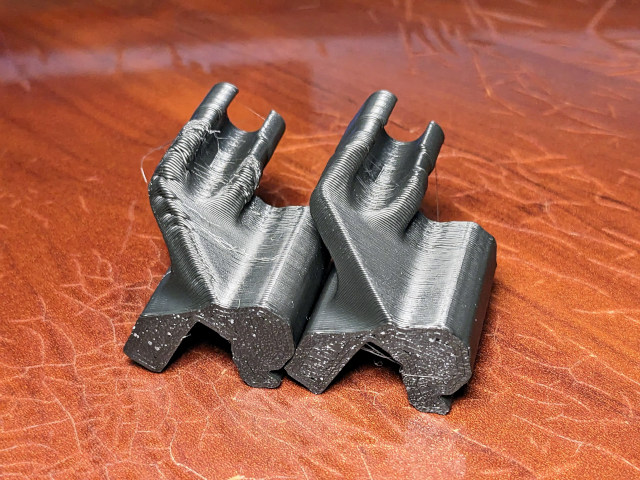
NOTE: These parts were printed with no slowdowns for overhangs and no minimum layer time. The only difference is whether or not that 45-degree overhang was facing the coolest side of the part-cooling duct or the warmest. The part’s default orientation faces it in the worst direction.
At least, it was easy for me to print a Benchy that with a 0.6 mm nozzle. We will touch on that more later.
I can’t upgrade my Prusa MK3S, so I have almost completely stopped using it. My Prusa has printed exactly two parts for me since cranking up the speeds on my Sovol. One time it happened to have the correct color already loaded. The other time I had forgotten to load one part of a project onto the Sovol’s build plate, and it was already printing, so I ran off the missing part in parallel on the Prusa.
- The Sovol SV06 – Is It Still Worth Buying in 2024?
- The Sovol Comgrow T300 Only LOOKS Like a Bambu A1
- My Bambu A1 Mini – The First Six Hours of 3D Printing
- The Bambu A1 Mini – The Best Choice for Your First 3D Printer
- Marlin Input Shaping, My Sovol SV06, and My Twenty-Minute Benchy
I want to stop tinkering, but I can’t!
I keep thinking that I have dialed in my speeds pretty well, but I am constantly finding edge cases where I run into my machine’s limits.
I can print a nice 21-minute Benchy from the SD card, but Octoprint can’t keep up with the curved hull at that speed, so I dial that back to around 24 minutes. This week I noticed that my cooling is significantly worse on the front, but especially to the left of the front, and I can’t print a clean 20-mm cube. I set the minimum layer time to 3 seconds, and I now have a nearly perfect cube, and that also cleaned up a lot of other small problems with other prints.
I don’t really want to have to think about this stuff. I am excited that I was able to hit a reasonably fast speed with my Sovol SV06, but I would like to be able to just hit print and not worry about it. Bambu has already run into the problem I had, and they have tuned their printer hardware and slicer profiles to avoid these sorts of issues. My free upgrade has cost me a lot of time.
It has mostly been fun, though, and being able to say that my $169 printer can crank out a Benchy in 21 minutes is neat!
Balancing cooling, the 0.6 mm nozzle, and Octoprint
I have been on the right track this entire time, but I didn’t quite make it to the destination I was expecting.
The faster you lay down plastic, the more cooling you need. To put down more plastic, you have to send more g-code to Marlin in a shorter amount of time. Octoprint can only send g-code to Marlin at 115,200 baud. I could try rebuilding the firmware to allow for 250,000 or 500,000 baud, but that is more effort than I want to invest. Especially knowing that it might not work well at all!
Moving up to a 0.6-mm CHT-style nozzle means you can extrude roughly twice as much plastic for every line of g-code. That helps avoid the communication speed issue with Marlin, and that is awesome.

What I didn’t realize is just how much more difficult it is to cool that thick line of filament. PrusaSlicer’s default 0.15-mm profile for a 0.4-mm nozzle has an extrusion width of about 0.45 mm, while my own 0.24-mm profile has an extrusion width of 0.7 mm.
I am extruding nearly three times more plastic. This is like spaghetti compared to linguine. How much harder is it to cool the center of that 220-degree linguine? It is a lot harder!
I was correct up to a point. I don’t have to push the speeds an acceleration nearly as high with a 0.6-mm nozzle to print as fast as the hot end can melt the plastic, and sending half as much g-code does indeed help Octoprint keep up. What I didn’t anticipate was just how much more difficult it is to cool the parts!
I paid $4 for a better part-cooling duct
I think it was a good deal! At first, I was on a mission to quiet some of the ridiculously loud fans on my Sovol SV06. Bigger fans are quieter, so I upgraded the part-cooling fan from a 4010 to a 5015, and I printed one of the popular ducts from Printables.
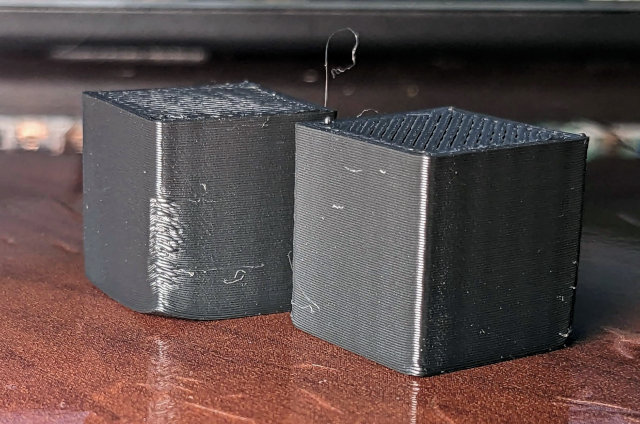
NOTE: The $4 fan duct doesn’t cool nearly as well towards the front left for me, but it definitely feels like it moves a lot more air than the free ducts on Printables. I had to add a 2-second minimum layer time to clean up that corner on my test cubes.
That was fine. I was able to run the part-cooling fan at about 30% instead of 100%, and it was a lot quieter. Then I started printing fast, and running the 5015 fan at 100% wasn’t cutting it. I almost printed one of the dual-5015 fan ducts, but Reddit suggested that the $4 from Cults3D was much better, since it was designed using air flow analysis software.
I assume they are correct, because this sucker feels like it moves a lot of air.
I stopped optimizing for the Benchy, and so should you!
Printing a single small object is challenging. You need quite a bit of cooling to quickly print that narrow little smoke stack on top of the Benchy. Most prints aren’t as demanding.
In the olden times when most of us were still using wood-framed 3D printers, we had a pretty standard piece of advice that we would give out when a small part was printing poorly; print two of them instead! If you smoke stack doesn’t have enough time to solidify between layers, giving it more time to cool by printing a neighboring smoke stack will probably help a lot.
We aren’t always speed-boat racing. We are trying to print the parts that we need to print. You don’t literally need to print two identical parts, either. You can always add another thing that you need to the build plate. My go-to objects are Gridfinity bins.
- My Bambu A1 Mini – The First Six Hours of 3D Printing
- I Bought a 3D Printer: I Have No Idea What I’m Doing
What have I done to balance these forces? Should I clean up my PrusaSlicer config so I can share it?
While breaking the rules of the speed-boat race, I think I have managed to dial in a reasonably clean Benchy in around 28 minutes. I don’t need an external part-cooling fan for this like I would to get under 20 minutes. Most of the overhangs print well. This Benchy is definitely not pristine, but I feel that the quality is better than just acceptable.
There is one part of the Benchy that prints poorly because Octoprint can’t feed gcode fast enough at 115,200 baud. Everywhere that the hull extends high in the front of the boat has weird artifacts. These artifacts vanish when printing from the SD card.
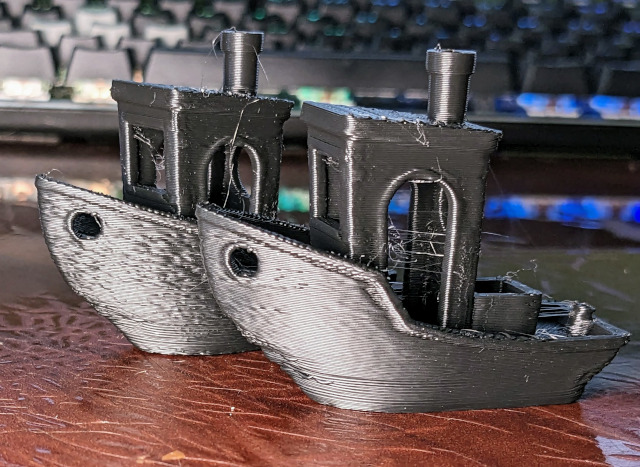
NOTE: You can see the difference in the hull between my 24-minute and 28-minute Benchy via Octoprint. The rough back corner is facing the problematic corner of my cooling setup!
The lower parts of the hull print well, because those long straight lines that wrap the hull around the back of the ship only take a few lines of gcode to print several inches of filament. That leaves room in the serial port’s buffer for the more complicated shape up front.
I improved this issue by lowering the G-code resolution from 0.0125 mm to 0.05 mm. That decreased the size of my gcode file for the Benchy from 3.2 megabytes to 2.3 megabytes. This didn’t completely eliminate the problem, but it helped tremendously!
What about speed, acceleration, and flow rate limits?
I should start by saying that I kept the first layer speed extremely conservative. I don’t need high speeds keeping a part from sticking to the textured PEI sheet. I did widen the extrusion width for the first layer from the default of 0.65 mm to 0.9 mm. That speeds things up by nearly 50%, and the wider extrusion helps with adhesion if the z-offset is a hair to high.
I am currently running 5,000 mm/s2 acceleration for pretty much everything. I have infill set to 190 mm/s, perimeters set to 170 mm/s, and external perimeters set to 140 mm/s. Nothing seems to go past 160 mm/s with my usual 0.24 mm layer height, because I have flow rate restricted to 21 cubic mm/s.
How did I settle on 21 cubic mm/s? Thin walls had crummy layer adhesion with a 0.48 mm layer height at anything over 22 cubic mm/2 with my knock-off 0.6 mm CHT nozzle, so I scaled it back by one extra just to be safe.
Larger parts spend most of the time printing up at 160 mm/s. Parts like a Benchy vary from 15 mm/s to keep the smoke stack cool, 60 to 90 mm/s around the overhangs of the hull, to 140 mm/s or so just above the hull.
Who cares about Marlin’s input shaper now that we can buy a Bambu A1 Mini for $299?!
Bambu is really smacking us over the head with the amazing specs and price on that Bambu A1 Mini. It can crank out a nicer Benchy than mine using a 0.4 mm nozzle in 14 minutes right out of the box. The new printer from Bambu is a fast, advanced, and priced super competitively.
I think that makes Marlin’s input shaper more important than ever before. I already know what happens when you own a slow printer and buy a fast printer. I can’t easily add input shaping to my Prusa MK3S, so I stopped using it.
I know there are cheaper ways to add Klipper to a printer, but most people are buying $120 Klipper screens. Is it worth spending $120 to upgrade a printer to make it about half as fast as a Bambu A1 Mini? Dialing in Klipper for fast speeds is definitely time consuming. I would feel better putting that $120 towards the faster printer.
Marlin’s input shaper doesn’t cost any money, but is it worth the time and effort getting those speeds dialed in? I don’t know, but spending a couple of hours speeding up an old printer might keep it out of a landfill, and that seems like a win to me!
Why aren’t you sharing your PrusaSlicer settings and printer settings?
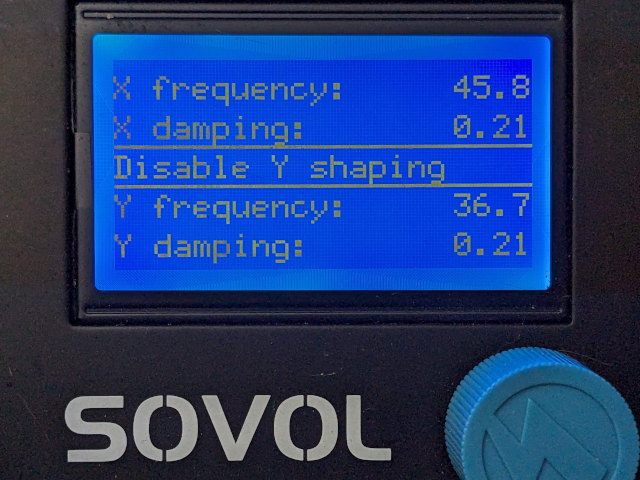
First of all, I am extremely uncertain that I have tuned my input shaping correctly. That said, it does seem to be working pretty well! I left the damping alone on both axes, and I am only right now wondering if that is something I should be tuning. I set the frequency on the X-axis to 45.8, and the Y-axis is at 36.7. That may very well be the most useful piece of information I have.
What about the slicer profiles? My profiles are a mess. Copies of copies of profiles with awful names. If I am going to export this for public consumption, I would need to clean it up. If I am going to clean it up, it really had better be of use to someone!
I am using a 0.6-mm nozzles with a 0.24-mm layer height. My suspicion is that none of you lovely people interested in Marlin’s input shaper on a Sovol SV06 are interested in using a bigger nozzle. Maybe I am wrong. If I am wrong, let me know in the comments. That would encourage me to get to work clicking on things in PrusaSlicer.
Bambu sure does give you a lot for your money
I am reorganizing my office. To tidy up my workbench, I printed a large Gridfinity organizer for my pliers. It took up most of the length and more than half the width of my Sovol SV06, and it is the biggest simple part that I have printed using my input-shaping PrusaSlicer profile.
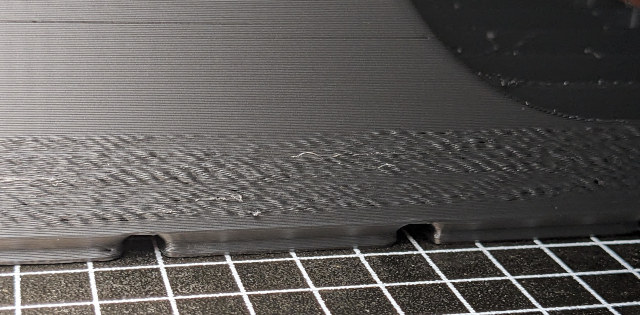
Why does that matter? Long, straight lines let your printer really get up to speed, and they keep your extruder pumping out filament the entire time. I had one side come out quite clean, two sides come out a little icky, and one side of the box had so much underextrusion and poor layer adhesion. Printing 24 inch lines without a retraction, z-hop, or non-printing move just wasn’t giving the heater any breathing room to catch up!
Most of this part printed at the 22 cubic mm/s that I specified for my max flow rate in PrusaSlicer. I backed that off by one cubic mm/s, I bumped my print temperature up from 200 degrees to 210 degrees, and I bumped my retraction from 0.2 mm to 0.4 mm to compensate for the extra temperature.
Bambu has already done tests like this. They ship you an extremely fast slicer profile that doesn’t push beyond the limits. I didn’t find my Sovol’s limits with smaller prints, but my first big print like this found some flaws.
It would be nice to buy a Bambu A1 Mini or Bambu P1S and not have to think about this at all, but I am not grumpy about it. My large Gridfinity bin is most definitely a usable part. I won’t be wasting 200 grams of filament in an attempt to print a perfect bin. I just made some mental notes, some minor slicer tweaks, and I will see how it goes when I print something similar in a month.
That is another reason why I am not maintaining a slicer profile for the public. I am not excited about immediately printing a test part to see if I found a solution. Maybe I fixed it, maybe I didn’t. I will find out eventually!
- My Bambu A1 Mini – The First Six Hours of 3D Printing
- The Bambu A1 Mini – The Best Choice for Your First 3D Printer
Conclusion
This is getting longer than I anticipated. Maybe we should wrap things up!
It is a weird and exciting time to be shopping for a 3D printer. Bambu is really shaking up the market. I got an email yesterday saying that the Sovol SV06 is on sale for $199, and the Sovol SV06 Plus is on sale for $289. The latter seems to be strategically priced $10 less than the Bambu A1 Mini. Is that a low enough price for this particular set of compromises?
Has Bambu’s latest release managed to make them your first choice for your new 3D printer? And do you want to print with four colors? Or do you need a big, honkin’ printer like the Sovol SV06 Plus? If you are moving up to a Bambu A1 Mini or Bambu P1S, will you be trying out Marlin’s input shaper on your old printer to extend its useful lifespan? Let me know in the comments, or stop by the Butter, What?! Discord server to chat with me about it!
- The Sovol SV06 – Is It Still Worth Buying in 2024?
- The Sovol Comgrow T300 Only LOOKS Like a Bambu A1
- My Bambu A1 Mini – The First Six Hours of 3D Printing
- The Bambu A1 Mini – The Best Choice for Your First 3D Printer
- Marlin Input Shaping, My Sovol SV06, and My Twenty-Minute Benchy
- The Bambu A1 Mini is So Good I Had to Delete an Entire Blog Post!
- The Sovol SV07 and Rethinking My Dislike of V-Wheel 3D Printers
- My Sovol SV06 — Two Months Later
- Please Don’t Take Apart Your Sovol SV06 To Grease The Bearings!
- My journey to a new 3D Printer: the Bambu Lab X1-Carbon at Brian’s Blog
- Refurbished Sovol SV06 at Sovol.com
- Sovol SV06 Plus at Sovol.com
- Sovol SV06 at Sovol.com