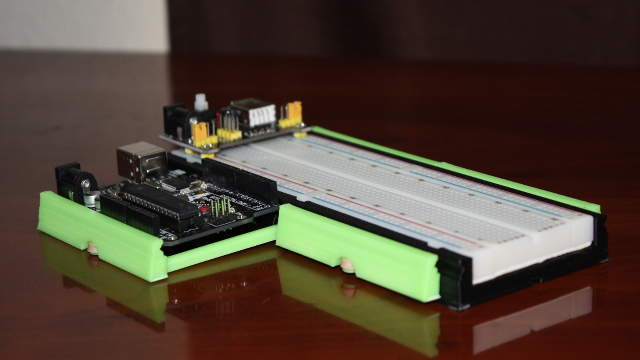
My friend Brian and I have been messing around with breadboards, Arduinos, and ESP8266 boards quite a bit during the past several months. We learned pretty quickly that it is difficult to keep the various boards you’re working with from flopping all over your desk, and it is even harder to line things up to take a decent photograph.
There are a lot of brackets on Thingiverse designed to hold a breadboard and an Arduino in place. I didn’t think it would be difficult to adapt one of those designs to also hold a tiny ESP-01 WiFi board in place as well.
Then I saw the awesome-looking Stickvise over at Hackaday.com. The Stickvise is quite versatile, but it is primarily used for holding circuit boards in place. The springs hold your part securely in the Stickvise while still allowing for parts to be swapped in and out quickly.
This gave me the idea of adding some spring-loaded vise jaws to a breadboard. I didn’t use springs, though. I used simple rubber bands.
Skipping to the completed breadboard “spring” vise
Here’s the final iteration of the breadboard spring vise. It works even better than I expected. I can load it up with Arduinos or other circuit boards and shake it around quite vigorously, and all the boards stay in place. I never thought it would be this sturdy, and still takes almost very little time and effort to insert or remove something from the jaws.

The entire breadboard vise assembly consumed less than 75 grams of ABS plastic. That is only about $1.25 worth of material.
Let’s go through some of the design process.
Offset rails
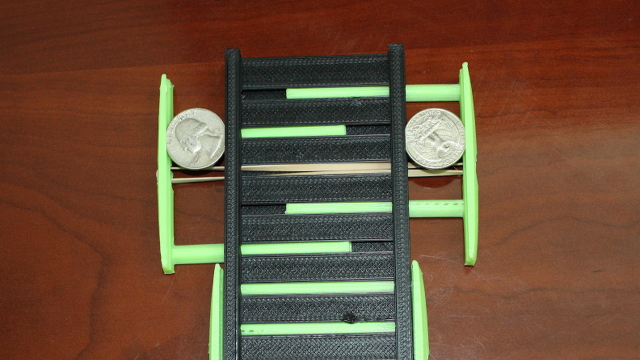
I wanted to be able to attach two vise jaws along each side of the breadboard. That means the rails that the jaws ride on can’t be directly across from each other. One solution to this problem would be to use different rail spacing on each side of the vise. I didn’t like this solution. I wanted to be able to print a single part that would work in any location around the breadboard.
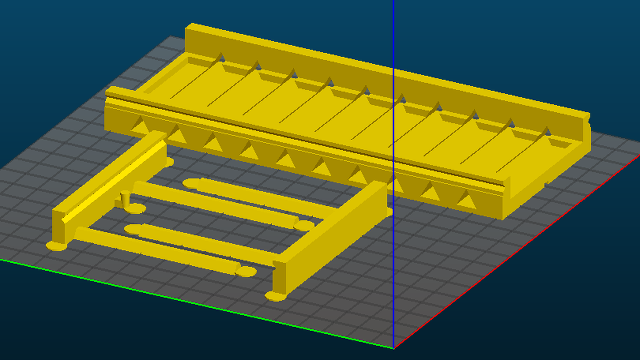
I ended up offsetting the rails to one side. That way the rails wouldn’t touch when you spin the clamp around 180 degrees. I wanted to have a pair of jaws along each side of the breadboard, so I divided the length of each jaw into five sections. Each section can have a rail, a post for a rubber band, or nothing at all. The center section always gets a rubber band post. That way the posts are always directly across from each other.

They say a picture is worth a thousand words.
Why are the rails shaped like triangles?!
Round rails were the first thought that came to my mind, but they wouldn’t print very well if they’re laying down flat on the print surface. Printing them standing on end wasn’t a good idea, either, because they’d be weakest in the direction where they needed to be strongest!
Square rails would print just fine. Unfortunately, the slots they’d be inserted into would have a bridge on top. That bridge might sag, and the rails wouldn’t fit well if they did.
Triangles have neither problem. They’ll print just fine laying down, because they’re flat on the bottom. They don’t have the bridging problem, because the sides are 60-degree angle.
Three-sided cylinders are problematic
I thought using a three-sided cylinder for the rails was a smart idea—it wasn’t. It would have been easier to work with the triangle if I knew the length of the sides or the height of the triangle. Instead, I knew the diameter of a cylinder. The diameter of a weird, three-sided cylinder. That meant I was often just guessing at dimensions until things looked right. I really hated doing that in OpenSCAD.
Spacing the rails
At first, I was barking up the wrong tree, and I was making things more complicated than they needed to be. I was trying to space up to five rails out equally along each jaw. That means I would need 10 slots in the base piece in order to mount two jaws on each side.
I had a lot of trouble getting the math to look right. When I finally did, I realized that it would be difficult to transfer this logic over to the base of the vise in order to carve out the slots. It would have required transferring the spacing from two sets of jaws over to the base, and that seemed too convoluted.

Instead, I did the math to evenly space 10 slots along the base piece of the vise. From there, it was easy to reapply that same math to the jaws.
Rails Vs. Slots!
On my first iteration of the vise, the rails were way too flimsy, and the slots were way too small. I really wanted to know how viable this design was, though, so I spent five minutes with some sandpaper to force everything to fit together.
The vise was able to do its job, but the rails were quite flexible. I only had to adjust one variable to make the rails and slots bigger, but they still weren’t going to fit.
I bumped up the width of the rails from 5mm to 8mm. That increased the cross sectional area by over 2.5 times, and it was definitely beefy enough now. I increased the size of the slots by an additional 10%.
I should mention something here. The triangular slots only have a ceiling near the outer edges. I did this to save on print time and materials. I just had to make sure the the walls were high enough to hold the outside edges of the rails in place.
In part due to my measurement guesswork regarding the “diameter” of the 3-sided cylinders, I forgot to increase the height to compensate for the taller rails. They weren’t held in place at all, so they were just flopping around in there.
I chopped out a small corner of the breadboard vise, and I printed some test parts are various sizes. I zeroed in on a good size on my second test.
Always test a small section
The breadboard spring vise has 10 rails that need to fit into 10 slots. I should have carved out a single rail and a single slot piece right from the beginning. It is easy to do, and it would have saved me quite a few hours of printing time.
Download my Breadboard Spring Vise
The OpenSCAD source for my breadboard spring vise along with STL files are available for download at Thingiverse and Github.
If you can’t print your own, you can buy a Breadboard Spring Vise at Tindie.com!
- Breadboard Spring Vise at Thingiverse
- Breadboard Spring Vise at Github
- Breadboard Spring Vise at Tindie