Craft Coffee - Revisting The French Press And Moka Express Pot

| Comments

I made a terrible mistake last month. I adjusted my Craft Coffee subscription to an even lighter roast setting, and this was just too light for my espresso machine. One of the three coffees, the one from Quasar Coffee, was only just barely dark enough and oily enough to work, and I failed as often as I succeeded with it. When I did succeed, though, it was delicious!

The other two were just too light and too dry. No matter how hard I would tamp, no matter how fine I would grind, and no matter how much I’d overfill the basket, it just wouldn’t work out. Most of the water would just work its way around the puck, leaving it dry in the center.

My mistake did make for an interesting couple of weeks, because I got to make use of some of my old, disused coffee brewing equipment—my Moka Express pot and my French press!

Old equipment with a new grinder

My old coffee equipment has been sitting in a cabinet for years. I’ve never had the opportunity to use quality beans with this gear, and I most certainly didn’t have a quality grinder while I was still using the French press and Moka Express pot.

They say that the grinder is the most important piece of equipment you can buy. My Baratza Preciso has a microadjustment dial that comes in handy for making espresso, but I recall reading that it is still a good grinder even way up at the extremely coarse French press range.

All three of my Moka Express pots and my French press came from a store called Brandsmart USA. They were impulse purchases, and they were all ridiculously inexpensive—I haven’t seen them priced that low anywhere else.

The French press

The French press and I have never gotten along very well. I just can’t ever manage to get the right ratios of cream and sugar no matter how hard I try. Things worked out a little better for me this time.

I knew that the correct grind for the French press is very coarse, but I didn’t realize just how coarse. My research suggested that I start at a setting of 32 on my Baratza Preciso grinder. I can tell you that I’ve never before ground coffee anywhere near this coarse.

For the sake of science, I followed Inteligentsia’s instructions to the letter. Everything went surprisingly well, and I actually enjoyed the coffee. The early attempts were a bit sour, but moving the grinder up to a setting of 34 seemed to correct that quite well.

The Moka Express latte

We really used to enjoy our Moka Express pots. We mostly used it to make iced and frozen drinks in an attempt to create something akin to a Starbucks Frappucino. I never managed to make a hot coffee beverage with the Moka pot using the cheap beans we used to buy. Everything came out tasting bitter and burnt.

My first attempt at an imitation latte using the Craft Coffee beans in the Moka Express pot was almost a success. It was definitely a passable latte, but it tasted a little off. My research suggested that I should start at a setting of about 14 on the Baratza Preciso, and my first instinct was to turn that up a notch or two. That would have been a rookie mistake.

As it turns out, the inside of my Moka Express pot was quite dirty inside—especially deep in those hard-to-reach places. I broke open my bottle of Caveza, took apart the Moka Express pot, and soaked everything for a few hours. When I was done, it looked new and shiny.

I was absolutely amazed with the results. My Rancilio Silvia may have me spoiled, and the latte-like beverages that I made with the Moka Express pot weren’t up to that high standard, but they were much better than anything I ever managed to make in the past. I have much more respect for the Moka Express pot than I did just a few weeks ago.

I was definitely cheating. I used the Rancilio Silvia to steam the milk. In the old days, we had some cheap contraptions for frothing milk, but they didn’t work nearly as well as Miss Silvia.

The Verdict

I really did miss the lattes from my Rancilio Silvia. You could buy twenty Moka Express pots for the price of a Rancilio Silvia, and you will be able to make a tasty, latte-like beverage, but it just isn’t the same. I was so excited when I was notified that my next box of Craft Coffee was on its way.

It was so nice to get back to making real lattes again. It was fun to see how much better the Moka Express experience is when using good beans and a proper grinder, but I’m glad this experiment is finally over.

Use my referral code “pat1245” and you’ll get 15% off

If you use my referral code (pat1245) when checking out at Craft Coffee, you will get a 15% discount. Not only will you save money, but they tell me I’ll get a free month of coffee with every order. That sounds like a good deal for both of us!

Bioshock Infinite Workaround For Linux With AMD Processors

| Comments

I’m late to the “Bioshock Infinite is now available on Linux” party. I didn’t notice it until a few days ago when Steam popped up a message telling me that 2K Games was having a big sale. I looked at the list, and there was Bioshock Infinite. Not only was it available for Linux, but it was also 75% off. I decided to grab the “Season Pass Bundle” and give the game a try.

I had to wait almost an hour for the 42-GB game to download. Things went just fine for a while, but the game froze up on me before even getting out of the rowboat. I figured that it might have been a fluke, so I tried again. I believe I made it off the rowboat on my third attempt, but I didn’t get much farther than that.

I tried tweaking all sorts of things. One red herring I encountered was when I switched from my custom 3.19-pf2 kernel to the stock Ubuntu kernel. I probably played that time for nearly an hour. I made it far enough to pick up a gun, then the game froze up again. No matter what I did at this point, I was consistently freezing up near the start of the first gun battle.

When it freezes up like this, the video stops but the music just keeps on playing. I end up having to kill the bioshock.i386 process.

I asked Google, but Google didn’t know

The Internet wasn’t terribly insightful this time. I did get a small clue while browsing r/linuxgaming on Reddit. In the comments on one of the handful of Bioshock Infinite posts, there were three people with a similar problem replying to one another. They all had various multicore AMD processors. My FX-8350 is a Piledriver CPU, and I’ve found forum responses from people with Bulldozer and Phenom chips.

This was enough of a lead to help narrow my search considerably. I found a Steam forum post with a considerable number of people in the same boat. The consensus seemed to be that using taskset to limit Bioshock Infinite to fewer cores either completely works around the problem, or at least reduces the incidence of crashing quite significantly.

I tried using taskset to limit the game to just one core, but the intro videos couldn’t even play smoothly. I ended up limiting the game to two cores, and this seems to be working quite well. My frame rates are a little lower, but the game is definitely playable. I haven’t crashed again, but I haven’t played much more yet, either.

A better fix than taskset. I hope!

I installed the amd64-microcode Ubuntu package last night. This package puts CPU microcode patches into your initrd, and these are loaded into the CPU on boot. I was too busy to reboot last night, but I gave it a shot today. I rebooted, removed all the taskset nonsense from Bioshock Infinite’s launched options, and then played some Bioshock.

The game now runs better than ever. It feels smoother—enabling all eight cores made the game really choppy the last time I tried, and I was able to make it through two checkpoints without any problems. This seems like a much better fix than using taskset.

If you’re running Ubuntu or Debian, all you have to do is run the command sudo apt-get install amd64-microcode and then reboot. If you’re having trouble and using an Intel processor, there is also an intel-microcode package. Installing that and rebooting may be helpful, but I can’t test that.

I’ll keep playing, and I’ll report back here if this continues to be successful.

Update on the better fix

Updating the microcode is definitely working better than limiting the game to just two cores using taskset, but it isn’t perfect. The game froze up again after another hour or two of playing. This time, though, it froze up and wouldn’t come back. There were no NVRM errors this time, though!

I’m currently running with both the AMD microcode update installed, and with taskset -c 0,4 set in my launch options. I added the taskset back after freezing up several times in a row. and the game hasn’t frozen up since. We’ll see if the combination keeps working well. I’m not sure if taskset is helping, or if dumb luck was keeping it from locking up on me.

How to use taskset

Using taskset with a Steam game is pretty easy. Open up Steam, and find Bioshock Infinite in your list of games. Right click on Bioshock Infinite and choose “properties.” That will open another window which should contain a button labeled “Set launch options.”

tasket for Bioshock Infinite

When you click that button you will be presented with a small dialog box that contains a single text field. In that field enter taskset -c 0,1 %command%.

Update 1:

On my FX-8350, cores 0 and 1 are completely different cores. I’ve had more luck using a sibling cores instead with taskset -c 0,4. Cores 4 through 7 are siblings of cores 0 through 3. Sibling cores each have their own integer processing units, but they share a floating point unit and cache.

After upgrading to the new 349.12 beta Nvidia driver, I decided to take a shot at running Bioshock without using taskset to restrict it to two cores. It didn’t go very well. It froze up pretty quickly, and the mouse felt terrible again.

At this point, I can usually play for a couple of hours at a time without any problems. I’m usually the one that decides it is time to stop playing instead of the game deciding for me, which I think is a big improvement.

The game is still very fragile, though. I’ve noticed that if I “alt-tab” out of the game, it will very likely freeze up on my in the next minute or so. This isn’t as bad as the “multicore freeze.” The game will eventually start moving again, but it will keep freezing at regular intervals.

Unfortunately, the autosave points are way too far apart for this to be of any use.

Update 2:

Sometimes Bioshock Infinite for Linux runs great, and sometimes it doesn’t. Last night, things were going well for 15 minutes before it started freezing up every three or four minutes. This was the less catastrophic sort of freezing, and I was able to make my way to the next save point. I restarted the game several times, but the situation didn’t improve at all.

I figured that I’d have to reboot or restart my X server to improve the situation. I didn’t think it was worth that kind of effort, so I just played Team Fortress 2 instead.

I decided to fire up Bioshock Infinite again today, and I played for over an hour with no problems. There were no reboots involved. It just happened to work. I can’t tell you anything that was different. I didn’t imagine it could really be the problem, but I was even keeping an eye on CPU and GPU temperatures. The temperatures weren’t any higher

Errors to watch out for

When the game freezes up, there are usually some NVRM errors in the dmesg output. I don’t see these when I play any other game. I did see some similar errors in Borderlands 2 when using the first beta driver that supported my GTX 970 video card, though.

1
2
3
NVRM: Xid (PCI:0000:01:00): 69, Class Error: ChId 0004, Class 0000b197, Offset 00002044, Data 0000000f, ErrorCode 00000004
NVRM: Xid (PCI:0000:01:00): 31, Ch 0000002e, engmask 00000111, intr 10000000
NVRM: Xid (PCI:0000:01:00): 12, COCOD 00000026 beed9097 0000b197 00000e0c 0b970283

I did experience some particularly annoying NVRM errors with an Xid of 50. Every time one of these errors showed up in dmesg, the “performance level” of my GTX 970 would drop by one level.

1
2
NVRM: Xid (PCI:0000:01:00): 50,  L2 -> L1
NVRM: Xid (PCI:0000:01:00): 50,  L1 -> L0

The first time the error shows up, the “performance level” drops from 3 to 2. Once this happens, I didn’t see the “graphics clock” go above about 700 Mhz. If I kept playing in this crippled state, it would eventually drop to “performance level” 1.

I have not had this problem since using the taskset workaround.

Nvidia Control Panel Performance Level

Every time this happened, I had to reboot to get back to normal. Restarting the X server may be enough to correct the problem, but it doesn’t take much longer to just reboot.

Bioshock Infinite for Linux keeps a log file at ~/.local/share/irrationalgames/bioshockinfinite/eon.txt. Every time I freeze up, I’ll find a line in that log file that starts with “Skipping draw call,” and then a bunch of lines saying “Ignoring motion.”

1
2
3
4
5
6
7
8
9
10
11
12
13
14
15
16
17
18
[thread 00000001][I][12207]: Ignoring motion
[thread 00000024][W][13336]: Skipping draw call because the draw wouldn't have any effect on any render target, depth stencil or unordered access view, and no occlusion query is being performed.
[thread 00000004][W][20886]: eON_LoadLibraryEx() couldn't load 'atiadlxx.dll', returning NULL!
[thread 00000004][W][20886]: eON_LoadLibraryEx() couldn't load 'atiadlxy.dll', returning NULL!
[thread 00000004][W][20886]: eON_LoadLibraryEx() couldn't load 'atiadlxx.dll', returning NULL!
[thread 00000004][W][20886]: eON_LoadLibraryEx() couldn't load 'atiadlxy.dll', returning NULL!
[thread 00000001][I][21078]: Ignoring motion
[thread 00000001][I][21089]: Ignoring motion
[thread 00000001][I][21102]: Ignoring motion
[thread 00000001][I][21102]: Ignoring motion
[thread 00000001][I][21113]: Ignoring motion
[thread 00000001][I][21124]: Ignoring motion
[thread 00000001][I][21135]: Ignoring motion
[thread 00000001][I][21145]: Ignoring motion
[thread 00000001][I][21176]: Ignoring motion
[thread 00000001][I][21187]: Ignoring motion
[thread 00000001][I][21198]: Ignoring motion
[thread 00000001][I][21208]: Ignoring motion

How is the Bioshock Infinite port?

Aside from the crashing, it seems pretty good. The graphics look great, and my GTX 970 card seems to be able to maintain better than 90 frames per second at 2560x1440 with pretty reasonable settings. I’ll have to go back and tweak those settings now that the game isn’t freezing up on me constantly. I made lots of seemingly random changes just trying to make the game stable!

The controls feel absolutely awful. I seem to have the mouse sensitivity set to about the same speed as I am used to in Team Fortress 2, but it doesn’t feel smooth like Team Fortress 2. A small move of the mouse results in very jarring movements. Bioshock Infinite uses the same engine as Borderlands 2, and I didn’t have this problem there. Hopefully I can steal the relevant bits from my Borderlands configuration files to make myself feel more at home!

Improving the mouse situation

Bioshock Infinite seems to be a little fragile. My mouse didn’t feel smooth because I have the polling frequency set to 1000 Hz. Lowering it to 250 Hz has made a huge improvement. It doesn’t feel like Team Fortress 2, but it feels pretty good now.

I also pilfered my MouseSensitivity setting from my Borderlands 2 configuration files. The mouse sensitivity slider in Bioshock Infinite isn’t very granular. One tiny click of the slider makes my mouse either much too sensitive or not nearly sensitive enough. Copying the setting from another Unreal Engine 3 game neatly sidestepped this particular annoyance.

I hope this information helps you with your problems. If it does, I would definitely like to hear about it. If it doesn’t, I’d like to hear about that, too! Please feel free to leave a comment. Maybe I can try to point you in the right direction!

Craft Coffee - Quasar Coffee

| Comments

I had some trouble this month. I adjusted the roast level of my Craft Coffee subscription down one notch from “Medium-Light Roast” to “Light Roast,” and this is pushing things a bit too far for espresso. I still enjoyed some amazing lattes using the beans from Quasar Coffee this month, but it was a lot more work than it should be, and I pulled a lot of terrible shots.

Craft Coffee - Quasar Coffee

I’ve corrected my mistake and switched my subscription back to “Medium-Light Roast.” Things should be back to normal next month. I am using the other two bags of beans to experiment with other brewing methods that I abandoned long ago—the french press and the Moka Express pot.

Quasar Coffee Roasters, Chicago, IL
Producer Chania Estate
Origin Thika, Kenya
Variety SL28, SL34
Elevation 1,500 Meters
Process Washed
Tart pomegranate acidity and pronounced ruby red grapefruit flavor reveal a lingering vanilla bean essence.

I made some pretty amazing lattes using the beans from Quasar Coffee Roasters, but it did like to get away from me and pull way too fast sometimes. Even the fast shots were still pretty good, though.

I’ve never been able to enjoy grapefruit, but I do have a very distinct and negative memory regarding grapefruit juice. I can’t tell you for certain that this pronounced flavor is indeed similar to a “ruby red grapefruit,” but this Kenyan coffee from Quasar Coffee Roasters has a hint of something that brings back memories of that bottle of grapefruit juice.

The vanilla taste is easy to pick out as well, and it is very nice.

I really enjoyed this coffee, but it was pretty difficult for me to pull a consistent double shot of espresso. The margin of error between a near perfect shot and a 12-second waterfall was really narrow with these beans, but some of those faster pulls of the Quasar Coffee still made some delicious lattes. With most beans, a pull that fast results in a pretty sour latte.

Use my referral code “pat1245” and you’ll get 15% off

If you use my referral code (pat1245) when checking out at Craft Coffee, you will get a 15% discount. Not only will you save money, but they tell me I’ll get a free month of coffee with every order. That sounds like a good deal for both of us!

Repairing an Old, Sagging Recliner

| Comments

For years, I had been saying that I wanted some sort of relaxing, comfortable chair for the corner of my home office. I kept saying that it should be a “reading chair.” I’m not entirely sure what that should be, but I quickly figured out that it would need to be a recliner of some sort.

Lane Recliner

I’ve been shopping around for several years. Yes, years. Nothing I found seemed worth the time, the effort, or the money. I didn’t expect to sit in it very often. I just wanted a place to occasionally read, and I wanted something to point at the television connected to the arcade cabinet. I couldn’t justify the money to buy a quality recliner, and all the cheap recliners I tried were rather uncomfortable.

Craigslist is a lot of work

Late last year, I pulled the back seats out of the minivan and started searching Craigslist for a suitable recliner. I don’t like using Craigslist. Finding what I want isn’t always easy, and communicating with the sellers is often strange or confusing. After two months of on and off searching, I finally saw something I wanted.

The Tag From The Lane Recliner

It was an older Lane recliner listed for $100. It is a big, brown “leather” rocking recliner that was manufactured in 2007. I’ve since learned that they still sell this model. It is part of Lane’s Summerlin line of furniture, and I have seen it listed for $900, but I assume you can haggle on that price.

Amazon seems to have an absolutely gigantic version of my recliner, the Snuggler Recliner by Lane. My tape measure says that that monstrosity is 12 inches wider than my old Lane Recliner. I doubt that it could fit in my already cramped office!

The Lane recliner isn’t perfect

It appears to be in pretty good condition, but the couple that sold it to me were very insistent about me sitting in the chair before I paid for it. It was obvious that the seat cushion was sagging quite a bit, but I told them this was fine. I didn’t expect to sit in it very often.

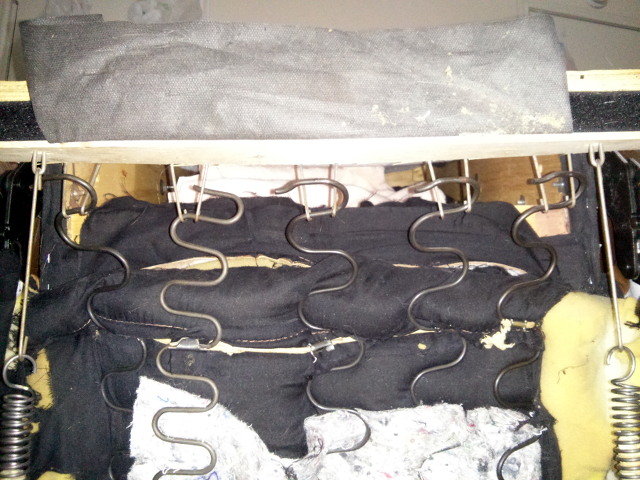
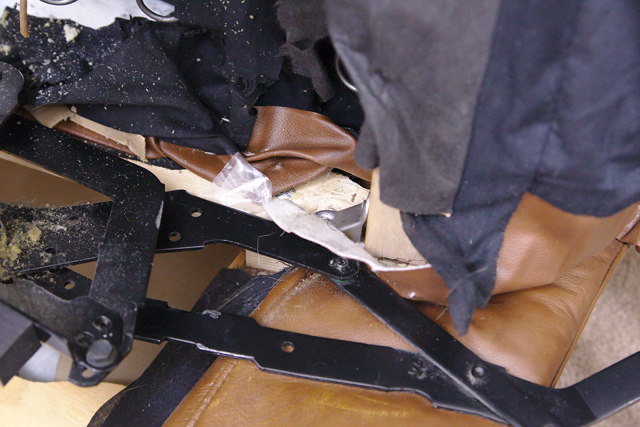
I was wrong about that. I sat in the chair every single day, and the sagging was starting to bother me. It was alright when I first sat down, but if you wiggled around a bit you’d end up with a 2x4 bumping against your back. I decided to flip the chair over to investigate.

One of the five springs was gone

The missing spring was very obvious when I flipped the chair over. Once I saw the problem, it also became obvious that the sagging seat was leaning to one side. This ended up being really easy to fix. I was able to buy a replacement spring from Amazon for around $13.

Putting the spring in place was slightly more difficult than I had anticipated. The hooks were still in place on the chair, but stretching the spring was a more complicated endeavor than you would expect.

I have no idea what I’m doing

The first thing I tried to do was muscle the spring into place with my bare hands. I thought I was doing a pretty good job at first, but once the spring was stretched to within about ¼” of the hooks the chair started lifting off of the ground! I tried holding the chair down with my foot, but it was no use. I just couldn’t get the spring into place.

I ended up using a pry bar to stretch the spring into place. Then it was just a matter of using my other hand do guide the end of the spring over the hook.

One Of These Springs Is Not Like The Other

The new spring was a HUGE improvement. It made it feel like a completely different chair. This created a new problem, though. The new spring is stiffer than the four old springs. The difference wasn’t as drastic as having a missing spring, but I knew it was there.

It was Christmas time at this point, so I decided that I would wait until after the holidays to order another spring. I thought about replacing all the springs, and I still might, but the two outer springs seem to have a kind of curve to them. I’m not entirely sure if replacing them would work out well.

I need more patience

I got bored one night during the holidays, and the uneven springs were bothering me. I didn’t have another replacement spring, and they aren’t available with Amazon Prime shipping. I did have an idea, though, and I thought it was a good one.

The springs follow a repeating S-shape, and I decided to try stretching the opposite spring tighter by one notch. It worked surprisingly well. The seat feels very evened out now!

A flaw in my repairs

At this point, I flew up to my home-town. I bragged to all my friends about what an amazing job I did fixing up this recliner, and I told them about all the things I learned in the process.

A couple weeks after all this bragging, I flew back here and returned to my home office. After a few days of sitting in my chair, I noticed that it wasn’t as comfortable as I thought it should be. The back edge of the seat was sagging a bit, and it was getting stuck under the frame of the seat back.

If I pull the back of the seat cushion up and out from under the back, then everything is fine. At least until you sit in the chair three or four more times. Then you have to repeat it.

This was easy enough to fix. All I did was pull the remaining springs one notch tighter. I don’t know if it is perfect, but it is working out quite nicely.

The Springs In The Seat Back Of The Recliner

There are similar, but weaker springs in the seat back. I also ended up pulling one of those springs tighter by one notch. That made the lumbar support a bit more stout, and now my lower back never ends up sagging into the frame.

Was it worth the effort?

I think it was definitely worth the effort. At the very least, I saved a couple of hundred dollars compared to the brand-new chairs I was looking at, and this chair is much better for me. Most of the new chairs that I looked at were too small for me.

With this Lane Summerlin recliner, I don’t have to slouch to lean on the armrests, like I do with many recliners. The arms are also far enough apart that I can easily fit my elbows in between them, which is much more comfortable when using my laptop.

I am surprised how often I actually use the recliner here in my home office. Had I known that, and had I known how much I like this particular model, I would have gladly paid the $900 for a brand-new Lane recliner. I would have never figured this out, though, if I hadn’t bought this used model, so I think I made the right choice.

The repairs were easy enough, but I did spend a lot more time that I should have tinkering with the various springs. That is partly because I enjoy tinkering, and partly because I wanted to make sure I had accurate enough information for this blog post.

If your recliner is sagging like this, I’d definitely say that it is worth flipping it over and taking a look at the springs!

UPDATE I replaced all the springs!

My friend Brian said he needed my help. He had a nasty old couch to put out with the trash, but he couldn’t carry it alone. Being that I’m a helpful guy, I headed over to give him a hand.

When I got there, I realized this old couch probably has a whole mess of springs inside. We flipped it right over, and I got pretty excited. At Amazon’s prices, I bet there were $200 worth of springs under there. Before taking the couch to the curb, I cut out six or seven springs to take home.

The couch springs might be an inch shorter than the springs that came with my Lane recliner. That’s definitely close enough, and now I have a full set of matching springs. I should have purchased a full set of matching springs to begin with, because this is working out quite a bit better. Replacing the broken spring was a huge improvement, but I didn’t realize just how much the seat was still sagging after my initial repairs.

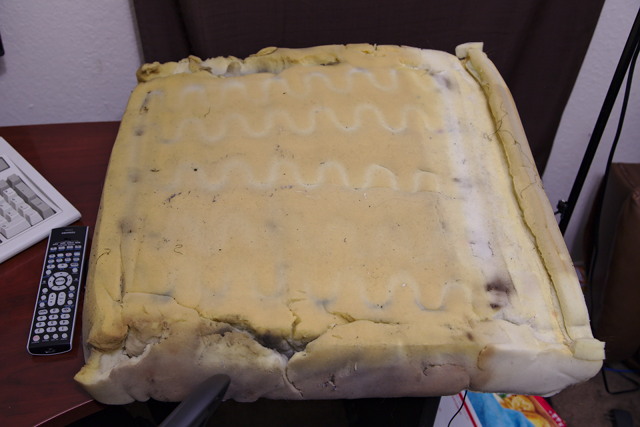
This time while I was in there, I pulled out the seat cushion foam to take a better look at it. It is in terrible condition. One of the seat springs has torn half way through on one side, and the back end has been compressed into a wedge shape.

I should replace the foam. You can get huge sheets of 4” thick high density foam at Amazon. I don’t have a good place to store the extra foam here, so I’m going to wait on that until we move into a bigger house next year. In the mean time, I rotated the cushion 180 degrees.

Craft Coffee - Rising Star Coffee

| Comments

I received a box from Craft Coffee about a month ago, and I already wrote about two of the coffees in that box. One of those three coffees was Ethiopian, so I decided to save that bag for last.

Craft Coffee - Rising Star Coffee

I don’t think I’ve ever met an Ethiopian coffee that I didn’t enjoy, and this bag of coffee from Rising Star Coffee is no exception. This Ethiopian Sidama might be every bit as delicious as the Ethiopian Yirgacheffe I had from modcup last year.

Rising Star Coffee, Cleveland, OH
Producer Korate
Origin Sidama, Ethiopia
Variety Various Varietals
Elevation 1,600-2,000 Meters
Process Washed
With notes of blueberry and sweet spices, this coffee has citrusy qualities and an awesome layer of chocolaty flavors.

This coffee from Rising Star Coffee is excellent. I had my double shots of espresso tuned in pretty quickly, and I have been making some lattes that rival the very best that I’ve ever made.

It has that fruity flavor that I’ve come to expect from Ethiopian coffees, and it is very smooth and delicious. If the shot pulls even just a little too fast, I am left with a bitter aftertaste. It has been better if I err on the slow side, though, because even the slowest shots that I’ve pulled have been delicious—not even the least bit sour.

Use my referral code “pat1245” and you’ll get 15% off

If you use my referral code (pat1245) when checking out at Craft Coffee, you will get a 15% discount. Not only will you save money, but they tell me I’ll get a free month of coffee with every order. That sounds like a good deal for both of us!

zsh-dwim: Simple chmod and chattr Transforms Are Too Simple

| Comments

Late last year, my friends and I were playing quite a bit of Borderlands 2. If you only have a finite amount of time, multiplayer Borderlands 2 involves a bit of cheating. Instead of farming the same items over and over again for all your friends every time you level up, it is much easier to just duplicate the items.

Duplicating items is very easy, and it involves switching your profile.bin file back and forth between read-write and read-only. That involves a lot of alternating chmod -w and chmod +w` commands. I must have done this hundreds of times before realizing that this would be an excellent fit for zsh-dwim!

What should zsh-dwim do with chmod?

This is a much harder question to answer than I had anticipated. I ended up choosing the most simple option—just flipping the state of the plus and minus signs. I had some other ideas, but I couldn’t decide what was actually appropriate.

I thought about making zsh-dwim check the current permissions of the files on the command line. Then it might just be a simple matter of setting the permission options on the command line to match the inverse of the actual permissions of the file. This seemed like an excellent idea at first, but the more I thought about it, the more complicated things became.

What if there are multiple files on the command line? What if the permissions on all of those files don’t match? What is the correct assumption to make in this case? Should zsh-dwim just check the first file? I don’t know if there is a good choice to make here.

There are other interesting options besides checking out the current permissions of the files on the command line. It might be interesting to have zsh-dwim toggle one +/- sign each time you press the key. If zsh-dwim could maintain a bit more state information, they could flip in a nice, predictable order.

This would probably work out alright if there were only two + or - signs on the command line. Any more than that, and the number of key presses required to reach the state you’re looking for could get pretty high.

Should zsh-dwim be stateful?

I am tempted to add some state information to zsh-dwim. It would be neat to even be able to better cycle through a sequence of related transforms. I want to be able to just hit a single key and have zsh-dwim just “do what I mean.” I don’t really want to be banging on the key over and over again, and I most definitely don’t want to be stuck cycling through any extra useless transforms while looking for the right one.

These new transforms may be a little too simple, but they are handy enough as they are, and I think they’re good enough for now.

What do you think? Leave a comment and let me know. I’m interested in hearing you opinion!

3D Printed Monitor Bracket

| Comments

I’ve been working on my biggest, most complicated OpenSCAD part since November. It is a cover to hide the cables coming out of the back of my monitor stand. It feels like a long time to be working on the same print, but I did print out a very successful version of this part back in November. The teeth that were meant to hold it in place worked better than I had anticipated, but my measurements were off by about 4 mm.

A Cable Cover For My Monitor Stand

It fit well enough, and I left it on there for about a month. Unfortunately, I knew that it was wrong, so I had to correct the model and print another copy. I was printing the updated part over the weekend, but I had a slipping Y-axis during the first half of the print.

Keep an eye on your belts

I actually noticed the Y-axis belt vibrating around during the print. This belt was one of my biggest problems in the first weeks of owning my Prusa i3 printer. It is just a little too long, and I can’t really get in there to shorten the belt properly without taking the build plate completely apart.

A Failed 3D Print

My quick solution was to use the spring from a clothespin as a belt tensioner. It worked very well, but I suspect that the spring has been constantly loosening. I tried to find a way to put tension on the belt while the printer was running, but that wasn’t an easy task. It is hard to make out in the pictures, but I can see how much smoother it is during the section where I was able to add some temporary tension.

After the failed print, I was able to tighten that spring back up. There were two other problems. It was getting too late in the day to start another eight-hour print, and my spool of ABS filament is running low. I don’t know if there is enough material left for such a large object.

A Successful Print

Not wanting to end the day on a failed print, I decided to design something simple.

From zero to printing in less than 45 minutes

I decided to print a pair of brackets to hold my monitors in place. The monitor stand does an excellent job, but the frames of the monitors are made of thin sheet metal. They flex quite a bit if you push on them.

The Final Bracket Design

I used my handy angle finder to figure out precisely what angle my monitors are sitting at in relation to each other, and I went to work designing a simple bracket in OpenSCAD. I don’t mean to brag, but I am really impressed with how quickly this process moved along. I was able to clear off the printer, correct the tension on the belt, design the new brackets, and start printing them in less than 45 minutes.

The first set of brackets

The first set of brackets did the job, but they weren’t perfect. The top bracket was a few mm too wide, and it was hitting a bulge in the back of the monitors. I also didn’t know that the power connector for the backlight is in the bottom corner of the monitor, so the bottom bracket wasn’t going to fit over that.

A Huge Gap With The First Set Of Brackets

Thankfully, ABS is very east to cut. I just clipped everything down so the brackets would fit, and they did a most excellent job. If I wiggle one monitor around now, they both wiggle in unison. And best of all, they don’t squeak if they rub up against each other!

There was another small issue. The little wedge on the inside of the bracket was keeping the monitors from touching. Clipping some of that wedge out improved things a bit, but the monitors could still only get so close together. At this point, they were roughly 0.1mm apart. That is quite close, but I wanted to improve on that.

The updated set of brackets

Updating the bracket model was easy. I lowered the value of my length variable by a few mm. I also made the length of channel that’s carved out of the bracket a few tenths of a mm longer. This made that troublesome wedge a bit smaller and got it out of the way.

There's No Gap With The Final Set Of Brackets

The first set of brackets were identical, but now I needed to leave room for the power connector on one of the brackets. Duplicating the brackets was simple enough. I just moved the bracket into a module—OpenSCAD calls their functions “modules.”

That made it very easy to create a pair of brackets, and to carve a section out of one to make room for the power connector.

They work great—I just wish I didn’t have to look at them

My monitors have never been this close together, and they have never been this stable. I have wished for a setup this solid since I bought my first pair of LCD monitors back in 2001.

I just don’t like the way they look. I like the bare, clean look of the metal frames of my debezeled monitors. I don’t like ruining that with a pair of black plastic bricks. Unfortunately, I don’t think I can have my cake and eat it too.

Both Iterations Of Monitor Bracket

The only other reasonable solutions that I can come up with involve hiding some sort of brackets behind the monitors and attaching them with some sort of adhesive. That would be less than ideal. I like being able to easily move my monitors around. It makes them easier to clean, and it makes it easier to access the connectors and wiring.

I think that I am going to keep using them. This final set of brackets is keeping my monitors ridiculously close together. I can’t even fit my 0.04mm feeler gauge between them. For reference, a dollar bill is around 0.1mm thick.

They’ve been in place for almost a week, and my QX2710 monitors haven’t budged. The brackets are doing a great job of making up for the flimsiness of the monitors’ sheet metal.

Craft Coffee - Perc Coffee and Vigilante Coffee

| Comments

My Craft Coffee experience is changing a bit this year. Last April, my friend Brian bought me a six-month subscription to Craft Coffee. He knows I enjoy coffee, and he knows that I set a blogging goal for myself. He thought that having some coffee show up once a month would get me something extra to write about each month.

That has worked out quite well. I have enjoyed recieving coffee each month, and it has been a lot of fun writing about all the coffee that shows up. I decided to include my little referral code in each blog post. I didn’t really think anyone would use it, but people are using it. At first they were using it often enough that my subscription was slowly being extended, but now it is being used quite a few times each month. It is now being used at a rate beyond which I can drink enough free coffee.

Three Bags of Coffee from Craft Coffee

The wonderful people at Craft Coffee have helped me increase my order from one 12-oz bag every month up to three 12-oz bags each month. This is probably more coffee than I can manage to drink in four weeks, but it should make my writing a bit more interesting.

Being transparent about all of this free coffee

I’m trying to rewrite the “referral code” blurb at the end of these blog posts. I’m not doing a very good job. This is probably because I am a terrible salesman, and I don’t even want to be a salesman.

Even if no one was using my referral code, I would have paid to extend my Craft Coffee subscription. I still believe that Craft Coffee is a very good value, and the coffee that they send me is much better than anything I have managed to find locally.

Perc Coffee, Savannah, GA
Producer Finca Bella Vista
Origin Santa Ana, El Salvadore
Variety Various Varietals
Elevation 1,450-1,750 Meters
Process Washed
Only a perfect combination of favorable soil, high altitude and sub-tropical climate can produce this creamy cup with notes of orange and brown sugar. Enjoy.

There were three bags of coffee waiting for me when I returned home, and the first thing I did was read Craft Coffee’s notes on each bag. Making a choice as to which bag of coffee to open first was an easy choice. Just read that description. How can I not immediately try the one with the words “only a perfect combination” in the notes. They’re even telling me to “enjoy!”

A Bag of Perc Coffee from Craft Coffee

My first Perc Coffee latte was a little disappointing. This happens to me quite a bit, though, and my recent travels have made me a bit rusty. I’ve been adjusting the grind, and I ended up with an amazingly delicious latte by the third or fourth try.

These beans are roasted slightly darker than I’m used to, but they’re still lighter than what most people probably use in their espresso machines. It doesn’t have huge, easily identified flavors like the amazing strawberry taste of the Yirgacheffe beans from Slate Coffee Roasters. It doesn’t have that amazing peanut buttery smell of the coffee from modcup.

It doesn’t need to have these things. It is just a delicious cup of coffee. I’ve been doing my best to tune in the perfect espresso shot of Perc Coffee for my lattes, and no matter where I land, they’re all delicious. I’ve had a few very short pulls that were close to 1-oz, and I thought for sure they’d be terrible—I was wrong. They were different, but they were still delicious.

With most beans, I usually settle in at pulling a shot that is probably on the ristretto side—about ¼-oz short of a full double shot in about 22 seconds. Usually if I go any farther or longer than that, my latte ends up a little bitter. I purposely pulled a more proper shot near the end of the bag of Perc Coffee. It very nearly filled my 2-oz demitasse cup in about 27 seconds, and it made for another delicious latte.

Vigilante Coffee, Washington, DC
Producer Cabrera Farm
Origin Huila, Colombia
Variety Caturra
Elevation 1,500-1,750 Meters
Process Washed
Clean, sweet and juicy with notes of chocolate and hazelnut, this cup has a velvety mouthfeel and a lingering finish.

Nutella. These lattes that I’m making with the beans from Vigilante Coffee definitely make me think of Nutella. It isn’t as sweet as Nutella, even though I use quite a bit of sugar—it definitely makes me imagine what a coffee-flavored Nutella might taste like.

I’ve had some trouble tuning in the Vigilante Coffee. I am following my usual process for a new bag of coffee. I take a partially wild guess as to the initial grinder setting, and I pull a double shot. I’m usually pretty close, and I am able to move the microadjustment lever to the correct position in about two or three tries.

Vigilante Coffee from Craft Coffee

The Vigilante Coffee has been mocking me the entire time. I’ve pulled about a half-dozen nearly identical ristrettos. I’ve moved the microadjustment lever up three clicks before each new shot, and the volume just doesn’t increase for me. I’m used to the difference between an OK shot and a good shot being only two clicks, so this has been very surprising.

I finally managed to get a longer shot, but it pulled way too fast. The last three clicks took me from a ristretto to a waterfall! It took longer than I would have liked to get here, but I’m now tuned in right around where I want to be.

I’m definitely not complaining, though. Those very ristretto shots all made delicious lattes, and the more dialed in the shots get, the more balanced the coffee from Vigilante Coffee tastes! Delicious coffee often makes up for my rookie mistakes!

Use my referral code “pat1245” and you’ll get 15% off

If you use my referral code (pat1245) when checking out at Craft Coffee, you will get a 15% discount. Not only will you save money, but they tell me I’ll get a free month of coffee with every order. That sounds like a good deal for both of us!

Craft Coffee - Revel Coffee Roasters - Part 2

| Comments

Things are a little different this time. I was up in Scranton visiting and helping out my parents for about two weeks. The timing of the trip wasn’t very well planned, and I didn’t have any delicious coffee to take with me. I stopped at our local Central Market here in Plano, and I picked up a bag of Java Pura’s Ethiopia Sidamo beans to take with me.

This is the first time that I’ve been without my Rancilio Silvia since it arrived, and going back to the old Mr. Coffee espresso machine at my parents’ house was quite a learning experience!

Craft Coffee - Revel Coffee Roasters

The Java Pura beans were almost completely unusable to me with the Mr. Coffee ECMP50 espresso machine. I tried tuning things in as best as I could, but every latte I made was bitter. I had to do something, so I ordered an extra bag of coffee from Craft Coffee. I chose a bag of Yirgacheffe from Revel Coffee Roasters.

I received a bag from Revel Coffee Roasters in October, and I enjoyed it, so I figured that I should give their Yirgacheffe a shot. I almost always enjoy Yirgacheffe.

Revel Coffee Roasters, Billings, MT
Producer Smallholder Farms
Origin Yirgacheffe, Ethiopia
Variety Heirloom
Elevation 1,800-2,000 Meters
Process Washed
A soothing bouquet of lavender prepares the palette for a coffee boasting the sweetness of honey with a light citrus acidity and flavors of stone fruit.

The tasting notes are problematic for me with this bag of coffee because I have no idea what a stone fruit tastes like. In fact, I had to look it up on Wikipedia!

With the old Mr. Coffee Machine

The Yirgacheffe beans from Revel Coffee were a much-welcomed improvement. After a slew of half-finished lattes, it was nice to finally make one that I wanted to finish!

I won’t say that they were GOOD lattes, though. Not compared to what I’ve been making with my Rancilio Silvia. There were no offensive bitter or sour flavors, but the Mr. Coffee espresso machine made a very bland latte. On the plus side, though, it was very easy to consistently reproduce that same mediocre latte.

With the Rancilio Silvia

I only managed to go through more than half of my 12-oz bag of Revel Coffee Roaster beans before I flew home to Plano. This is exciting for me, because it is the first time that I get to compare my old Mr. Coffee espresso machine experience directly to my new Rancilio Silvia.

My skills with Rancilio Silvia have been slowly improving over the last six months. I didn’t have a clear memory of what the Mr. Coffee lattes tasted like. I didn’t know if Miss Silvia was really worth her price tag—she costs almost ten times as much as my old Mr. Coffee machine!

I can say that Miss Silvia is worth every penny. There is absolutely no comparison between two machines. It was a very welcomed improvement coming home to my Rancilio Silvia.

I didn’t have enough Revel Coffee beans to tune in the perfect latte, but I think I came pretty close.

Use my referral code “pat1245” and you’ll get 15% off

If you use my referral code (pat1245) when checking out at Craft Coffee, you will get a 15% discount. Not only will you save money, but they tell me I’ll get a free month of coffee with every order. That sounds like a good deal for both of us!

Craft Coffee - December 2014

| Comments

There was a slight problem with my shipment from Craft Coffee this month. I’m pretty certain that I was the cause of the problem. I ended up receiving three 4-oz sampler packs this month. This made pulling shots for lattes more complicated this month, but also much more interesting!
Coava Coffee Roasters, Portland, OR
Producer The Pacas Family
Origin Lomas de San Marcelino, El Salvador
Variety Bourbon, Pacas
Elevation 1,400-1,600 Meters
Process Washed
Pleasant red grape acidity reveals notes of buckwheat and toasted oats before ending with tannic blood orange stweetness.

I had a lot of trouble with the beans for Coava Coffee. I could pick up hints of all sorts of nice flavors, but nearly every shot I pulled had a bitter aftertaste. Nearly every shot, but not the last one.

I’m usually happiest when I pull a ristretto. My favorite shots almost always end up being about 1.5 ounce double shots pulled in about 22 seconds. I was still aiming for this with the Coava Coffee beans, and this was a mistake. The best shot I pulled was a full 2-oz shot.

If I had more than 4 ounces of this coffee, I am certain that I would have made quite a few more delicious lattes.

Onyx Coffee Lab, Fayettevill, AR
Producer New Kiriti Farmers Coop
Origin Murang’a, Kenya
Variety SL-28
Elevation 2,000 Meters
Process Washed
A soft maraschino cherry acidity complements flavors of dried mango and smooth brazil nut before culminating in a fragrant finish of lemon oil and peppercorn.

This was the second coffee I tried this month, and I did a much better job with this one. I choked up my Rancilio Silvia pretty good on my first attempt, but my second try was pretty much spot on. I don’t believe I pulled a bad shot after that first one.

There’s definitely a fruity component to the taste. I don’t know that I would have identified it as dried mango. I won’t dispute it, but it may just be the power of suggestion making me believe it

This is a very nutty coffee. I don’t think I could compare the flavor to brazil nuts, but that might only be because I don’t care for brazil nuts, so I haven’t had any in years.

I am quite pleased with the coffee from Onyx Coffee Lab, and I would be happy to drink it again, and I would love to see what it could be with a little more tuning.

Magpie Coffee Roasters, Reno, NV
Producer Gondo Cooperative
Origin Murang’a, Kenya
Variety SL-28, SL-34
Elevation 1,650 Meters
Process Washed
A juicy tangerine acidity pairs perfectly with rich kumquat and sour cherry notes balanced by hints of lilac.

I had a bit more luck with the beans from Magpie Coffee. The grinder setting that I was using for the Onyx Coffee Lab beans was a great starting point, so my first latte was delicious.

This Kenyan coffee from Magpie Coffee seems much smoother than Kenyan coffee from Onyx Coffee Lab, but the fruity flavors are much less pronounced. It is a delicious coffee, and I could certainly drink it every day. It just isn’t very exciting.

I don’t think I can choose a clear “winner” between these two Kenyan coffees.

Use my referral code “pat1245” and you’ll get 15% off

If you use my referral code (pat1245) when checking out at Craft Coffee, you will get a 15% discount. Not only will you save money, but they tell me I’ll get a free month of coffee with every order. That sounds like a good deal for both of us!