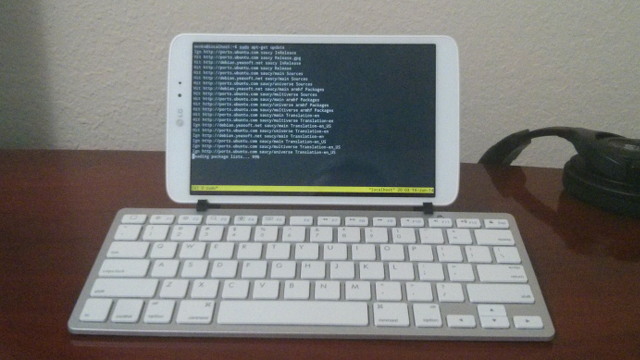
I ordered an adjustable tablet stand not even two days before I decided to buy a 3D printer. That stand is inexpensive and versatile, but it doesn’t do quite what I wanted. What I really wanted to do was attach my LG G Pad 8.3 to a compact Bluetooth keyboard.
There are plenty of models at thingiverse.com that do this, but they are all designed around Apple’s Bluetooth keyboard. I don’t want to use Apple’s keyboard. I don’t expect to use this setup very often, and I want to use cheap hardware. Cheap enough that I could buy extras so I can keep one in each car. Cheap enough that I won’t care if they get lost or stolen.
I found a pretty good keyboard that fits that description. It is a generic knock-off of an Apple keyboard, and it is sold under a dozen different brand names at Amazon. I ended up buying the SANOXY Wireless Bluetooth Keyboard. It was one of the lowest priced of an array of identical-looking keyboards that were available with Amazon Prime shipping. There is absolutely no branding on this keyboard whatsoever, and I am confident the brackets I designed will work with any of the other identical looking keyboards.
The first attempt was a failure
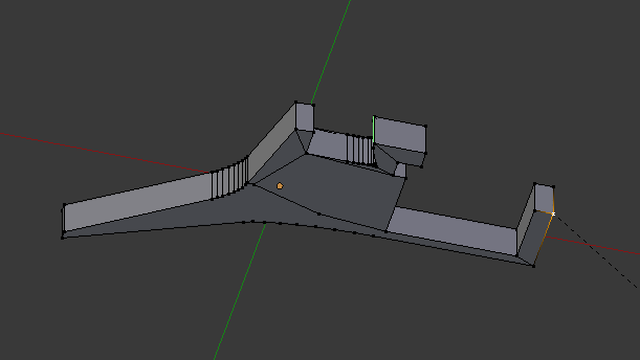
My box of M3 nuts and bolts arrived shortly after I finished up my very first custom-designed part. I wanted to try designing an object with a captive nut. I figured I could build a nut into the bracket and tighten a bolt to clamp the bracket to the keyboard.
I’m both proud and excited that I was able to model a hex-shaped hole into the bracket for the captive nut. It was a little snug, but it worked just fine! The base of my bracket just wasn’t strong enough. When I tightened the bolt, it would just bend the bracket.
This wasn’t how I originally envisioned this part anyway. That first test piece showed me that I transferred my measurements of the keyboard’s battery compartment into Blender correctly, and the dimensions carved into the top for the tablet were pretty close to correct.
I just needed to expand on that initial design, and I would be all set.
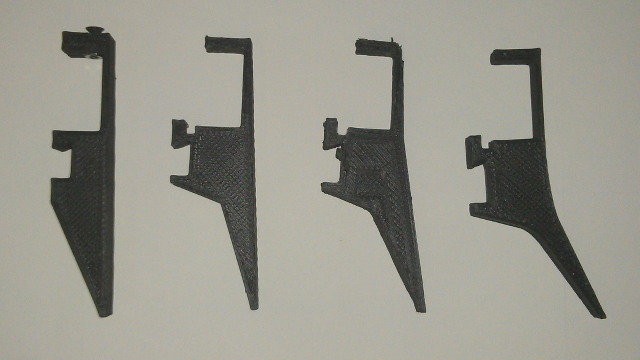
The new clip works great, but there were many failures.
Measure twice and cut once. That’s what they say, and I measured the heck out of this keyboard with my caliper. My dial caliper is SAE, so I spent a lot of time asking Google to convert my measurements to metric. I need to remember to pick up a metric caliper to speed things up.
All my measuring paid off. I was able to get the brackets to snap onto the keyboard on my first try! That was all that worked on the first try, though. As you can see in this YouTube video, I didn’t properly account for the angle of the keyboard.
It seemed like this was going to be easy to fix. I pushed the keyboard into its correct position, and I measured the gap between the desk and the tips of the brackets using my caliper. It was off by about 8 mm, so I adjusted the model accordingly—or so I thought! I repeated this process a few more times, and I still had a wobbly tablet stand.
The finished product
I took one final measurement, and I added about 50% to it. I figured that if that didn’t get me the angle I needed, then nothing would. I also tweaked the depth, width, and angle of the notch for the tablet. I tested one of the earlier pieces with my Nexus 4 phone, and the notch just wasn’t quite wide enough to fit the phone. I don’t know that I’ll ever use this stand with my phone, but it was a simple fix, and I’d like to keep my options open.
I also discovered my new favorite tool in Blender: the bevel tool. Until now, all of my designs have sharp angles. I used my new found knowledge to change two of the sharp corners of this bracket into nice, long, sweeping curves! It looks so much nicer now.
I am very pleased with how they came out. They do their job very nicely, and I learned a lot during the design process. I’m looking forward to taking my keyboard and tablet on a field trip in the near future.
How is the keyboard?
I haven’t typed more than a few paragraphs with this wireless keyboard, but I’m reasonably happy with it. It feels like a laptop keyboard, but the key spacing is almost identical to my big, old IBM Model M mechanical keyboard. I don’t enjoy typing on these short-throw laptop-style keyboards, but proper keyboards and very portable.
It is most definitely worth the $13 that I had to pay for it.
- SANOXY Wireless Bluetooth Keyboard at Amazon
- Tablet Keyboard Stand at GitHub
- Tablet Keyboard Stand to thingiverse.com