I’m Managing My Passwords with Bitwarden now!

| Comments

Passwords are hard work. We can’t use simple passwords, because they’ll be easy to guess or brute force. We can’t reuse passwords, because when a random Internet forum’s database is compromised, we don’t want anyone to use that data to steal our Slashdot, Reddit, or bank account. What should we do?

Bitwarden Window

I’ll be surprised if you’re not already using a password manager. You’re probably using something like 1Password or LastPass to store your passwords. Maybe you’re an old man like me, and you’re still using KeePass. It almost doesn’t matter what you use. You need to be using something, right?


What have Pat and Brian been up to lately? To find out you can check out the latest episodes of The Butter, What?! Show


My life up until today

I’ve been using KeePass for a long, long time. I couldn’t even take an educated guess about when I started using it. The only change I made was to upgrade to KeePass2 at some point. Even that was a long time ago!

KeePass is an encrypted password database. Your password database is stored locally, and KeePass has a crufty but usable interface that lets you keep track of usernames, passwords, and URLs. There are plugins to integrate KeePass2 with various web browsers, and it has the ability to automatically type your username and password into various dialog boxes.


Syncing your database between your devices is a problem you have to solve on your own. I store my KeePass database file in an encrypted Seafile library. That keeps the database in sync on my desktop, laptop, and tablet. The Android Seafile client doesn’t actually sync files, so I use SyncThing to keep the database on my phone up to date.

The storage devices on my desktop, laptop, tablet, and phone are all encrypted. The KeePass database is encrypted. My Seafile library is encrypted. There’s encryption all over the place, and for the most part, the database doesn’t leave my control. I don’t own my Seafile server, though.

What’s the problem?

All this stuff works fine. All these layers of encryption are nice. KeePass’s integration with Chrome and Firefox works just fine. Getting sync going was easy, but required a bit of effort syncing to Android. Once I had it set up, it worked just fine. Why not keep using KeePass?

To tell you the truth, I probably would have kept using KeePass for years. Last week, I saw Bitwarden mentioned in a comment thread somewhere. I didn’t think much of it. I just assumed it was another attempt at a KeePass replacement.

Then I saw it mentioned again a few days ago, and I realized that Bitwarden is attempting to be a replacement for LastPass or 1Password. That piqued my interest. An open source LastPass equivalent that I could host myself sounds awesome!

Bitwarden Family Collection Sharing

1Password and LastPass have one particular feature that KeePass will never be able to have. They allow you to share passwords with your friends and family. This wasn’t a deal breaker for me, but I imagine it will come in handy. With Bitwarden, our Netflix and Hulu passwords won’t get out or sync between mine and my wife’s KeePass databases!

I’m using Bitwarden, but I’m not hosting my own server

A few nights ago, I did a bit of research on Bitwarden. I’ll tell you some of the details of my findings soon, but I didn’t find anything that scared me away. I signed up for an account, upgraded to a premium account for $10 per year, and I imported my KeePass2 database.

The process was painless, and I haven’t had any problems signing into anything yet. I’ll keep you updated over the next few months.

You can host your own Bitwarden service, and it looks easy enough to set up. If you already have a server out there somewhere, they offer a Docker image that you should be able to have up and running in no time.

When I had a server colocated downtown, I would most definitely have set this up. I’ve been trying to offload most of that work to other companies, though, and this is definitely inexpensive enough to outsource.

The free Bitwarden account would meet my needs, but the premium account was inexpensive enough.

Password hygiene and vault health reports

These services are available with a premium Bitwarden account, but what on Earth does that mean?! Bitwarden will correlate information in your password vault with leaked password databases. Have your email addresses been compromised in a password leak? Are you using passwords that are commonly found in those leaked databases? Are you still using weak passwords anywhere?

Bitwarden can give you this information. I have a lot of old cruft in my KeePass database. Ancient websites that I will probably never log into again. Websites that are long gone. Old garbage. Bitwarden’s health service threw up a lot of red flags on that old junk!

KeePass is better in many important ways

BitWarden will always be a little scary. Just like 1Password and LastPass, the BitWarden browser extension has full access to your password vault. Once you enter your passphrase, all that important information is sitting around in memory in an unencrypted state. Not only that, but that unencrypted data is part of your Chrome or Firefox browser process.

You’re relying on Firefox or Chrome to keep malicious web pages or extensions out of your password vault. You could be one compromise away from your password database being gobbled up.

KeePass is always a separate process. The browser extensions for KeePass don’t store your data. They communicate with a KeePass process to request a particular username and password. When the request is made, the KeePass desktop app will ask you for confirmation.

If you’re logging into Reddit, you might check the button to remember this decision. Next time you log in, KeePass will hand that password over to the browser without prompting. Maybe you would want to be more careful with your bank password, so you might require confirmation each time.

I know I’m oversimplifying things when I say this, but I’m trying to keep this post under 2,000 words. Bitwarden, 1Password, and LastPass may have your bank password in memory in the browser process whenever the vault is unlocked.

KeePass may have the password in memory, but it is further protected from the browser by your operating system’s kernel’s memory protections. That’s a much bigger wall to break down or climb over, and just having an additional wall is nice.

Does this really matter?

It depends who you ask. Security and ease of use are almost always at odds. It would be simplest to just use a password everywhere for your password, but that wouldn’t be safe. It would be extremely safe if you could memorize a different 128-character password for every single service that you use, and type it in manually each time, but that’s never going to happen.

I’ve thought about this problem for years. I’ve done my research. I’ve decided that the level of protection and convenience provided by Bitwarden, LastPass, or 1Password is the right compromise for me.

Yes. I most definitely gave up some amount of security for the sake of convenience when I switched from KeePass to Bitwarden. I’m pleased with this compromise.

Bitwarden’s pricing structure is weird

I was confused when I looked at their pricing charts. I quickly zeroed in on the $1/month family plan listed under organization accounts. It says it includes 5 users, and that’s only $2 more per year than the premium plan. Seems like a no-brainer, right?

That’s not how it works. Organization accounts are something completely different. Each user has to have either a free or a premium account. The organization accounts are where the shared password vaults live.

I have a premium account. My wife has a free account. I believe you could say we’re using a separate organizational account for the passwords we share with our family. It is just the two of us, so our organizational account is free as well. We will likely be setting up an organizational account for Butter, What?! to make it easier to share important passwords with Brian.

Is Bitwarden safe?

I suppose it depends on what you’re trying to protect yourself from and your definition of safe, but I believe it is more than safe enough for my use. I did some research. I tried to find as much terrifying information about Bitwarden as I could. The scariest stuff isn’t that scary.

I found this short security review of Bitwarden. He found that the password to log into the service and the password used to encrypt your database are the same. He has a heading that says your password is sent to the server, but it appears that some sort of salted hash is actually sent to the server.

That’s not too terrible. It would be nice if two different passwords could be used, but I understand the design choice. A single password is much more convenient for the user!

He also noted that Bitwarden loads quite a bit of Javascript from third-party sources. It seems that this has been addressed to some extent by the Bitwarden developer in recent months.

Bitwarden was audited by a third-party security company last year. There were definitely some problems. The major ones seem to have been addressed quite quickly.

Conclusion

I’ve only been using Bitwarden for a few days. I’ve been holding off on migrating from KeePass to something like LastPass, because I prefer to use open-source software. I especially prefer to use open source software for my most important infrastructure. My virtualization, my web servers, my file sync server, and all my computers run on open-source software.

Bitwarden has been a welcome surprise, and I look forward to giving you an update in a few months. I expect that there won’t be much to tell you about. If it is working fine today, I expect it to continue to do so in three months!

What do you think? Are you a KeePass holdout like me, or have you already moved on to something like LastPass or 1Password? Did you already discover Bitwarden long before I heard of it? Tell me about your experiences in the comments, or stop by the Butter, What?! Discord server to chat with us about it!

My First Attempt to CNC Aluminum on My Shapeoko XXL

| Comments

I have no idea what I’m doing. I’ve broken two endmills so far; thank goodness they were cheap ones! If you want to learn how to CNC aluminum on your Shapeoko, check out Winston Moy on YouTube. He already knows what he’s doing. If you want to learn about the mistakes I’m making, then I encourage you to keep reading!

My CAM software is still rather simple. I’m going to need to buy something better, but I haven’t decided what that will be. The choices in CAM software that runs on Linux are few and far between. For now, I’m running Carbide Create using Wine.

Team Fortress 2 Engineer Logo in Aluminum

I bought ¼” and ½” sheets of 6061 aluminum on Amazon last month. The Shapeoko can handle aluminum, so I have to give it a try. What sort of thing should I cut out of aluminum?

I decided to go with something simple and decorative. Brian and I have played quite a few hundred hours of Team Fortress 2. I figured it would be fun to machine a medallion with the logo of one of the classes from TF2. They’re round. They’re simple. Seems like fun.

Most of the emblems have too much detail

Small details sound easy. That’s what vcarving is for. I converted a Demoman emblem to an SVG, imported it into Carbide Create, and tried to figure out how to carve that sucker out. I couldn’t figure out how to do it. It only wanted to run my v-bit near the edges of the SVG.

Team Fortress 2 Engineer Logo in Carbide Create

I’m not smart enough to somehow combine a vcarve pass and a pocketing pass with a different bit. Even if I knew how to do it correctly, I’m not sure things would line up.

So I decided to keep my first carve into aluminum simple. I chose the Engineer’s emblem. It is less detailed than the Demoman’s stickybomb emblem, and once I scaled it up enough, it looked like I would have no trouble carving it with a 2mm endmill!

My cheap 2mm endmills

I didn’t buy these endmills for machining aluminum. I’ve been using cheap 1/16” endmills when cutting drone frames out of carbon fiber. They seem to work as well as nicer mills. They get dull quickly, but everything dulls quickly when cutting carbon fiber! I’d rather dull cheap mills, right?

When I was shopping at Banggood, I came across a 10-pack of 2mm carbide endmills. That’s about 25% larger in diameter than my 1/16” endmills, and also just small enough to cut my Kestrel frames. These should be sturdier, and they should cut more quickly than my 1/16” mills, so I figured I’d give them a try!

My collection of cheap endmills and taps from Banggood

My emblem is cutting with one of these endmills right now. It is on the final pocketing pass, and it will probably be working on the countour cutting operation to free the disc by the time I finish writing this blog.

I didn’t get to this point immediately. I broke two endmills last night! I believe it was my fault, though, and not the cheap mills!

Feeds and speeds are hard!

The first thing I did after firing up Carbide Create was head over to YouTube to see what Winston Moy thought I should be using for my settings. He told me what feed rates to use with a 1/8” endmill from Carbide 3D’s store. I’m a smart guy, right? I can make an educated guess. I can just use smaller numbers for my 2mm endmill, right?

I could, and I did. Except I goofed up. I also didn’t document my failures well.

I made it through at least two passes before breaking the first endmill. I lowered my feedrate and depth per pass, and I tried again. I attempted to pick up the job roughly where it left off, and I broke another endmill.

Where did I goof? I goofed up the stepover. I left it at Carbide Create’s default of 1.4mm. That must be acceptable when cutting MDF, but it was killing my mills when cutting aluminum! I lowered the stepover to 0.8mm, and it seems to be doing a much better job.

These are the settings I’m using successfully right now:

  • 0.187 mm Depth Per Pass
  • 0.8 mm Stepover
  • 355 mm Feedrate
  • 7.144 mm Plungerate
  • Dewalt DWP611 set to 1

I’m certain this isn’t optimal. With last night’s settings, the job was going to take about three hours. The second endmill broke after an hour of cutting. I started today with roughly 0.6mm already pocketed out, and I had set the depth of that pocket to 1.5mm.

I did my best to pick up right around where I left off, so there was 0.9mm left to pocket out. Today’s estimate was another three hours, so this is definitely going slower!

Can you use a bigger endmill to remove most of the material?

This would save a lot of time, but I don’t think I can do this efficiently with Carbide Create. For this to work well, your CAM software needs to be aware of the material that was already removed on the previous pass.

It would be possible to simulate this with Carbide Create. You could make another SVG with lines covering the area that would have been hogged out on the first pass with the big ¼” endmill. That way you could create a toolpath using the 2mm endmill that avoids that area.

I need to invest in software that will do this for me. The savings in machine time and my own time means it will be a worthwhile purchase!

My contour operation failed, so I abandoned this project for now

The 2mm endmill did a fantastic job pocketing out the void around the wrench. You can see the pattern of marks left behind by the tool, but it is quite smooth to the touch. In fact, the machined surface feels smoother than the top surface of the extruded aluminum!

The 2mm endmill ran into trouble while trying to machine the disc out of the block of aluminum. I noticed that at a depth of around 1.5mm, things started to get noisier. Then the shape of the cut started to get wonky. I wound up canceling the job.

The tiny endmill just couldn’t clear the chips of aluminum. Maybe I need a high-pressure air nozzle to blow the chips clear. Maybe I could have used my ¼” endmill for this operation. An air nozzle will definitely be a future upgrade, but next time I attempt a cut like this, I will use the bigger endmill.

The relatively huge flutes on the ¼” endmill are probably three times deeper than the flutes on the 2mm endmill. I bet that would have solved all my problems!

Another option would have been to use a pocketing operation to remove a ring of material slightly wider than the endmill. Making contact with aluminum on two sides of the endmill while it is moving along gets more and more problematic as the tool cuts deeper into the material. Taking two passes to clear out a wider channel would have helped with this!

Conclusion

I’m excited. My Shapeoko is considered a hobby-grade machine. Its biggest downside is its use of pulleys and belts instead of heavy-duty lead screws for movement. Sure, I won’t be cutting steel with these belt-driven gantries, but it is obvious that they won’t be limiting my ability to cut aluminum!

I’m working on a larger drone frame, so playing with aluminum is going to be on the back burner for a few weeks. I’m happy with my test cuts, and I look forward to putting what I’ve learned to good use next time!

What do you think? Am I doing a good job? Was this a good failure? Do you have any questions? Let me know in the comments, or stop by the Butter, What?! Discord server to chat about it!

Designing a 3-Inch HD Micro FPV Quadcopter Frame

| Comments

What the heck is up with this blog post? Did I already write about designing my HD micro quadcopter frame? Isn’t it already finished and nearly ready for production?

Yes. This is all true, but I was thinking about creating a video talking about all the early design decisions that shaped the layout of the Kestrel. I don’t know if I could do a good job talking about all this stuff without at least a loose script.

My 4-inch Kestrel build

I don’t know how to write a script. I have a decade of experience writing blog posts. So here we are!

Everything goes back to McMaster-Carr

I like simple sandwich frames. Four arms with a bottom plate and a top plate separated by aluminum standoffs. It is a simple design. It works quite well. It is versatile—if your stack doesn’t fit, you can just use taller standoffs!

There are dozens upon dozens of sandwich-style micro quad frames. I don’t need to design one. They’re already everywhere!

The most innovative 3” frame I know of is the Ummagawd Acrobrat. The Acrobrat isn’t the frame for me, though. I wanted something lighter. I wanted individual, replaceable arms. I wanted arms for both 3” and 4” props. I also wanted to design something myself, so why not design exactly what I want to fly?

The Grommet Hole in the Kestrel FPV Frame

I needed rubber bushings for my suspension. I thought about buying some Acrobrat bushing kits, but they seemed expensive, and they would make it difficult to sell my own frame kits. So I went to McMaster-Carr.

I found a rubber grommet with reasonable dimensions. It would plug a hole in a piece of material 1/8” thick. That’s just barely thicker than a 3 mm piece of carbon fiber.

This is where the design work began. If my grommets fit into a 3 mm sheet of carbon, then the Kestrel’s side plates are going to be 3 mm thick.

When the grommets arrived, I reached for my 3D printer. Carbon fiber is thin, so you need to turn that round bushing into an oval. How tall and wide is does that oval need to be? I printed a variety of holes and tabs to get an idea of where to start. It wasn’t perfect. It needs to be snug, but not tight. The grommet needs to absorb vibrations, but not jiggle around.

This testing made it obvious that I needed to use 2 mm carbon for the Kestrel’s bottom plate. Any thinner, and my bottom plate would be too weak. Any thicker, and my soft suspension wouldn’t work very well!

Mounting your electronics

I wanted to make room on the bottom plate for three 20x20 stacks. Running your motor wires is easier if your 4-in-1 ESC board is in the center, so I knew I would have a stack right in the middle.

To keep the props out of view, the FPV camera needs to be way out in front. That left me plenty of room for a second 20x20 stack up front.

I’m trying to maintain balance, so why not stick a third stack in the rear and have a long fuselage? That might help offset the weight of the camera that has to stick out so far in the front.

That was enough thinking to get me through my first two prototypes. When I wanted to build my first 4” Kestrel, I realized that some ESC boards with 20x20 mounting holes are huge, so I needed to move the front and rear stacks farther away from the center.

I’m jumping ahead a bit, but I also realized that four of the bolts I was using to attach the Kestrel’s arms were quite close to being spaced correctly for mounting 30.5x30.5 parts from 5” and larger quads.

I haven’t used this option in any of my builds yet, but it was a simple change to make! The Kestrel has room for a 20x20 stack in the front and rear, and either a 20x20 or 30.5x30.5 stack in the center.

From 8 screws to 4 screws for mounting the arms

Using replaceable arms was a must. The Kestrel is open source, and the OpenSCAD source code makes it easy to configure arms in any way that you’d like. Do you want stubby arms for 2” props? Do you want ridiculous 6” arms? All you have to do is input different lengths and angles for the arms, and you’ll be all set to have a fresh set of arms cut!

My goal is to have the fuselage of the Kestrel be as static as possible. So far, I have cut 3” and 4” compatible arms, and those same arms will fit any of my Kestrel fuselages. I expect there will be a 5” experiment in the near future, too!

On the first few prototypes, I took the easy way out. Each arm was attached to the frame with a pair of M3 screws and lock nuts. This worked just fine, but when I decided that I wanted room for a full-size stack in the center, half of those screws were going to be in the way.

I eliminated one screw from each arm, and I replaced it with an I-shaped piece of carbon fiber—the wedge. The wedge keeps the arms from rotating forward and backward around the M3 mounting screws, and the 2 mm bottom plate and 1 mm bottom bracing plate keep the wedge from falling out.

This saved nearly three grams of weight, made the arms easier to replace when they break, and the arms are just as solid and sturdy as they were before!

My first broken arm

I’m trying to save weight wherever I can. If there’s material that serves no useful purpose, it needs to go. There are two round cutouts near the base of each arm. One of those cutouts leaves you room to put M2 or M3 screws into your center stack.

The other cutout is to save the tiniest amount of weight. It seemed like a great idea. In a crash, most of the stress on the arm will be at the M3 mounting screw, right? How much stress could there be on that tiny length of material from the M3 screw to the wedge?!

This mistake seems so obvious with the benefit of hindsight. In some crashes, most of the force will be pushing the arm against the bottom plate or the brace plate. If you hit an arm while traveling parallel to the bottom plate, though, the arm acts as a lever around the M3 screw.

I broke an arm on my 4” Kestrel right at that weak spot.

It was easy to fix the design. If you’d like to watch, I walked through the design process on YouTube. All I had to do was put that piece of material back in. I imagine the arm is going to break somewhere completely different next time!

Everything is a tradeoff

Most of the time, I expect the tradeoff to be related to cost or time. With a quadcopter, the design decisions are almost always trading weight for durability. Carbon is cheap. Weight is problematic.

The first fuselage that I cut on my Shapeoko was fat. The side plates are 3 mm wide, because that’s how thick the material is. How thick do they need to be? I took a guess. It looked reasonable on my screen. That first prototype was so sturdy that I couldn’t flex the assembled fuselage at all!

The first fat Kestrel prototype fuselage

The goal is to make the Kestrel just sturdy enough to survive most impacts, but no sturdier. I knew after assembling that first fuselage that my instinct to err on the side of being too sturdy would be a mistake. I don’t have fancy software to analyze the weak points of the Kestrel. I have to built it, fly it, and see where it breaks. That’s the best way for me to find the weak spots!

Convenience is also important

I imagine there’s quite a bit of weight to be saved by eliminating the rear 20x20 stack. Sure, I’d have to make the fuselage a little taller. The side plates are extremely long, so they have to be rather durable to resist flexing.

Is saving five or six grams worthwhile? For my builds, I don’t think it is. Spreading out the components makes the Kestrel easier to work on. That long body gives me plenty of room to mount a tiny GPS module up high in the back. I wind up putting the ESC and FC in the center and the Caddx Turtle board up front.

I can save weight by mounting a 200mw 20x20 VTX in the back, but there’s plenty of room back there for a 1,000 mW RaceDayQuads Mach3 VTX back there. Even with the GPS module.

More than a year ago, I help Brian build a 3” micro quad with a Runcam Split. It was awful to work on. It only had one stack with an ESC, FC, VTX, and both Runcam Split boards all piled up on top of each other. Then we had to find room to fit the R-XSR. Not only that, but all these boards had to be wired to each other. It was a mess.

Spreading things out makes maintenance so much easier!

What’s next? Why haven’t I ordered a batch of these so I can sell them?!

I have absolutely no idea how many frames to order. I’m not a store. I’ve never had anything manufactured for me before. I have no idea what I’m doing.

I was talking to Brian last night and today. We’ve run three quadcopter build classes at our local makerspace. The first time, the class built five or six 450 mm quads. At the second, we built six of my PH145 quadcopters. At the last class, we built six 5” FPV freestyle quads.

Things have come a long way since our last build class, and we think we can help get people started even more cleanly than before. Buy a Taranis radio. Practice in the simulator. Buy a Tinyhawk. Have fun. If you’re enjoying yourself, and you want to go farther, we’ll help you build a 3” Kestrel with an HD camera.

Outside of the parts list, we haven’t really hammered out any details. Maybe I’ll cut the frames for the class in my garage. That sort of thing is cool if the class is being held at a makerspace! Maybe the class will use the first batch of production Kestrel frames from CNC Madness. We’ll see!

Conclusion

All our Kestrels are flying great, except for my poor 3” Kestrel. She’s needed lots of extra filtering ever since the crash that burned out her first Caddx Turtle. I’m thankful that this isn’t the fault of the frame! I expect to upgrade her to the same parts we use in our upcoming Kestrel build class!

The arms are stronger than ever, and I think she’s just about ready to go into production. What do you think? Should I send the CAD files off to CNC Madness and have a batch of frames cut? How many do you think I need to order? Let me know in the comments, or stop by the Butter, What?! Discord server to chat with me about it!
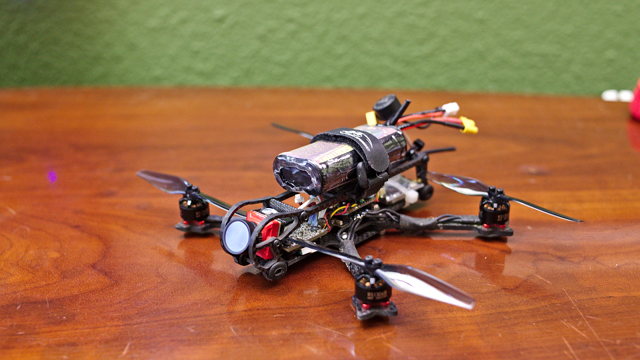
Three Months With The Osmo Pocket: The Perfect Vlogging Camera?

| Comments

I’ve been using my DJI Osmo Pocket for three months. I’m almost willing to say that I couldn’t be happier with this thing. There’s always something that could be improved, but the Osmo Pocket is definitely the only product on the market that so perfectly fits my portability, ease of use, and comfort needs while still producing video of acceptable quality.

I bought the Osmo Pocket for vlogging

Before the Osmo Pocket, I was using my smartphone on a Zhiyun Smooth 4 gimbal. It works quite well. I could get a nice, steady shot of myself while I’m walking. The Smooth 4 wasn’t all that heavy, so it wasn’t difficult to hold it up in front of my face for extended periods.

What is the upgrade path from a smartphone on a $120 gimbal? I’ve used my enormous Canon 6D paired with my Zoom H1 mic to record here at my desk. That’s just about the only place I’d ever record myself with this setup. The camera and lens weigh just over 4 pounds. It doesn’t autofocus while recording, and the screen doesn’t flip around, so there’s no way to tell if I’m even in focus.

The upgrade that was in my sights before the Osmo Pocket was announced would have been the Sony a6400 or a6500. The screen on the a6400 flips around, it is just light enough to hold in front of my face, and the quality is definitely close enough to what I can get out of my Canon 6D. Not quite as good, but it would do the job!

The best vlogging camera is the one you have with you

Vlogging with your phone is smart. You always have your phone in your pocket. Sure, the guy hauling around a Sony a7ii with a giant gimbal is going to capture much better footage, but he has to carry that setup around with him. When I crash my quadcopter, am I going to remember to pick up that camera to take it with me? I rarely remembered to pick up my Smooth 4 gimbal when I crashed!

The Osmo Pocket literally fits comfortably in your pocket. The form factor is a bit different, but it is comparable in size and weight to your smartphone. I designed a little 3D-printed cover that I stick on mine, and I put it in my front pocket with my cell phone. The Osmo Pocket is smaller and weighs less than my Zhiyun Smooth 4 gimbal, and the Osmo Pocket has a camera built right in! Not only that, but the Osmo Pocket’s camera is definitely an upgrade over my budget Android phone.

When I crash my quadcopter, and I have to take the walk of shame to hunt for the wreckage, my Osmo Pocket is already with me. Since it is small enough to fit in my pocket, I don’t have to remember to pick it up. I can have it out of my pocket and recording in roughly five seconds. This is fantastic!

Vlogging in the car with the Osmo Pocket

This is my favorite thing to do with my Osmo Pocket. We have a little gravity-assisted phone holder in the car. I kludged together an Osmo Pocket stand thing from Thingiverse with a simple rectangle. This lets me drop the Osmo Pocket right into the phone holder in the car.

It works quite well! The angle is a bit lower than I’d prefer, but it isn’t too far off. I enjoy the Osmo Pocket’s face tracking. People talk to the camera in the car quite often, but their journeys are more static than mine. As I turn corners, the Osmo Pocket attempts to stabilize things while also attempting to track my face. That makes for a slightly more dynamic experience for the viewer.

I expected road noise to be a huge problem. In our box of a tiny SUV, wind noise is a huge problem at 70 MPH on the highway, so I don’t vlog on those longer trips. The speed limit on the country road out to Brian’s house is 55 MPH, and that doesn’t cause problems at all. Somewhere between these two speeds, the noise in our SUV increases dramatically. Your mileage may vary, of course!

Vlogging at home

I vlog at my desk with the Osmo Pocket. I’ve even been using the Osmo’s internal microphone for that, too. I have a Zoom H1 mic, and I’ve thought about recording the audio on there, but I’m almost pleased enough with the quality of the Osmo Pocket’s mic. The increase in quality when using the Zoom H1 isn’t big enough for me to justify the extra step of synchronizing separate audio and video tracks in post!

In the car, I have the Osmo Pocket set to fully automatic with D-Cinelike enabled. At my desk, I manually control all the settings. These are the settings I use.

  • 1080p30
  • D-Cinelike
  • 4500K white balance (approximately)
  • 1/30 or 1/40 shutter speed
  • ISO 400

My office has three light sources: two lamps with 150-watt equivalent daylight LED bulbs, and a fixture on the ceiling with a 175-watt equivalent daylight CFL. I can’t use the light on the ceiling, because it just makes the top of my head glow.

My Canon 6D has me spoiled. Video recorded on the Osmo Pocket at ISO 400 has nearly as much noise as the Canon at ISO 1600 or 3200. This is to be expected. The full-frame Canon’s sensor dwarfs the sensor in the Osmo Pocket.

I would say the Osmo Pocket’s video is acceptable at ISO 400, but it isn’t ideal. I’d like to add more lighting to my office so I can bring the ISO down to 200 or even 100.

Just like in the car, I enjoy the Osmo Pocket’s face tracking in the office. It makes the vlog just a little more dynamic. It is almost like I have a cameraman in the room with me.

With a lot of manual work, my Canon 6D with my Tamron 28-75 f/2.8 lens can capture video that rivals just about anyone’s vlog. It is just too much work for me to record with the Canon 6D. If I had a Sony a6300 or a Canon 6D mk2, I would definitely use them for vlogging at my desk. Attempting to manually focus my first- generation Canon 6D from the wrong end of the lens is just too difficult!

I wish the Osmo Pocket had WiFi

Yes, I am aware that I can spend $100 or so for the WiFi module. So far, though, I only have one use case where I’d like to actually make use of the WiFi, and I could just run a cable to my phone.

I have a webcam attached to an arm taken from an IKEA arm lamp. It is affixed to my dual-monitor mount. I learned that I can strap my Osmo Pocket to this arm, and it has no trouble holding the extra weight! I plan to use this to record things from directly above my desk in the future.

Looking up at this rigging to see what’s in focus requires some terrible gymnastics. It would be nice if I could mirror the Osmo Pocket’s screen to my smartphone over WiFi for this. I will probably just run a cable when I do this instead.

What about the DJI Osmo Action?

When I saw the Osmo Action announced last month, I was worried that I made a mistake in buying the Osmo Pocket. The Osmo Action has the same sensor as the Pocket, but with a slightly wider field of view. The mic seems to be of similar quality, and the Osmo Action’s RockSteady image stabilization is as good as a gimbal—sometimes even better!

So what? Just about the same things can be said about the GoPro HERO7 Black. That was available when I bought my Osmo Pocket. What’s so exciting about the Osmo Action?

It is the front-facing screen. It is hard to vlog well if you can’t see yourself. If you’ve ever tried vlogging with a GoPro, you know that you just have to guess that you’re in frame. Adding that front-facing screen eliminates that problem.

The Osmo Action could most definitely handle all my vlogging needs. The more I think about it, though, the more happy I am about owning an Osmo Pocket.

The Osmo Pocket is like having a robot for a cameraman. I can set her on a tripod, and she’ll follow me around the workshop. I can set her on my desk, and she’ll follow my face around as I move around my desk. That feels a little more organic to me, and I like it.

The Osmo Pocket can also record motion timelapse videos. You can choose two points on the Pocket, set the timing options, and it will slowly pan from one point to the other as it records the video. You can add additional point using the app on your phone. I don’t use this feature nearly often enough.

Conclusion

With my tiny YouTube channel, the Osmo Pocket is easily the best vlogging camera for me. It fits in my pocket. The quality of the video is better than my phone’s camera. Recording video with the Osmo Pocket is much more comfortable than holding a phone.

Maybe someday I will graduate to the point where I need to improve my video quality to improve my YouTube channel, but I’m not there yet!

Is the DJI Osmo Pocket the perfect vlogging camera? Probably not, but it is the perfect vlogging camera for me!

What camera setup do you use for vlogging? Are you using an Osmo Pocket? Or are you using your Osmo Pocket for something else entirely? Let me know in the comments below, or stop by the Butter, What?! Discord server to chat about it!

Roasting Coffee Beans at Home: One Month Later

| Comments

This is awesome. I never thought I’d be roasting coffee beans at home. I can’t believe how quick and easy it is, and I’m surprised by just how delicious the coffee actually is!

I’ve been drinking Craft Coffee almost exclusively for the past 5 years. In fact, the anniversary of my first coffee delivery from Craft Coffee should have been about a month ago. At some point during the past five years, Craft Coffee pivoted.

In the beginning, they were delivering unique, gourmet coffee every month. At the time, their service would have been more comparable to Angels’ Cup. Today, Craft Coffee is set up to be a fresh replacement for your daily coffee.

Craft Coffee Latte

Both Craft Coffee and Angels’ Cup are fantastic coffee delivery services, and I am somewhat relieved that they no longer offer products that compete so directly. I enjoy both, and I enjoy telling you about both of them.

Since pivoting, the light roasts from Craft Coffee have gotten darker. They’re still light, but I didn’t notice how much darker and oilier they had become until I started roasting my own beans.

I’m using a popcorn popper and beans from Sweet Maria’s. You can get a popcorn popper with a four-pound sampler of green beans from Sweet Maria’s for less than $30. It is a fantastic value. I pay $20 or more for a 12-oz bag of roasted beans of a similar quality.

There’s the equivalent of roughly five 12-oz portions of beans included in the bundle from Sweet Maria’s. That works out to around $6 for 12 ounces of coffee. That’s cheaper than the store brand stuff at the grocery store!

Sure, you have to spend some time roasting the beans. It takes me about four minutes for me to roast two days’ worth of beans. It would take about twice as long if you prefer a darker roast. I know that time is money, but you’re not just saving money. You’re also enabling yourself to drink the freshest coffee possible all the time.

How much have you roasted so far?

I’ve just finished consuming two pounds of coffee that I roasted myself. That’s a lot more than I usually drink in a month. The coffee loses weight as it roasts, but even if you account for that, I went through a lot of coffee this month!

I’ve been drinking more lattes than I should, and I’ve been sharing more often than usual.

First batch of roasted coffee from Sweet Maria's

I’m roughly eight ounces ahead in my roasting. At first, I was making sure to roast only enough for the next day or two. Then I pulled two bad shots in a row. I wanted to have a bit of a buffer built up to prevent that, and I also wanted to see if I could notice a difference in the beans as they age.

I’m not being scientific enough. I know some of the flavor develops over the first week after roasting, but I’m never sure what I’m drinking! I know which beans I’m brewing, but I’m never sure how old they are. The good news is that they definitely don’t taste worse up to a week after roasting!

Two bags down, two to go

I roasted the beans from Costa Rica first. Of the four green beans in the sampler pack, they seemed like the most pedestrian bean. The Costa Rican coffee tasted fine, but it was boring. The Ethiopian bag I roasted next was a nice upgrade. Definitely not the best Ethopian coffee I’ve ever had—it sure didn’t taste like Frankenberry cereal! Even so, I bet I would have guessed its origin if I didn’t already know.

The next bag is a honey-processed coffee from Sumatra. I’ll be tasting this for the first time tomorrow, and I can hardly wait. It smells different when roasting. Chris says it smells like honey, but I don’t believe her. Even when I pull them off just after I hear the first crack, they’re coming out darker than the other two bags of beans.

I ordered more beans!

I couldn’t wait. I enjoyed the Ethiopian coffee so much, and Sweet Maria’s was having a sale on Ethiopian beans. What do I do when there’s a sale on Ethiopian green beans?

That’s right. I ordered a bunch of coffee. I wound up buying four more pounds of coffee. I thought about ordering even more, but even at the regular prices, it isn’t much more than $6 per bag. Unlike roasted coffee, green coffee beans can survive for months or even years before roasting, but I don’t need to get too far ahead of myself!

Ethiopian assortment from Sweet Maria's

If I slow back down to my usual pace, I should have enough coffee here to last me until Thanksgiving! I still have an unopened bag of beans from Craft Coffee sitting on top of my refrigerator!

That bag of Craft Coffee will be interesting

I’m having a good time roasting coffee. I’ve learned a lot, and I haven’t invested much. Will I continue to roast all my beans, or will I go back to letting Craft Coffee do it for me?

Calium Free Latte

How good of a job am I really doing? I haven’t had any professionally roasted coffee in a month. Will I be disappointed in the beans I’m roasting when I open my next bag from Craft Coffee? There’s only one way to find out. I’ll probably go through another two or three pound of coffee before I do that, though!

Conclusion

Roasting your own coffee at home is easy, fun, and educational. Not only that, but it can be a great way to save money, and you can make sure that your beans are always freshly roasted. It only takes me four or five minutes to roast two days’ worth of beans, and if I work that into my usual six-minute latte-making process, it only adds two or three minutes to my routine.

What do you think? Are you roasting coffee at home? Are you interested in trying? What’s stopping you? Do you prefer to just use a subscription service like Craft Coffee? Let us know in the comments, or stop by the [Butter, What?! Discord server][bw] to chat with me about it!

My Rancilio Silvia and Baratza Preciso: Five Years Later

| Comments

I’m doing a bad job. I like to revisit things after I’ve owned or used them for three to six months. I’ve been using my Rancilio Silvia almost every day for nearly five years now, and I haven’t written a follow-up to my early posts yet! I have a draft for a post that I started somewhere around the six-month mark, but I completely failed to finish it!

My Rancilio Silvia has suffered her first hardware failure, so this seems like an appropriate time to write about how she’s been holding up!

One of her thermistors is on the fritz!

I woke up one day, and she was cold. I’m a terrible person, because I leave Miss Silvia running 24 hours a day. I don’t like waiting for her to warm up when I want a latte! I had some home automation in place to warm her up automatically at the appropriate times, but she was just too powerful for the remote-controlled outlet I had her plugged into, so I had to scrap that.

Miss Silvia

I fiddled with her buttons. I could turn the steamer on, and she would heat up, but she wouldn’t come up to brew temperature. This means I have a bad 100C thermistor. They don’t have any at Amazon, so I ordered one from espressoparts.com.

I didn’t want to wait for a latte!

It was going to take many days for the replacement thermistor to arrive, because I noticed the failure on a Friday. I was impatient. Could I get the temperature close enough for pulling an espresso by manually shutting off the steamer when it hit boiling temperature? I have an infrared thermometer, so I had to give it a try.

This failed. The steamer reached 140 degrees Celcius before my thermometer even made it past 60. This seemed like a bummer, but I swore I heard the 100-degree thermistor click at one point. So I turned the steamer off, and I ran some water through the machine.

Craft Coffee Latte

As the temperature crossed the boiling threshold while it was cooling down, the heating light on Miss Silvia started to flicker! I’ve never seen it do that before, but it didn’t take long before it came on solid. She was working just fine, and I was going to be able to make my latte!

She’s been working fine ever since. The replacement thermistor is here now, but I’m not going to put it in. I’m going to wait until it actually fails.

How many shots do you think I’ve pulled before this failure?

I have pulled a lot of shots. Not a literal ton of shots, but I bet more than 10 gallons of espresso have passed through this machine so far! She’s also been heating up water almost nonstop for years. I think she’s held up quite well. Much better than the $100 and $200 fake espresso machines I’ve owned, for sure!

In the early days, I was pulling double shots. For years, I was pulling triple shots. Due to some medical problems, my doctor made me stop drinking milk for three or four months last year, so I shut down the machine for two or three months. I shouldn’t be drinking big triple-shot lattes anymore, so I’m back to pulling doubles again.

It doesn’t really matter if I’m pulling a double or triple. I’d count either as a single pull!

Some days I drink more than one. Some days I make coffee for my wife or for friends. Sometimes I pull a bad shot, and I have to repeat the process.

Then there are other days when I’m just not home. I might be out of town. I might just be busy. Those are the days when I just can’t pull any shots.

I wouldn’t be surprised if I’ve come close to averaging nearly one pull every day for the past five years. That could be over 1,800 pulls.

A failure of a $12 part after more than 1,500 pulls and tens of thousands of hours of operation is awesome! Does it count as operation if the machine is powered up and heating while I’m not using it?

Enough about the failure. How’s Miss Silvia been working out?

Miss Silvia has been fantastic. I’ve had to replace her rubber gasket on her portafilter a few times. I waited too long the first time, and it became solid and brittle, so it was extremely difficult to remove; it had to come out in pieces.

From now on, I’m doing this once a year. You can get a kit with a fresh, clean screen and a new rubber gasket for around $15. It is easy to replace.

I’ve made some minor upgrades. I bought a bottomless portafilter and a triple-shot basket. I also have a pressure gauge that screws onto the original portafilter.

The bottomless portafilter is fantastic. It helps me see what was wrong with my espresso shots as they are pulling. You can also observe the color of the shots more clearly, so you can stop the pull as the shot is blonding.

Most people won’t need a pressure gauge, but I like to use light roasts in my lattes. Light roasts are difficult to pull at the stock pressure; you’ll get a lot of gushers!

Adjusting the pressure isn’t difficult. You just need to take the lid off the machine, and you need a pair of large wrenches. I brought my pressure down by about 1 bar. This has increased my success rate with light roasts significantly.

The Baratza Preciso

The Baratza Preciso is the more adjustable version of the Baratza Virtuoso. These are both fantastic grinders, but I don’t believe they make the Preciso anymore.

The Preciso has all the same grind settings as the Virtuoso, but it also has an additional dial that lets you hit ten micro adjustment points in between each large increment.

These micro adjustments are necessary for espresso, and labeled micro adjustments seemed like a fantastic idea. If I know the beans I’m using for espresso need to be ground at setting 3C, and I need to use a coarser grind of 12 for the Aeropress, it will be easy to go back to pulling shots tomorrow, right?

In practice, I don’t do that often. I wind up running into a completely different problem. Lets say I’m at setting 4C, but my shots are pulling too fast. I need to go finer. I’d like to get somewhere in the middle of 3.

I have to go up on one dial, and then down on the other. The whole time you’re adjusting the dials, you need to be grinding. I waste a lot of coffee doing this.

I suppose this is a minor complaint.

I’ve broken the Baratza Preciso several times

There’s a lot of soft plastic inside the Baratza Preciso and Virtuoso. This is on purpose. If you get a hard coffee bean or a rock in your grinder, something has to give. Baratza is smart. They decided that a cheap plastic part should break before you do damage to the expensive conical burrs!

In five years, I’ve broken three or four of the retainers that hold the burrs in. I’ve also broken one adjustment ring.

These parts aren’t expensive. Baratza sells replacements for just about every part of their grinders. When you break one, though, you’re going to be disappointed that you have to wait! I’ve learned that when I order a replacement part, I order extras!

What sort of coffee have you been using?

The beans I drink just about every day are from Craft Coffee. They are a coffee subscription service. They have basic coffee for around $10 per bag, and nicer beans for around $20 per bag. Shipping is free, and you can choose whole beans of grounds.

Their service has been great. If you use my coupon code (‘pat1245’), they’ll take 15% off your order, and they’ll send me a free bag of coffee. This is a good deal for both of us.

I have to be honest. I’ve been drinking Craft Coffee longer than I’ve owned my Rancilio Silvia. Just enough people use my coupon code that I have never had to pay for their coffee. I’m still drinking it. I still recommend it to friends. I like it a lot. I think you should try it.

I usually ask people to tell me if I steered them wrong about this in the comments!

I’ve just started roasting my own coffee!

This has been a lot of fun. I ordered a popcorn popper with a free 4-pound sampler pack of coffee from Sweet Maria’s a few weeks ago. I put my Craft Coffee deliveries on hold, and I even have an unopened bag of delicious-sounding Craft Coffee in my kitchen. I’m having too much fun roasting delicious coffee!

I’ve paid more for a single 12-oz bag of coffee than I paid for the air popper and 4 pounds of beans, and the roasting process is much easier than I expected. I wrote about my early coffee-roasting experiences over at Butter, What?!. If you’re interested, you should check that out.

Ethiopian Coffee Beans from Sweet Marias

I’ve roasted two pounds so far, and I already ordered four more pounds from Sweet Maria’s. I chose four different Ethiopian beans this time. I can’t wait to see how that goes!

I haven’t quite worked the roasting into my latte-making routine. The last time I timed the process, I learned that I can make a latte in about six minutes. It takes about four minutes to roast a small batch of beans. I’m pretty confident that I could squeeze those steps in between my latte routing, and I would add less than two minutes to the process.

I think the idea of drinking the coffee I roasted yesterday is exciting!

What’s next?

While I was waiting for the replacement thermistor, I was thinking that it was a mistake to even order that part. I should be upgrading my Rancilio Silvia with a PID controller!

A PID controller is able to keep a precise temperature on your boiler. Miss Silvia’s simple thermistors mean her temperature swings quite a bit, and you never know exactly where she is. I’m pretty used to temperature surfing for my shots, but it would be nice to have a PID controller to eliminate the need.

You can get a PID controller unit for around $60. The nicer units do more than control temperature. They offer preinfusion and shot timers. Those units are around $200.

I’ve been avoiding this, because I don’t want my machine to be out of commission while I upgrade it. Doing the upgrade while it is already broken seems like a good plan.

I’d like to go a step further. I’d like a PID controller with WiFi. I want to tie my espresso machine into my home automation. I want her to be ready to go when it is time to make coffee.

Should I just buy a $200 PID controller? Should I build one myself? I don’t know if I should be lazy, or if I should build one with WiFi!

Conclusion

The Rancilio Silvia has been a fantastic machine. After tens of thousands of hours of heating and well over 1,000 shots pulled, I’ve finally started to break a $12 thermistor. She’s a tank, and every replacement component is available to buy.

The Rancilio Silva was around $700. The Baratza Preciso was around $300. I’ve spent less than $200 on upgrades and repairs. That’s less than $240 per year, or well under $1 per latte.

She’s been a good investment, and I’ve gotten a lot of enjoyment out of her. I’ve never had a latte as good as one of my own from Starbucks, and my lattes are a lot cheaper. I’d rather spend 6 minutes making my own latte than spend those same 6 minutes waiting in line at a coffee shop!

What do you think? Do you own a Rancilio Silvia? Do you own one of her competitors? Have you had as much luck as I have? Tell me about it in the comments, or stop by the Butter, What?! Discord server to chat about it!

The DJI Osmo Action

| Comments

This isn’t a review. I don’t have a DJI Osmo Action, and I’m not expecting to buy one, but I’m excited about it. I’m excited that there’s a real competitor to the GoPro HERO 7 Black. I’m excited that the Osmo Action looks like it could be almost every bit as good of a vlogging camera as my Osmo Pocket, and it may even be a good fit on my freestyle miniquads. I’m just excited!

What’s unique about the Osmo Action?

I don’t care about the exact specs. I’ve seen enough sample footage to know that the Osmo Action is a nice video camera. It is at least as good as my Osmo Pocket or a GoPro HERO 7 Black. For most purposes, it sure looks like the Osmo Action is a better camera than the GoPro!

There’s one important feature that makes the Osmo Action unique: it has a front facing display.

When I was shopping for a simple vlogging camera, I knew that I would need to have a screen that I could look at while talking to the camera. The GoPro HERO 7’s HyperSmooth footage is often as smooth as footage using a gimbal, and I would have loved to use a GoPro for vlogging. Unfortunately, there’s no good way to frame up a shot with the GoPro when I’m pointing the camera at my own face.

I don’t know if that front-facing screen is a game changer, but to me, it is a huge improvement!

I almost regret buying the Osmo Pocket

Almost. Just like the Pocket, the Osmo Action is priced at $350. I was shopping for a lightweight, compact vlogging camera, and the Osmo Action would certainly fit the bill. Not only that, but the Osmo Action is the right form factor for strapping it to one of my freestyle miniquads.

I can’t literally use one camera for vlogging and flying. I’m too likely to be breaking the action camera that’s strapped to my 90 MPH rocket of a quadcopter. If I could get away with it, though, I would much rather carry a pair of Osmo Action cameras than carry a GoPro and an Osmo Pocket. I’d gladly strap my vlogging camera to my quad in a pinch!

I don’t think the Osmo Action will be a good fit for an FPV miniquad

Just about the only place I use an action cam is on my freestyle quad. I greatly rely on GoPro’s SuperView. The GoPro has a 4:3 aspect ratio sensor. When you record regular widescreen footage, the GoPro discards the image above and below that 16:9 area.

When you record in SuperView, the GoPro uses the entire 4:3 sensor. It stretches the image horizontally to reach the 16:9 aspect ratio. It doesn’t just naively stretch the image. The area in the center isn’t stretched at all, and the edges are stretched more. This keeps the distortion down while providing a wider field of view.

This looks fantastic when flying FPV, especially when you’re flying fast and in close proximity of objects. I won’t give this up.

You can simulate SuperView in post processing. The Osmo Action will need to have a rather large field of view to coax comparable results out of it, though. I’m not confident that it will be possible to get comparable results, and I’m not sure it would be worth the effort!

The DJI Osmo Pocket is fun!

I’m new to vlogging. I’m not good at it. I may never be good at it.

That said, I enjoy the Osmo Pocket’s face tracking. Even when I’m just sitting here at my desk, I can talk to the camera, and I can move around a bit, and the Osmo Pocket follows me.

The results feel a bit more dynamic. It almost feels like I’m not sitting alone in my office talking to absolutely no one. It gives the illusion that there’s someone present in the room pointing the camera at me.

I don’t know if my viewers agree, but I like the results!

The gimbal almost makes the Osmo Pocket into an adjustable tripod. I can lock it into my car’s cellphone mount, and rotate the gimbal to aim the camera right at me. I don’t have to do that, of course, because the face tracking follows me around while I’m driving!

I think the Osmo Pocket’s motionlapse ability is awesome, but I’m not utilizing it often enough. You can’t set an action camera down and have it track from one angle to another over a period of time. I need to make better use of this feature!

The Osmo Pocket is light and comfortable

I might be focusing too much on the vlogging advantages of the Osmo Pocket, but I suppose that’s to be expected. I bought my Pocket primarily for vlogging!

For handheld use, the Osmo Pocket is quite good. You get to hold it almost like a pistol. You just have to be careful to not cover the microphones or the display! If you were using a GoPro or Osmo Action, you’d have to pinch that tiny brick between your fingers or attach it to some sort of small tripod for vlogging. That isn’t as comfortable.

With the Osmo Pocket, there’s usually plenty of camera to hold on to, and you can keep the screen in view at almost any angle. That’s a nice advantage offered by the gimbal.

Which camera should you buy for vlogging?

If you’re trying to be a professional, neither camera is up to the task. There are folks using large, heavy Panasonic Lumix G85 cameras or even enormous Sony a7R III mirrorless cameras combined with huge gimbals just for vlogging. Can you imagine holding that much weight at arm’s length for 20 minutes?

This might make me sound like an old man, but I don’t enjoy just holding my arm out in front of my face for 20 minutes. I want my camera to be light, and I want it to be easy to carry around.

If you’re vlogging with the Osmo Action, you’re going to attach it to a small tripod for vlogging. This will probably make it marginally more cumbersome than the Osmo Pocket, but I imagine it’ll be a comparable vlogging experience in just about every way.

My favorite feature of the Osmo Pocket is that it literally fits in my pocket. I can go out for a day of flying, and I barely notice it is there. It is also nice that the Pocket can be out of my pocket and recording in less than five seconds—I should test that to see if I’m exaggerating!

I don’t think I could do that with any of my short tripods and an action camera. It just wouldn’t fit in my pocket. I will be sticking with my Osmo Pocket.

Conclusion

When I started writing this post, I was thinking the Osmo Action would be a better camera for just about everyone compared to my Osmo Pocket. Just writing these 1,200 words has changed my mind.

I like the Osmo Pocket. It is small, light, comfortable, and so easily pocketable. I’m glad it is part of my collection of photography gear. Sometimes I have to write things to figure out what I actually think!

What do you think? Are you enough of an amateur vlogger that the Osmo Action or Osmo Pocket are the right fit for you? Which one would you prefer to use? Let me know in the comments, or stop by the [Butter, What?! Discord server][bw] to chat with me about it!

RAID Configuration on My Home Virtual Machine Server

| Comments

I didn’t think the low-level details of my virtual machine server’s disk configuration is a terribly interesting topic, but I get asked about it quite often, so I figured that it might be time to document it!

NOTE: I’m planning to post a video on YouTube related to this post. I’m going to recreate my KVM server’s setup in a virtual machine. I’ll jabber about what I’m doing as I’m doing it, and I’ll be able to grab screenshots of the various steps. The device names won’t quite match up, but I can massage things to match my actual setup. I’ll be adding those screenshots to this blog when they become available!

NOTE: I recorded a rough draft of that YouTube video. I made lots of stupid mistakes, did things in the wrong order, and had to backtrack to make corrections. I took notes, though, and I’m ready to record a better video. I’m doing a bad job, because I took those notes two months ago!

Choosing your RAID configuration

Writing this post got me thinking a little. Are folks having trouble trying to decide what sort of RAID configuration to run on their homelab or home NAS servers? I decided to write a whole mess of words about choosing a RAID configuration and posted it over at Butter, What?!

The article at Butter, What?! is rather long and detailed. You don’t need to read it. You should probably be running RAID-Z2 or RAID 6. If you think I’m wrong about that, go read the article and tell me why!

Where does the operating system live?

My server has a pair of 240 GB Samsung 850 EVO SATA SSDs. At the time, these were just about the smallest SSDs you could buy that also had good performance. I knew this was much more space than my Ubuntu installation would require, but I knew I would be dedicating the majority of these SSDs to an lvm-cache. We’ll talk about that later.

I didn’t do anything remotely fancy at this point. I simply used Ubuntu Server’s install utility to create a 30 GB partition at the beginning of each drive, and I told the installer to use those partitions in a RAID 1 configuration, and I had the installer create an LVM Volume Group (VG) on top of that RAID 1 array.

I didn’t have to use the LVM layer on the RAID device where my operating system is stored, but LVM gives me flexibility. If I do something stupid, and I fill up that 30 GB volume at some point in the future, it will be easy to expand it using LVM!

My host operating system is not encrypted. I only encrypt the storage used for the virtual machines, and I don’t use any swap space.

When the server boots, I have to SSH in and manually run a short script that unlocks the rest of the storage, mounts anything that needs to be mounted, and fires up all my virtual machines. Someone has to enter the passphrase to unlock the LUKS encrypted devices, so I can’t start the virtual machines automatically.

Why not use full-disk encryption for the host?

Full-disk encryption is a bit of a misnomer. If a machine is going to boot, something has to be left unencrypted. You can get tricky and use a removable USB disk as your boot device, but that introduces its own problems.

These days, it is possible to have GRUB load a kernel and initrd from an encrypted disk. Traditionally, a LUKS encrypted machine has an unencrypted kernel and initrd on your boot partition.

In either case, I would need a way to unlock the disks, and I don’t have a monitor or keyboard plugged into this machine. There are some tricks you can play by loading the Dropbear SSH server in your initrd. That still leaves you with an unencrypted SSH server anyway, right?

Leaving the entirety of the host operating system bootable without unlocking the rest of the system doesn’t leave me much more vulnerable. This server is up and running 24/7. Disk encryption isn’t protecting me from remote attackers. My VMs are useless if they’re left encrypted, so if they’re running, they have access to the encrypted data.

Encryption is protecting me from physical theft. If someone breaks in and hauls away my hardware, whoever they sell the stolen goods to will not have access to my data. That’s 99% of what I’d be worried about.

What is the biggest flaw of this encryption strategy?

I’m probably leaking some sort of data on my KVM host. The config files for all my VMs are stored unencrypted, so if someone steals my hardware, they know the names of all my virtual machines. There are log files storing things like my SSH session information, so the thief can find out when I logged in.

It would be simple to disable logging and move all the libvirt configuration data to the encrypted file system.

If your desired level of paranoia requires you to hide this sort of information, you should just take the extra steps and encrypt as much data as possible. It is better to hide everything, because it is easy to accidentally let something leak!

Storage for the virtual machines

When I set this server up, I manually created a two disk RAID 10 array. Yes, Linux’s MD RAID allows you to create a RAID 10 array with fewer than four disks. Converting a RAID 1 to a RAID 10 is a real pain in the neck. Adding additional disks to a small, existing RAID 10 is easy. Planning ahead is smart!

I run a LUKS layer on top of the RAID 10 array. You could do it the other way around, and put a LUKS device on each disk that makes up that RAID device, but your server will have to calculate AES for each disk. If LUKS runs on top of the RAID 10 instead of underneath, it will consume half as much CPU.

I run LVM on top of that LUKS device. Some people prefer to use Logical Volumes (LV) as block devices for their KVM virtual machines. If I had any virtual machines that required optimal disk performance, I would do the same. My requirements are quite light, so the majority of this Volume Group (VG) is allocated as an ext4 partition mounted at /var/lib/libvirt/images.

I tend to use qcow images for all my virtual machines. They’re easy to back up. They’re easy to duplicate. They’re easy to shuffle around from my server to my desktop or laptop. They can also be deduplicated, though I don’t use that feature often anymore. For me, the convenience is worth the decreased disk performance.

Tell me more about this oddball implementation of RAID 10!

Linux’s MD RAID 10 implementation is designed to keep a copy of each block on two separate disks. Of course, you can configure it to keep more copies if you like, but we’re just going to talk about what it does when keeping two copies.

If your RAID 10 has two disks, this works exactly like a RAID 1 mirror. If your RAID 10 has four, six, or eight disks, then Linux’s RAID 10 functions exactly like you’d expect a RAID 10 to work.

It gets more interesting when you use an odd number of disks. I currently have three 4 TB 7200 RPM disks in my RAID 10. A copy of the first block of data is stored on disk 1 and disk 2. A copy of the second block is stored on disk 2 and disk 3. A copy of the third block is stored on disk 3 and disk 1.

This staggering of your data repeats until you reach the end of your disk.

Why RAID 10? Why not RAID 5 or RAID 6?

I am certain that I could dedicate an entire blog post to this section, but I’ll try to keep it down to a handful paragraphs!

First of all, don’t use RAID 5. Once hard drives started pushing past a few hundred gigabytes in size, the odds of encountering a read error during a RAID rebuild quickly started to approach 100%. Also, failure rates are high enough that the odds of a second disk failing while an array is rebuilding make me uncomfortable. You should have two disks’ worth of redundancy.

RAID 10 performs better than RAID 5 or RAID 6. The differences in performance characteristics are more complicated than that, but I’m trying to keep this to a few paragraphs. I wasn’t too concerned with the performance, especially since I was planning to use lvm-cache. The performance advantage helped lean me in this direction, though!

I was more concerned about my initial costs. My largest VM was going to be my NAS, and I had only about 1 TB of data that needed to be stored there, and my RAW photo collection was only growing by 5 to 10 GB per month. A pair of 4 TB disks in a mirror would have me covered for a long time.

RAID 6 would give me more storage for my dollar over the long term, but I would have had to buy four drives right away. In my case, though, it would have cost a lot more up front!

Odds are that the math will work out different in your case!

lvm-cache

I had to stop writing when I got to this heading. My lvm-cache configuration is a bit off. We didn’t have lvm-cache when I set this up originally. We had to use dm-cache directly; lvm-cache is a convenience layer on top of dm-cache. lvm-cache requires the cache devices to be a part of the volume group that you want to cache, and I’m not set up to allow that!

I have one Volume Group (VG) built on my SSDs, and a second VG built on my RAID 10 array. I can’t easily shrink my SSD VG, so I cheated. I used a Logical Volume (LV) on the SSDs as another Physical Volume (PV) that I could add to the RAID 10’s VG. You have more information than I did when I built this, so you can avoid this workaround!

I also forgot that I’ve had my lvm-cache disabled for almost an entire year! I recall having to turn it off around the time when we moved into our new house, but I don’t specifically remember why.

I just set my lvm-cache back up—that’s why I had to take a break from writing! I can’t properly explain how I set up my cache layer, because my setup is extra convoluted.

I’m also not prepared to tell you how much value there is in running lvm-cache. I remember being disappointed for a number of reasons, but that was over a year ago. I’m sure progress has been made, and I know the usage of my NAS VM has shifted quite a bit over the last year.

I’m going to let the cache populate itself, and I’ll report back in a few weeks!

What should I have done to make using lvm-cache easier?

I should have added the SSD RAID 1 and the spinning RAID 10 arrays to a single VG. I tend to dislike doing this. Putting different classes of storage in different VGs is a good mental abstraction, and it means you’re less likely to accidentally create an LV on the wrong grade of storage.

I don’t want to accidentally put a PostrgreSQL server’s database files on a RAID 5 with its slow write speeds, and I don’t to put my NAS on an expensive NVMe RAID 1! When both arrays live in the same VG, you have to explicitly state which Physical Volume (PV) you want to use when creating your LVs.

Conclusion

I hope you found this interesting. My disk configuration may not be the right choice for you, but I hope that the description of my setup might make you think of some possibilities you hadn’t considered before!

I’ve had this setup running since 2015, and it has been faring quite well. It started with the pair of 4 TB disks in a RAID 10, and I added a third disk to that array last year. I don’t expect to make any major changes, and it won’t surprise me if I continue to use this setup for another four years!

I did my best to include the right amount of detail in this overview blog. Do you think I should dive deeper into any particular aspect of this setup? Do you have any questions? Leave a comment below, or stop by the Butter, What?! Discord server to chat with me about it!
We Are Working On an Open Source LED Board

| Comments

I’ve had an idea stewing around in my head for years. It started when I saw a Dekatron posted on hackaday.com. Dekatrons are high-voltage vacuum tubes, but they seem easy enough to emulate with LEDs. There are all sorts of things I could indicate using a ring of LEDs!

You could use it like a clock. You could use it as a progress bar. You can spin it around at various speeds. A Dekatron seems like a lot of fun!

At the time, I wanted to replace the lock indicator LEDs on my IBM Model M keyboard with three tiny Dekatrons. I never did, but I also never stopped thinking about what I would do with a ring of spinning LEDs.

We’re going a bit bigger

Brian has been building and giving away custom DIY NAS servers for years. We were chatting about it one day, and we were thinking that we need something of our own to use in those builds. Then we completely forgot about it for a few months.

Then I remembered my obsession with Dekatrons. Why not design some LED rings to put into a 5.25” drive bay in your server? The LEDs could spin to indicate network traffic. They could light up like a progress bar to indicate disk utilization. They could flash red lights to indicate a drive failure!

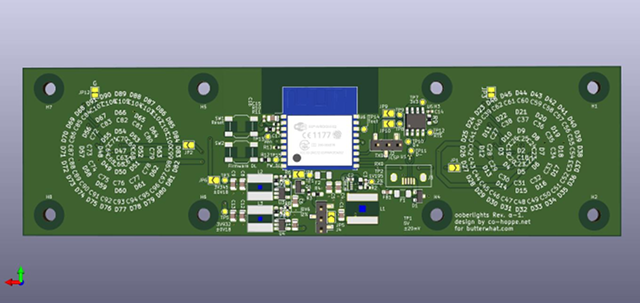
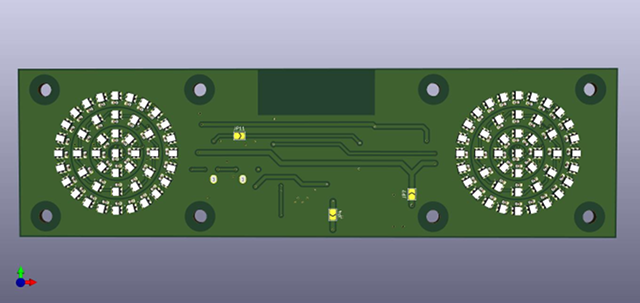
OoberLights Prototype PCB Front

NOTE: I didn’t even remember seeing real Dekatrons mounted in a 5.25” drive bay on Hackaday until I was attempting to find that old article that inspired me many years ago. I don’t know for certain that this is the project from my memory, but I’m betting that it is. It looks like I’ve circled all the way back to the beginning!

I don’t know how to design a PCB. Brian doesn’t know how to design a PCB. So what do we do? I happened to talk to a friend that’s been dabbling in this sort of thing as a hobby.

In the end, we thought up something pretty cool!

OoberLights

We decided to use WS2812 RGB LEDs in the ring. This opens up all kinds of neat possibilities. The disk-utilization progress bar can be blue. The spinner for incoming network traffic could be red and spin clockwise. The spinner for the outgoing network traffic might be green and spin counterclockwise. Maybe the spinner could be a bright, white LED with a red and orange trail following it!

My vision only included fitting a pair of simple LED rings side by side, but my friend is more ambitious than me. He decided to include concentric rings of LEDs! Both discs of LEDs is now three concentric rings, with fewer LEDs in each ring as you approach the center. He also included a single LED at the center.

This is awesome, but it has made my job more complicated. I was ready to display some useful data about your server on a pair of simple rings. To utilize all these extra lights, I am going to have to get creative!

We’re no longer limited to spinning. The OoberLights can pulse in and out. They can also be used to crudely simulate the hands of a clock. I’m even wondering if they’re dense enough to display a simple font. This is going to be so much fun!

OoberLights can sit on your desk or on a shelf!

Some people put their computers on display prominently on their desks. I’m an old man. I’m used to my computer being a plain beige box, and I don’t want it cluttering up my workspace, so I hide it on the floor. I don’t want my OoberLights hiding somewhere behind my desk or on the floor!

We’re going to design a small display case as well, so you can place your OoberLights right in front of your monitor or up on a bookshelf.

How is it going to display anything useful if it isn’t connected to my computer?!

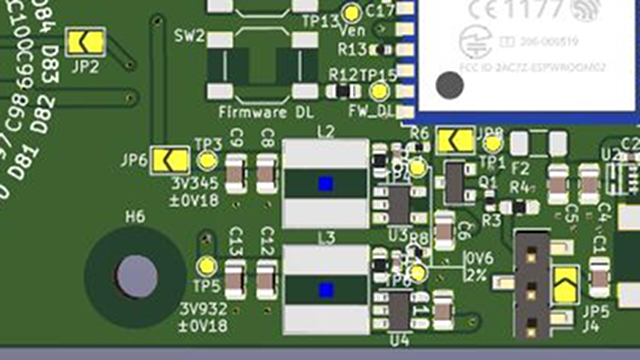
I thought it was important for the OoberLights to have WiFi connectivity, so we’re using an ESP8266 microcontroller. We are going to allow you to control the lights via WiFi using an HTTP REST interface or directly over the USB port. The USB port will also be used for power.

How do you control the OoberLights?

My expectation is that the software will get fancier over time, but I have some plans for how we’re going to get started.

I don’t want you to have to know how to write complicated code to get the OoberLights to do something interesting. I want them to be able to do fancy things right out of the box.

We’re planning on having simple text commands to control things like progress bars, spinners, and other things. I want various bars and spinners to be able to be active at the same time. You’ll be able to give it commands along the lines of, “display a blue spinner at 60 RPM,” or “give me a green, clockwise progress bar from 0% to 33%,” and the device will render these for you.

If you’re a UNIX junkie like me, this will make it easy to string a handful of commands together and pipe the correct command over the USB serial port to the OoberLights to display exactly what I want.

I expect that one of our first projects will be designing some sort of open-source agent to run on Brian’s FreeNAS boxes to push useful information to some OoberLights.

Everything will be open source!

I haven’t talked about which license we will be using, but the hardware and software will definitely all be open source. We don’t even have our first prototype built yet, though, so this may take a little while. We have no idea what we’re doing!

The first prototype is close!

I’ve gotten a few recommendations on local shops than can manufacture our prototype OoberLight PCBs for us. I thought about ordering PCBs and all the surface mount components and soldering them onto the boards myself. I know I could manage to solder a few components on, but there’s 90 LEDs on each board, and nearly as many other individual components as well! This is beyond my skill level.

We’ve never designed anything this complicated before. I’m having an experienced friend check it over, but even so, what are the odds that the first prototypes will even be functional? We don’t know! It’ll be fun to find out!

What’s the timeline for a release?

Who knows! I’ll be excited if we can be manufacturing real OoberLights in time for Brian’s next DIY NAS giveaway. It sounds like his next EconoNAS giveaway may be less than six months away. Do you think we can do it in time?

What needs to be ready by then?

The hardware needs to be finalized, of course. The possibilities for animations and things that the OoberLights can do seem nearly limitless. We can’t implement everything in version 1.0 of the firmware. We’ve thought of a lot of ideas already, and I have a feeling those ideas are only the tip of the iceberg.

We need easy firmware updates. It looks like it won’t be difficult to allow firmware updates over HTTP. We’ll see how that goes in practice. If we have to plug in for firmware updates, I won’t be too disappointed, though.

To be ready to ship, the OoberLights need to be controllable over both WiFi and USB, and they need to be able to display multiple spinning indicators and progress bars simultaneously. I think that will be a pretty awesome start to the project!

How much will the OoberLights cost?

This is a very good question. I wish I had a good answer!

We have a rough idea of what the components cost. I have some guesses as to what the prototypes will cost—they won’t exactly be cheap!

I don’t know what quantities we’ll be ordering yet, so I don’t know what sort of volume discounts we’ll be able to get. The more people that are interested, the better the pricing will be!

What do you think?

Do you want crazy, spinning blinkenlights on your desk or in your PC case? I sure do! I want one in my virtual machine server. I want one in my workstation. I want one on my desk keeping count of retweets and visitors to my blog!

If you think this is interesting, let me know! Leave a comment. Tell me about what I’m forgetting. Tell me if you want one. Stop by the Butter, What?! Discord server to tell me about it. The more interest we see, the more we can order, and the better the pricing will be for us and for you!

I Roasted Coffee and I am Drinking My First Cup!

| Comments

My air popper and 4-pound coffee bean sampler arrived today from Sweet Maria’s. I have no idea what I’m doing, and I am impatient. I opened the box as soon as it arrived, then I unpacked the air popper, plugged it in, and loaded it up with some green coffee beans!

My first batch of roasted coffee!

That was about four hours ago. I’m supposed to wait at least 24 hours before brewing coffee, but I’m not that patient. I roasted about 50 grams, and it takes a little over 20 grams to pull a double shot of espresso. What if 24 hours went by, and I learned that my grind was way too coarse or fine? I’d only get two tries, then I’d have to wait 24 more hours.

I didn’t want that to happen, and I was impatient.

How does it taste?

The sampler came with four one-pound bags of coffee beans each from different parts of the world. I decided to do my test roasting with the beans from Costa Rica. I’ve had good coffee from Costa Rica in the past, but it was the least exciting of the four, so I wouldn’t mind ruining it!

I just finished my single-shot latte, and it was delicious. I roasted just about as light as I could. I’m weird, and I enjoy espresso made from light-roast beans. I’ve even adjusted the pressure on my Rancilio Silvia to help pull successful shots from light roasts!

I finished a bag of Kenyan beans from Craft Coffee earlier in the day. These freshly roasted beans from Costa Rica definitely made a better latte. I’ve been working my way through those Kenyan beans for a week, though. I can’t expect them to be comparable to beans I roasted a few hours ago, right?

What’s in the sampler?

There are the beans I already tried from Costa Rica. Then there are dry-process beans from Ethiopia, honey-process beans from Sumatra, and also a bag of beans from Kenya. I’m assuming since it isn’t specified that the beans from Costa Rica and Kenya are both wet process.

The beans in all four bags are quite small. I don’t know what determines the size of a coffee bean, but I do know that all the best roasts I’ve ever had all had small beans. I’m assuming this is a good sign!

I’ve always enjoyed dry-process beans, and I’ve never had an Ethiopian bean that I didn’t like. I’m looking forward to trying that bag and the honey-process bag from Sumatra.

Green coffee beans are weird

I’m used to opening a bag of recently roasted coffee. There’s a certain aroma that I expect. When that aroma is accompanied by fruity smells, I know it is going to be delicious.

Green beans smell weird. The bag of honey-process beans has a slightly different smell, but I wouldn’t be able to tell the other three apart. I am not a fragrance expert. I can’t explain what these bags of beans smell like. I can say that they don’t smell appetizing!

My first roast

I have a vague idea of what I’m supposed to be doing. Don’t load too much coffee into the air popper. The beans need to be spinning around in there.

I’m aware of the concept of the beans cracking during roasting. I guess light roasts start just before the first crack, and dark roasts are stopped after the second crack. The cracking was much louder than I expected!

One of my lattes

I stopped my first small batch well into the first crack. That was at after roughly four minutes of roasting, and the beans looked a little darker than I was hoping for.

I stopped the second batch shortly after the cracking started—a little over three minutes of roasting. These were just about as dark as the first batch.

I didn’t measure each batch, but I think the first batch was a bit smaller than the second. When I combined my first two batches together, the total came in at around 50 grams.

Thoughts so far

The coffee tastes good. Roasting doesn’t take long, and it isn’t a lot of work. The beans are delicious and inexpensive. Learning about roasting is going to be a lot of fun!

It takes me roughly six minutes to make a double-shot latte with my Rancilio Silvia. It would be awesome if I could roast tomorrow’s beans while making today’s latte. Even if I do one task after the other, it won’t take much more than ten minutes. There’s some waiting involved in my latte-making process, though. I wonder if I can shave a few minutes off that time by interleaving the steps!

What do you think? Have you tried roasting your own coffee beans? Are you interested in giving it a shot? Leave a comment and tell me about it, or stop by [the Butter, What?! Discord server][bw] and chat with me about it!