I have dozens of files from various corners of the Internet in my ~/.emacs.d/lisp/ directory. I’ve tried to keep the important ones up to date, but I’ve never done a very good job of it. The ones that are old and outdated are the lucky ones. Most of them are so old that I don’t even use them anymore.
Emacs now has a rather nice package manager called ELPA, and I started using it over the summer. Converting my existing configuration files has been a bit painful, and the apparent gains from the effort have been pretty small. I’ve only converted a very small number of my configuration files because of this.
My problem with ELPA
My Emacs configuration is pretty well organized. I’ve been using my-site-start to help manage my configuration since 2009. It is very simple, and it works a lot like the SysV init system. It automatically executes all the files in my ~/.emacs.d/site-start.d directory. I try to keep all the configuration for each individual package in its own file. That makes it easy to quickly remove configurations that I don’t need.
Most of these files are very simple and quite similar. They usually have a require statement at the top followed by one or more setq. Some contain key binding assignments, but I mostly keep those to a single file.
I assumed that I would be able to reinstall my existing packages using ELPA, and my existing configuration files would just continue to work. The reality wasn’t quite that simple. My understanding might not be entirely accurate here, but it shouldn’t be too far from reality.
The packages installed by ELPA aren’t available until after Emacs is completely finished starting up. This means that all of those require statements become errors. That isn’t a problem on its own, but this also means that any call to functions within these packages also becomes an error. At this point, that call to the global-git-gutter-mode function will fail.
I was able to work around this by setting package-enable-at-startup to nil. This seemed like a bit of a kludge. I’m pretty sure this means that I now have to require every package I install.
John Wiegley’s use-package
I found John Wiegley’s use-package last week, and I am very pleased with it. It manages to solve all my issues with ELPA, and it sure looks like it is going to lead me towards a much cleaner Emacs configuration.
~/.emacs.d/site-start.d/90git-gutter.el with use-package
I’ve started my journey the lazy way. I replaced all my require calls with use-package calls. Then I just wrapped up my existing code and stuffed it into the use-package’s :init section. This was just enough to eliminate my reliance on setting package-enable-at-startup to nil.
I’ve only just scratched the surface of use-package. It also has options for the configuration of key bindings and for populating your auto-mode-alist.
I have a feeling that I’m going to be slowly rewriting all of my Emacs Lisp files over the next few weeks!
Quite a bit has happened since I reported in September. Seafile 2.0 was released, and that release just happened to coincide with a hardware failure. That was actually pretty convenient for me, since I wanted to rebuild my libraries with Seafile 2.0’s improved encryption.
Seafile server bandwidth usage
I was really hoping to have at least a couple months’ worth of good bandwidth reports by now. Unfortunately, I’ve had reason to upload large amounts of data every single month since I started using Seafile. One month my data was uploaded, then Chris’s data was uploaded the next month. I had a hardware failure the month after, and I had to upload my data to the new Seafile 2.0 server. We didn’t get around to uploading Chris’s data again until last month.
We’re not quite two weeks into December yet, but I haven’t had a reason to upload any libraries from scratch yet. Chris and I have only used about 1.5 GB’s worth of bandwidth so far this month. We’ll probably finish the month out with well under 4 GB of bandwidth use. I’ll come back and replace this paragraph in a few weeks when I know the final bandwidth total.
I’m very happy with that. It is barely a blip on the radar. I could almost fit numbers like these into our tiny, inexpensive mobile data plans.
Update: I’m counting down the final hours of 2013 and updating the Seafile server’s bandwidth screenshot image. It looks like we came in at 2.74 GB of bandwidth usage for the month of December. I will be quite pleased if most months end up looking like this!
Seafile server disk usage
I have a total of 11 GB of data in 69,022 files spread across twelve separate libraries. The most files that I have in a single library are 22,347. These libraries are all kept in sync on both my desktop and laptop.
Chris has a single 31 GB library containing 14,596 files, and she has only one computer.
All the libraries are configured to expire deleted files after 90 days.
Seafile performance
When I first started using Seafile, I was only using a single computer with a fast solid-state drive. I had no performance issues at all. I could boot my computer up, and Seafile would finish checking my local libraries for changes before I could even think to look.
When I bought my new workstation, I had to put a traditional 7200 RPM hard drive back in my laptop. The laptop is now excruciatingly slow for two or three minutes after booting up.
My start-up scripts are pretty aggressive. They simultaneously start up all the long running applications that I use all day long. Things like Emacs, Chrome with a bunch of tabs, Pidgin, Thunderbird, and LibreOffice. These would all be ready to use in just a few seconds with the solid-state drive. They take almost a full minute to get up and running on the old, slow, spinning disk.
Now it takes Seafile almost three minutes to scan my libraries. That is certainly not a ridiculous amount of time to check nearly 70,000 files. It isn’t want I’m used to, though.
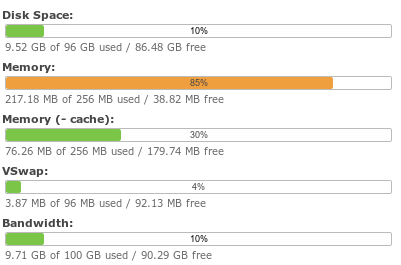
The server-side requirements are also extremely light. The virtual server that I’m running Seafile on is configured with only 256 MB of RAM and 96 MB of swap space, and half of that is being used as disk cache. Running in such a small virtual machine hasn’t been a problem at all.
Seafile sync speed
I was pleasantly surprised a few weeks ago. I had the same file open on my laptop and desktop. I made some edits on my desktop and walked away. When I got back, I sat down at my laptop and was surprised to see my changes staring back at me!
By default, Emacs prompts you when it notices a file has changed on disk. I had completely forgotten that I had configured it to automatically reload when a file changes on disk. I was bouncing back and forth between computers as though I were accessing a share on a file server!
Of course, it isn’t quite as fast as a file server. It takes about 20 to 30 seconds for the change to be detected, uploaded to the server, and downloaded to the other computer. That is definitely fast enough for me, and it is very nice to be able to pick up working right where I left off, even if I forget to commit my work in Git before I walk away.
Testing my Seafile backups
I’ve been procrastinating. I back up my Seafile server every day, but I haven’t gotten around to restoring any of those backups to a test server. Since an untested backup may not be a backup at all, I figured it was time to stop procrastinating.
Testing the backups was really simple. Each of my daily backups are stored in btrfs snapshots. All I had to do was chroot into them one at a time, restore the database, and fire up the Seafile service. All I had to do was follow along with the instructions in the Seafile backup and restore documentation.
wonko@backup1:~$ sudo btrfs subvolume list /mnt/vz-rsync/
ID 439 gen 352 top level 256 path .snapshot/rsync_2013-12-03_23:34:16ID 442 gen 357 top level 256 path .snapshot/rsync_2013-12-04_14:57:11ID 448 gen 371 top level 256 path .snapshot/rsync_2013-12-05_16:03:00ID 480 gen 444 top level 256 path .snapshot/rsync_2013-12-06_15:41:10ID 509 gen 426 top level 256 path .snapshot/rsync_2013-12-07_07:18:05ID 515 gen 457 top level 256 path .snapshot/rsync_2013-12-08_01:39:49ID 520 gen 462 top level 256 path .snapshot/rsync_2013-12-09_01:12:41ID 526 gen 468 top level 256 path .snapshot/rsync_2013-12-10_01:17:34wonko@backup1:~$
The first one took the longest to test. Seafile or Nginx didn’t want to start up until I mounted the proc file system in the chroot. It was easy to test a few random days once I got that problem squared away.
A convenient bonus
Cloud storage software like Seafile is a great way to help protect yourself from ransomware like CryptoLocker. If I notice that my library has been corrupted, I can just click a few buttons and restore the entire library to a previous state. I can go back to yesterday, or last week, or as far as I need to go.
I’m using Linux, so I’m not a target of CryptoLocker. Ransomware is some pretty insidious stuff, though, and storing or backing up your data in the cloud is a good way to keep yourself safe.
You don’t have to host your own cloud backups to get a good deal. I’ve heard good things about Backblaze, and I’m looking for an excuse to build one of their awesome, big, red storage servers. They don’t seem to support Linux, though. I’ve also heard good things about Crashplan, and they do support Linux.
Seafile’s own service, Seacloud, has pretty good pricing on their “team” packages. You can sign up for a single account, create libraries for multiple users, and let everyone share the same storage quota. That seems like a pretty good value to me.
There’s a lot of overlap between “cloud storage” and “cloud backup.” “Cloud storage” is generally aimed towards syncing your data between multiple machines, while “cloud backup” is geared more towards moving your data from one computer up to the Internet. If you just want to keep your data safe, then one of the various backup services is probably a better value for you.
The verdict
I had a lot of cloud storage options to choose from six months ago, and I definitely made the right choice. Seafile has just the right combination of encryption, performance, and storage efficiency to meet my needs, and it has made the process of using multiple computers a much more pleasant experience.
There are some interesting features due out in the next couple of months that are listed in the Seafile 2.x Roadmap. I’m looking forward to the improved syncing speed. Improved performance will most likely let me squeeze a little of extra life out of my laptop’s new battery.
Buying gifts is hard work. It is that time of year again, and I’m working hard trying to figure out exactly what to buy for everyone. I thought I might be able to help someone else out if I made a list of some of my favorite toys and gadgets. My friend Brian also thought this was a good idea, and he posted a list of his own this year.
I already own almost everything on this list. That means that you shouldn’t buy me anything on this list for Christmas, because I already have it. It also means that I’ve actually used all this stuff, and I am giving it my official seal of approval.
There are a few things on this list that I don’t own. For instance, I only have one of the listed USB battery packs. I can only put my seal of approval on the smallest of the three, but I was worried that that size might not be ideal for everyone.
USB Battery Pack Chargers ($9 to $50)
External USB battery packs should come in handy for any geek who needs to keep their gadgets powered up while on the go. I ordered my first external battery pack last week, and I decided to get one of the smallest and most inexpensive models I could find.
It is the Swift Gear Mini 2600 mAh battery pack. It is a small, light, four-inch tube that is small enough that I won’t even notice it in my jacket pocket. It is about the size of a small flashlight. In fact, it is a small flashlight, and a surprisingly bright one at that.
I was a bit worried that a 2600 mAh battery pack might not have enough capacity, but I’m happy with the choice I made. It is able to bring my Nexus 4 from 14% charge all the way up to 84% in less than two hours. That is enough to buy me a few extra hours of tethering, which will definitely be helpful next time I’m stuck waiting in an airport. It also manages to bring my 2012 Nexus 7 tablet up to 43% from the low battery warning at 14%.
I also included two larger battery packs in my list. I haven’t used these specific models myself, but they were other models I was considering before I decided what size I wanted. Both of the larger battery packs are capable of charging two devices at a time, and their larger capacity would be handy if you were trying to charge a more power-hungry device like a tablet.
The Arduino is a nifty little hardware prototyping platform, and it is a great way to dip your toe into the world of hardware development. An Arduino board all by itself isn’t very useful. When my first Arduino board arrived, the first thing I did was program it to blink an S.O.S. on its built-in LED.
This isn’t very exciting at all. You need other electronic components if you want to do something interesting. You need parts like LEDs, resistors, buttons, motors, and buzzers. The easiest way to get going is to buy an Arduino starter kit.
I pieced together my own starter kit, but that wouldn’t make a very good gift. The Official Arduino Starter Kit and the Sparkfun Inventor’s Kit are both good choices, and they’re pretty comparable. The official kit seems to come with a larger printed guide, while the kit from Sparkfun comes with a nice storage case.
Of the two, I think Sparkfun’s Inventor’s Kit is a better gift and a better value. Sparkfun’s carrying case is a nice touch, and their holder for the Arduino and breadboard looks pretty convenient.
If you’d like to save money, you can go with a more generic kit. This Arduino Uno Ultimate Starter Kit is about half the price of the other two kits. It may have fewer components than the other two kits, but it definitely provides a better “bang for the buck.”
I have had my Swiss Army CyberTool for at least 12 years now, and I would be lost without it. I actually received mine as a Christmas present, and it is the perfect multi-tool for a geek like me that is always building computers and taking apart servers.
The thing that puts the CyberTool 34 above most other multitools is its bit driver. It comes with Torx bits, which are handy if you run into any HP servers. The bit driver itself is also the correct size to fit those brass motherboard standoffs.
A lot of people prefer the Leatherman-style tools, and I own a similar Gerber multitool. These are also very handy tools, and I’ve used mine quite a bit, but they’re all centered around that giant pair of pliers. I just don’t need pliers very often. If your geek is anything like me, he’ll get a lot more mileage out of the Victorinox CyberTool 34.
This is probably one of the best birthday presents that I’ve gotten in a long time. First off, it is just really awesome looking. It is pretty much an actual beaker with a handle molded on to the side, and that is just really cool.
I use it every day when I make myself a latte. It is the perfect vessel for that, too. The thin glass doesn’t instantly cool down my drink like standard ceramic mugs do, and being able to see the layers of espresso, milk, and foam through the side is a nice bonus.
I’m going to be away from home for a few months, and I’ve picked up a few items to make myself a little more comfortable while I’m gone. My laptop battery was dead, so I thought it would be a good idea to replace that before I left.
While I was shopping for a new laptop battery, I also noticed that Amazon has quite a few Bluetooth gamepads that clip onto your cell phone. I’m a huge fan of old-school video games, and I’m going to be spending a lot of time in waiting rooms next month, so I figured I would pick one up.
I usually pack a Wii remote with me when I travel. They’re pretty small, I can use them with my phone, tablet, or laptop, and I always have a spare Wii remote lying around. The Ipega gamepad is a pretty big upgrade over the old Wii remote.
Expectations
I decided to go with one of the most inexpensive clip on gamepads; the Ipega PG-9017. They’re selling for right around $20, so my expectations really weren’t all that high. The reviews made it sound like it is cheaply made, and it is incompatible with a lot of Android devices.
My biggest worry was the d-pad. The pictures made it look like it had the terrible, round, Xbox-style d-pad. I figured that even if the d-pad ended up being awful, it would still be a huge upgrade over touch controls.
Reality
The Ipega PG-9017 is very light, and a lot of people probably assume that means it is shoddy. I don’t think this is necessarily true. I’ve tried bending the controller. When I put this much force on my Sony Sixaxis controller it starts to creak a bit. The Ipega doesn’t make a sound.
The spring-loaded clip surprised me the most. It seems pretty sturdy, and the spring has no trouble holding my Nexus 4. I did not think it would be a good idea to try to see how much flexing the clip could stand up to. It is just a couple of interlocking pieces of plastic, but it is more than enough to get the job done.
The d-pad is nothing short of excellent. It has a Nintendo-style plus sign shaped d-pad, and it feels great. I’ve been playing a ton of Zanac, and it feels almost just like it did on the NES. The round bits that I perceived to be part of the d-pad in the pictures are molded into the shell of the controller. They’re not part of the d-pad at all.
There is no noticeable lag, either. I would never be able to play Zanac so well if there were, and I would be missing all sorts of jumps in Super Mario Bros!
The analog sticks are indeed analog. I used them to play a bit of Mario 64 and Starfox 64. They’re a little stiff, and they’re not terribly accurate, but they work well enough for the most part. The shoulder triggers are a bit hard to use, because they’re right up under the phone.
There’s one massive flaw
The Bluetooth implementation seems to be broken in a very strange way. I’ve paired it with my laptop, a Nexus 4, a Nexus 7, and a Samsung Galaxy S. It works just fine on all of them. I played a bit of Super Mario Bros. on every device.
Once you turn off the gamepad, it just won’t reconnect. I have to go into the Bluetooth settings on the phone, delete the gamepad, and pair it back up again. This is very annoying.
I don’t know what I changed, but I had it working correctly for a few days. All I had to do was hit the “home” button on the Ipega gamepad, and I could immediately start playing. Then I decided that I should pair it up to the laptop before writing this post. It hasn’t worked correctly again since.
The verdict
I was really hoping that I could recommend this device. The d-pad feels great. The buttons feel good, even if they’re a bit too tightly spaced for my big hands. The clip works great. This should be an awesome gamepad for any retro gaming fan.
Unfortunately, the Bluetooth pairing issue seems like a showstopper. I already have the controller, so I’m going to just deal with it, but I wouldn’t want to inflict this on anyone else.
I’ve since learned that there is a newer revision of this controller, the Ipega PG-9018. I’d really like to know if the newer model corrects this problem.
Do you have a gamepad for your phone? Which one is it, and how is it working for you?
Update: I’ve had this battery for over 18 months now, and it is still running like a champ.
Update 2: I’ve had this battery for two and a half years. If I’m doing light work, it will still run my laptop for almost four hours. However, if the CPU and GPU are working hard, and I hear the fan working overtime, I’m likely minutes away from randomly losing power. There must be a dying cell in there, because it just can’t supply enough voltage anymore.
I’m still pleased with my choice of battery. It got me through a few years, and my laptop is starting to feel pretty ancient now anyway.
The 8-cell battery that came with my HP DV8T laptop has been nearing the end of its life since the beginning of the year. When I was traveling back in March, I was lucky if I could get thirty minutes of use out of it. I can’t get much done in half an hour, but it was more than enough juice to let me move the laptop from one outlet to another.
The battery completely gave out at some point in the last few months. I haven’t been using my laptop all that often since buying my new desktop machine, so I hadn’t given it much thought at all. I’m going to be traveling for a few months, and that seemed like a good reason to pick up a fresh battery.
How do I choose a battery?
There are quite a few choices. The most expensive option is a replacement battery from the laptop manufacturer. This seems like a good idea; the laptop manufacturer is likely to be using high-quality parts in their batteries. The problem is that you don’t know how long those batteries have been sitting on a shelf, and lithium ion batteries deteriorate quite a bit if they’re not cycled regularly.
Then there are really cheap third party replacement batteries. I saw 8-cell batteries for my HP DV8T for as little as $20 shipped. I’ve bought cheap batteries like this before, and the reviews at Amazon seemed to match up pretty closely with my experiences. The ones I bought didn’t have as much capacity as the original battery, and they ended up turning into doorstops within about twelve months.
This worked out just fine for me in the past. Those laptops were nearing the end of their useful life, and I just needed them to limp along until it was time for an upgrade. A battery like that isn’t a good fit for me this time, since I don’t plan on replacing this laptop anytime soon.
There were some more expensive third party batteries at Amazon that come with 18-month warranties. The reviews on these batteries were much better than the $20 batteries, and I figure that if they’re willing to stand behind their product for 18 months, then these batteries should last longer than just a few months.
My laptop is very power hungry, so I just couldn’t resist the upgrade to a 12-cell battery. I’m not worried about the extra weight, since this is already a gargantuan nine-pound laptop anyway. It also seemed like a good value; it only cost me 28% more to get 50% more battery!
The larger battery adds a small bulge that raises the back of the laptop off the desk a bit. I’m sure some people will be happy that this gives the laptop better airflow. I’m not one of those people, but the extra height surely won’t cause me any problems.
The colorful brochure that came with the battery recommended that I fully charge and discharge the battery 2 to 6 times. They obviously don’t know me very well. I would have done this anyway just to see how long it would last!
When I first bought this laptop, and its battery was factory fresh and it still had a solid-state drive, the best I could manage was a bit more than 150 minutes of run-time on a charge. I would have been happy to beat that by anything more than an hour. If we can trust the math, I should be able to hit 225 minutes now.
I wasn’t expecting to do that well, though. I’ve since downgraded the SSD with a 7200 RPM spinner, and I used to have all sorts of power saving tweaks set up. This is just a bone stock Xubuntu 13.10 install now.
I was extremely surprised by this new battery. I charged it up and ran it dry for the first time yesterday. The laptop had all my usual applications up and running. The screen brightness was set to about half, and I left it sitting idle almost the entire time. It took 268 minutes to empty the battery. That’s two hours more than I ever got out of the original battery!
The second discharge cycle didn’t go quite as well; it only ran for 238 minutes. This was entirely my own fault. I threw off the results by running some disk-intensive operations while the battery was draining.
The results were even better on the third discharge cycle. It managed a whopping 282 minutes. It was good to see that the first discharge wasn’t a fluke.
30-day update
Things are a bit less scientific this time. I’m traveling, and I don’t have my desktop with me, and it isn’t easy to leave my only available computer alone for four solid hours. Even so, I’m not having any trouble breaking the four-hour mark. I’m going to say that the battery is still working just fine.
I am noticing a small physical problem with this 12-cell battery. The larger battery raises the back of the laptop off the desk, and the battery is off center. I can see the screen shaking around a bit while I type. I’m sure that there’s more to blame than just the battery. I am not terribly gentle with the keyboard, and this old particle-board desk from the eighties isn’t nearly as stable as it once was.
18-month update
The battery is still doing quite well after 18 months. I just ran the laptop from a full charge, and it kept running for 259 minutes. This fits in well with the numbers I was getting when the battery was new. I definitely made the right choice.
Will the battery still be good in 18 months? How about in three years?
It is too soon to tell, but I have a lot of confidence in this battery now. The label on the new battery says that it has 50% more capacity than my original battery, while it is able to power my laptop about 70% longer. I think that’s a very good sign, but I’ll only know for sure with time.
Are you using a third-party replacement battery in your laptop? How is it working out for you?
I have some rack-mount servers out in the world, and none of them have optical drives. You never know when something is going to go wrong, so I always carry a USB DVD drive and a stack of various discs in my laptop bag. I know that all of these servers should be new enough to boot off of USB flash drives, but I don’t want to run into any weird problems while I’m out in the field. It also doesn’t help that CentOS 5 didn’t seem all that happy about being installed from a USB flash drive.
I don’t do SysAdmin style work very often these days, but you might think otherwise if you looked in my laptop bag. I have all sorts of things in there that I rarely use, like my trusty Swiss Army Cybertool 34, a network cable tester, and an RJ45 crimping tool. I’m trying to cut down on the weight a bit, and a recent hardware failure gave me the perfect opportunity to test out DriveDroid.
What does DriveDroid do?
DriveDroid is an Android app that allows you to use your phone as a virtual CD-ROM drive. DriveDroid can make use of any CD or DVD iso image stored on your phone, and it can even be used to download various Linux and FreeBSD images.
My oldest server had no trouble booting from DriveDroid. I didn’t expect to have any problems. I originally configured that server using an external USB DVD drive, and DriveDroid emulates a CD-ROM drive.
My phone isn’t big enough for all these disk images
My Nexus 4 is only the 8 GB model. I’ll never actually fill that under normal circumstances, but it is a little too tight for storing CD and DVD image files. I’m not using my old Samsung Galaxy S anymore, and it has plenty of extra room.
I decided to wipe the old phone clean and install DriveDroid. That way I can keep it in my laptop bag all the time. It is significantly smaller and lighter than the DVD drive and 10-disc case that it replaced.
I have two small problems with CentOS and DriveDroid. The FAT32 file system on the Galaxy S can’t hold files as large as the CentOS DVD. I copied the CentOS 6 “netinstall” and “minimal” disk images to the phone instead. Either of those will be more than enough to meet my needs.
I also had trouble with the Centos 6.4 and 6.3 “minimal” DVD images; they just don’t want to boot for me. Their MD5 checksums look just fine, and I have no trouble booting the live DVD and “netinstall” images.
Carrying a working “netinstall” will work well enough for my purposes.
Earlier in the year when I was up north visiting my parents, I reloaded their old laptops using DriveDroid. It definitely came in handy that time because one of the DVD drives was acting up.
I don’t expect that I’ll be installing operating systems using optical drives or flash media ever again. DriveDroid is just too convenient.
I decided to upgrade my laptop and desktop to Ubuntu 13.10, the Saucy Salamander, this weekend. I don’t run Unity, so I expected things to go pretty smoothly. I’m pretty sure that the operating system on my desktop was installed using the “alternative” Ubuntu 12.10 installation media. If I am remembering correctly, that was a requirement at the time if you wanted to use whole-disk encryption.
The operating system on my laptop was installed more recently using the regular Xubuntu 13.10 installation media, and I performed that installation using DriveDroid. Both machines are running XFCE and using Sawfish as the window manager.
Things went pretty smoothly, but there were a few small obstacles.
The xorg-edgers PPA blocks the upgrade
The first time I tried the upgrade, update-manager gave me the error “Could not determine the upgrade,” and it advised me that unofficial software packages might be blocking the upgrade. I took a look at the logs, and I found a lot of problems with video and x.org related packages mentioned in /var/log/dist-upgrade/apt.log.
I’m using x.org and Nvidia driver updates from the xorg-edgers PPA on both of my machines. This certainly counts as unofficial software, and it is most definitely video related. I used ppa-purge to downgrade to the stock versions of these packages.
The upgrade went smoothly once the PPA was disabled and all of its software was removed.
The Nouveau driver hates my monitors
The upgrade completely removed the proprietary Nvidia driver and stuck me with the open-source Nouveau driver. My new QNIX QX2710 monitors are very picky; their EDID information is broken, and they will pretty much only run at a resolution of 2560x1440. I have some specific configuration in my xorg.conf to account for this.
I’m sure some of those configuration options are specific to the Nvidia’s driver. The simplest thing for me to do was just install the proprietary drivers again and reboot.
Installing the (slightly outdated) Nvidia drivers
1
wonko@zaphod:~$ sudo apt-get install nvidia-319
The reboot was required because the Nouveau kernel module was being used to drive the text consoles, so I couldn’t manually remove it from the running kernel.
I’m not sure exactly what I did differently on the laptop, but the proprietary Nvidia driver was already installed on there after the update. It was the old 304.88 version, though.
The best upgrades are the ones you don’t notice
Aside from the small driver issues, which were really my own fault, everything went smoothly. There were no issues with my encrypted root file system, my RAID 1 came up just fine, and no ugly window grips showed up in my terminal windows. In fact, everything looks exactly like it did before the upgrade.
One of my oldest friends, from all the way back in elementary school, was in town last weekend. My friend Jimmy wasn’t in Dallas very long this time, but he did stop by the house for a few hours. I didn’t remember to drag him into the home office to see the arcade cabinet until he was fixin’ to leave.
I showed him the menus, and I shuffled through the list of games and systems for him. Then he said to me, “Do you have Contra on this thing?” Of course I have Contra on this thing!
I’ve only been playing lonely, single-player games on the arcade machine for the last year or two, so I had to set things back up for two-player cocktail-mode split-screen. The player-one joystick was acting up a bit, too, but some aggressive back and forth action on the controller straightened that right out, and before we knew it, we were playing some co-op Contra just like in the old days!
Back in the day
I specifically remember hauling my Nintendo down to Jim’s house one time, and hooking it up to the TV in his bedroom. This was back when Contra was still relatively new. There were probably four of us crowded around that little old TV that night: me, Jim, Marc, and Chad. I’m certain that we made it to the end of the game that night.
I’m not sure if we had to continue or cheat that time, but we most definitely finished the game. We were much better at this type of game back then.
I was also remembering another time when I was playing Double Dragon in the little arcade down at South Side Bowl with my friend Chad. We must have fed a whole roll of quarters into the machine that day, but we made it right to the end of the game.
We had just finished off the last guy, and I still had my baseball bat. We were just wandering around the screen waiting for more bad guys, but they never showed up. I ended up walking off the bottom of the screen into the spikes, and Chad ended up winning. We didn’t know we were supposed to fight at the end!
Back to last weekend
Jim and I ran out of lives very, very quickly. I punched in the Konami Code and got us our 30 lives, and we were off to try again. Things went much better this time.
We were near the end of the sixth level when Jim ran out of guys, and I didn’t have many left either. I didn’t recall what sort of boss was going to be there to meet us at the end of the stage, but I wasn’t expecting to get past him. I have no idea how I managed to survive, but I just barely killed that big, ugly cyclops.
I sacrificed my last few remaining lives so that we could continue and get Jimmy back into the game. There were just two stages left, and we didn’t have too much trouble getting through them. It only took 45 minutes, the Konami Code, and one continue to get us through an entire game of Contra!
This is exactly what I built my arcade cabinet for, and it is probably the most fun I’ve had with it yet! Jim and I probably played Contra on the Nintendo for years back in the eighties. It was awesome being able to do it again over 20 years later. I hope we get a chance to do it again some time!
We had some server hardware problems here at patshead.com last week. At first it looked like one of the hard drives in the RAID 10 failed. It dropped out of the array, and when I added it back into the array, the rebuild speed was less than 4 KB per second. I have some spare drives here, so I planned to drive out the next morning to replace the drive.
Another drive dropped out of the array overnight, and it had the same abysmal rebuild speed when I tried to reuse the drive. I did some more investigating. I was now seeing timeout errors in the logs for three out of the four drives, and I couldn’t get any more than 500 KB per second write speeds out of any of them.
It was starting to look like a disk controller failure. I power cycled the server. I was hoping that I’d luck out and it would come back up. It didn’t. It was going to take a few days to buy new hardware, so I temporarily moved the blog over to my tiny little secondary DNS server. The little guy with his 128 MB of RAM seemed to hold up well enough. I’m not sure whether to be relieved or disappointed about that!
I am most definitely relieved that everything is back up and running again.
The Seafile 2.0 beta client
I am very excited about this. Seafile released their 2.0 beta client right in the middle of my server outage over the weekend. I’ve been impatiently waiting to try it out since Sunday night.
This new release replaces Seafile’s local web interface with a native QT application. The new client seems to have most of the functionality of the old web client, and it feels much snappier, too.
There is a very important new feature in the beta client that I’ve been waiting for: You can now create encrypted libraries in the client without having to send your passphrase up to the server. I haven’t checked the source code to verify that this is actually happening, so if you’re more paranoid than I am, you might want to check it out for yourself.
In my opinion, this is a huge win with regard to security, and hopefully the first of many similar improvements. This means that I barely need to have any trust in the server at all to securely store and synchronize my files.
I still have to trust the server if I want to restore something from my history. I can live with that for now, though. If history browsing and file restore capabilities make it into the new client, I won’t have anything left to complain about!
My paranoid upgrade to 2.0
I’ve been using the same virtual machine and Seafile installation ever since I first started trying out Seafile. I know that I first tried synchronizing some test data with a bare minimum Seafile configuration, and I know that I upgraded that setup to use Nginx with SSL encryption later on.
I couldn’t decide if I actually set up my current encrypted libraries after I enabled SSL. Since the NSA is tapping the Internet backbone, I thought it would be best to err on the side of caution. I ended up wiping out my old libraries, choosing new passphrases, and reuploading all my data.
It wasn’t too bad. It took less than an hour to upload everything. My laptop caused a bit of trouble, though. It only took a few minutes to connect up the libraries that are shared between my two machines because the data was already on the laptop.
Seafile was spending an awful lot of time trying to index my ~/.local directory. I was surprised to find that my Steam library was stored in there! I guess Valve changed the default location at some point. There isn’t much value in backing up my collection of Steam games, so I added it to a seafile-ignore.txt file. The library uploaded in just a few seconds after that.
Seafile’s minuscule server requirements
It shouldn’t come as much of a surprise that Seafile’s server component is very lightweight. They offer a build for the Raspberry Pi, and I bet it runs just fine on that tiny platform. My Seafile virtual machine is configured with only 256 MB of RAM, and more than half of that is free.
It would be no trouble at all squeezing Seafile onto even the smallest virtual private server.
Are you running Seafile on a Raspberry Pi or some other tiny piece of hardware? I would love to hear about how that’s working out!
I already generated a new 2048-bit RSA key pair for SSH this year, on January 3rd, to replace the 1024-bit DSA key pair that I had been using since October 23, 2010. I’ve been putting off generating a new key pair for use on my laptop because I didn’t want to have to go through the effort of figuring out exactly which hosts I need to copy the new public key to.
Since the NSA has been trying very hard to scare us recently, I’m not entirely certain that my existing 2048-bit key is strong enough. I read an article telling me that the NSA may have the magical ability to crack 1024-bit RSA keys in a matter of hours. I’m not so sure I believe this, but what’s the harm in going overboard and generating some fresh, new 4096-bit keys? I have to update a few dozen authorized_keys files with the new public key on my laptop, and it doesn’t require much more work to add a new key for my desktop at the same time.
Is authentication slower when using a 4096-bit key?
I was a little worried about this, so I did some testing. Connecting to my web server with SSH using my new 4096-bit key usually takes between 0.35 and 0.39 seconds. That’s only two or three hundredths of a second slower than when using my old 2048-bit key.
Using PKCS#8 for more secure SSH private key files (Ubuntu 13.10 and older)
Earlier this year, I saw Martin Kleppmann’s article about improving the security of your SSH private keys. Martin points out that brute forcing the passphrase on a private key created by ssh-keygen isn’t a very difficult task. You won’t have much time to remove your key from your servers if someone manages to get their hands on your private key.
Martin’s excellent write-up also explains how to convert your ssh-keygen generated PEM key file into a more secure PKCS#8 key file. I’m not exactly sure of just how much more security this is really buying me, but anything is better than using MD5, and I’ll take every bit of extra security I can get.
This is probably just about the as safe as you’re going to get if you have an older version of OpenSSH that doesn’t support the new key format. You should definitely skip this part iff your installed version of OpenSSH supports the new key format and PBKDF.
Creating and converting a new 4096-bit RSA key for SSH
wonko@zaphod:~$ ssh-keygen -b 4096 -f .ssh/id_rsa4096_2013 -C wonko@zaphod_4096_2013
Generating public/private rsa key pair.Enter passphrase (empty for no passphrase): Enter same passphrase again: Your identification has been saved in .ssh/id_rsa4096_2013.Your public key has been saved in .ssh/id_rsa4096_2013.pub.The key fingerprint is:ba:dc:39:af:d3:e5:d8:85:d6:f0:77:f0:cb:62:05:66 wonko@zaphod_4096_2013The key's randomart image is:+--[ RSA 4096]----+| || || || .E. || S o=.o || . + +.+|| . . * .o.o|| . oo.o oo o || o +=. . . |+-----------------+wonko@zaphod:~$umask 0077
wonko@zaphod:~$ openssl pkcs8 -topk8 -v2 des3 -in ~/.ssh/id_rsa4096_2013 -out ~/.ssh/id_rsa.new && mv ~/.ssh/id_rsa.new ~/.ssh/id_rsa4096_2013
Enter pass phrase for /home/wonko/.ssh/id_rsa4096_2013:Enter Encryption Password:Verifying - Enter Encryption Password:mv: overwrite ‘/home/wonko/.ssh/id_rsa4096_2013’? ywonko@zaphod:~$ head -1 .ssh/id_rsa_2013
-----BEGIN RSA PRIVATE KEY-----wonko@zaphod:~$ head -1 .ssh/id_rsa4096_2013
-----BEGIN ENCRYPTED PRIVATE KEY-----wonko@zaphod:~$
Using PBKDF for extremely secure SSH private key files (Ubuntu 14.04 and newer)
I’ve been waiting patiently for Ubuntu 14.04 to ship. It includes the latest release of OpenSSH, and this version supports a new key encryption method. This encryption method, called PBKDF, is much more secure, since it is designed to run slowly. This means it takes much, much longer to brute force a stolen key.
Immediately after upgrading my laptop, I found an excellent blog explaining the new key format and how to make use of it. I stole his command line, and his idea to use 1000 rounds. The more rounds you use, the longer it takes to decrypt your key. Increasing the number of rounds makes it take longer to brute force your key.
I think 1000 rounds is a bit excessive. It takes a solid seven or eight seconds to decrypt on my laptop, and that just feels like an eternity. I decided to cut that in half. That is still several orders of magnitude more secure than my old keys!
Creating a 4096-bit RSA key with 500 PBKDF rounds
123456789101112131415161718192021
wonko@zaphod:~$ ssh-keygen -b 4096 -f .ssh/id_rsa4096_test -C wonko@zaphod_test -o -a 500
Generating public/private rsa key pair.Enter passphrase (empty for no passphrase): Enter same passphrase again: Your identification has been saved in .ssh/id_rsa4096_test.Your public key has been saved in .ssh/id_rsa4096_test.pub.The key fingerprint is:3c:f1:43:62:b6:c8:fc:d0:86:67:65:29:93:14:7b:d9 wonko@zaphod_testThe key's randomart image is:+--[ RSA 4096]----+| o. || . o + || X B E || o B % || * S o || * . . || . || || |+-----------------+wonko@zaphod:~$
Updating a few dozen authorized_keys files
I needed to add my new public keys to a few dozen hosts, and I also needed to remove the keys. Lucky for me, I’m not sharing a login on any of these hosts, so I was able to do this the easy way.
All I had to do was remove the old keys from my local .ssh/authorized_keys files and add the two new public keys. Then I just used scp to push that out to all the other machines.
Pushing keys to remote hosts: the abridged version
1
wonko@zaphod:~$for host in patshead.com laptop tf2.patshead.com; do scp ~/.ssh/authorized_keys $host:.ssh/; done
There were a few hosts that I was a little more careful with, though. I didn’t want to lock myself out of any virtual server host machines.
More than just my SSH keys need updating
My personal GnuPG key is embarrassingly old and weak. I’m looking at it right now, and I don’t even want to say how old it is. My corporate GnuPG key is much less embarrassing. It isn’t even two years old yet, and it is a 4096-bit RSA key.
I’m going to have to correct this oversight in the near future. Once I get that taken care of, I can print QR codes of all my new private keys and lock them safely away in case of an emergency.