I decided to upgrade my laptop and desktop to Ubuntu 13.10, the Saucy Salamander, this weekend. I don’t run Unity, so I expected things to go pretty smoothly. I’m pretty sure that the operating system on my desktop was installed using the “alternative” Ubuntu 12.10 installation media. If I am remembering correctly, that was a requirement at the time if you wanted to use whole-disk encryption.
The operating system on my laptop was installed more recently using the regular Xubuntu 13.10 installation media, and I performed that installation using DriveDroid. Both machines are running XFCE and using Sawfish as the window manager.
Things went pretty smoothly, but there were a few small obstacles.
The xorg-edgers PPA blocks the upgrade
The first time I tried the upgrade, update-manager gave me the error “Could not determine the upgrade,” and it advised me that unofficial software packages might be blocking the upgrade. I took a look at the logs, and I found a lot of problems with video and x.org related packages mentioned in /var/log/dist-upgrade/apt.log.
I’m using x.org and Nvidia driver updates from the xorg-edgers PPA on both of my machines. This certainly counts as unofficial software, and it is most definitely video related. I used ppa-purge to downgrade to the stock versions of these packages.
The upgrade went smoothly once the PPA was disabled and all of its software was removed.
The Nouveau driver hates my monitors
The upgrade completely removed the proprietary Nvidia driver and stuck me with the open-source Nouveau driver. My new QNIX QX2710 monitors are very picky; their EDID information is broken, and they will pretty much only run at a resolution of 2560x1440. I have some specific configuration in my xorg.conf to account for this.
I’m sure some of those configuration options are specific to the Nvidia’s driver. The simplest thing for me to do was just install the proprietary drivers again and reboot.
Installing the (slightly outdated) Nvidia drivers
1
wonko@zaphod:~$ sudo apt-get install nvidia-319
The reboot was required because the Nouveau kernel module was being used to drive the text consoles, so I couldn’t manually remove it from the running kernel.
I’m not sure exactly what I did differently on the laptop, but the proprietary Nvidia driver was already installed on there after the update. It was the old 304.88 version, though.
The best upgrades are the ones you don’t notice
Aside from the small driver issues, which were really my own fault, everything went smoothly. There were no issues with my encrypted root file system, my RAID 1 came up just fine, and no ugly window grips showed up in my terminal windows. In fact, everything looks exactly like it did before the upgrade.
One of my oldest friends, from all the way back in elementary school, was in town last weekend. My friend Jimmy wasn’t in Dallas very long this time, but he did stop by the house for a few hours. I didn’t remember to drag him into the home office to see the arcade cabinet until he was fixin’ to leave.
I showed him the menus, and I shuffled through the list of games and systems for him. Then he said to me, “Do you have Contra on this thing?” Of course I have Contra on this thing!
I’ve only been playing lonely, single-player games on the arcade machine for the last year or two, so I had to set things back up for two-player cocktail-mode split-screen. The player-one joystick was acting up a bit, too, but some aggressive back and forth action on the controller straightened that right out, and before we knew it, we were playing some co-op Contra just like in the old days!
Back in the day
I specifically remember hauling my Nintendo down to Jim’s house one time, and hooking it up to the TV in his bedroom. This was back when Contra was still relatively new. There were probably four of us crowded around that little old TV that night: me, Jim, Marc, and Chad. I’m certain that we made it to the end of the game that night.
I’m not sure if we had to continue or cheat that time, but we most definitely finished the game. We were much better at this type of game back then.
I was also remembering another time when I was playing Double Dragon in the little arcade down at South Side Bowl with my friend Chad. We must have fed a whole roll of quarters into the machine that day, but we made it right to the end of the game.
We had just finished off the last guy, and I still had my baseball bat. We were just wandering around the screen waiting for more bad guys, but they never showed up. I ended up walking off the bottom of the screen into the spikes, and Chad ended up winning. We didn’t know we were supposed to fight at the end!
Back to last weekend
Jim and I ran out of lives very, very quickly. I punched in the Konami Code and got us our 30 lives, and we were off to try again. Things went much better this time.
We were near the end of the sixth level when Jim ran out of guys, and I didn’t have many left either. I didn’t recall what sort of boss was going to be there to meet us at the end of the stage, but I wasn’t expecting to get past him. I have no idea how I managed to survive, but I just barely killed that big, ugly cyclops.
I sacrificed my last few remaining lives so that we could continue and get Jimmy back into the game. There were just two stages left, and we didn’t have too much trouble getting through them. It only took 45 minutes, the Konami Code, and one continue to get us through an entire game of Contra!
This is exactly what I built my arcade cabinet for, and it is probably the most fun I’ve had with it yet! Jim and I probably played Contra on the Nintendo for years back in the eighties. It was awesome being able to do it again over 20 years later. I hope we get a chance to do it again some time!
We had some server hardware problems here at patshead.com last week. At first it looked like one of the hard drives in the RAID 10 failed. It dropped out of the array, and when I added it back into the array, the rebuild speed was less than 4 KB per second. I have some spare drives here, so I planned to drive out the next morning to replace the drive.
Another drive dropped out of the array overnight, and it had the same abysmal rebuild speed when I tried to reuse the drive. I did some more investigating. I was now seeing timeout errors in the logs for three out of the four drives, and I couldn’t get any more than 500 KB per second write speeds out of any of them.
It was starting to look like a disk controller failure. I power cycled the server. I was hoping that I’d luck out and it would come back up. It didn’t. It was going to take a few days to buy new hardware, so I temporarily moved the blog over to my tiny little secondary DNS server. The little guy with his 128 MB of RAM seemed to hold up well enough. I’m not sure whether to be relieved or disappointed about that!
I am most definitely relieved that everything is back up and running again.
The Seafile 2.0 beta client
I am very excited about this. Seafile released their 2.0 beta client right in the middle of my server outage over the weekend. I’ve been impatiently waiting to try it out since Sunday night.
This new release replaces Seafile’s local web interface with a native QT application. The new client seems to have most of the functionality of the old web client, and it feels much snappier, too.
There is a very important new feature in the beta client that I’ve been waiting for: You can now create encrypted libraries in the client without having to send your passphrase up to the server. I haven’t checked the source code to verify that this is actually happening, so if you’re more paranoid than I am, you might want to check it out for yourself.
In my opinion, this is a huge win with regard to security, and hopefully the first of many similar improvements. This means that I barely need to have any trust in the server at all to securely store and synchronize my files.
I still have to trust the server if I want to restore something from my history. I can live with that for now, though. If history browsing and file restore capabilities make it into the new client, I won’t have anything left to complain about!
My paranoid upgrade to 2.0
I’ve been using the same virtual machine and Seafile installation ever since I first started trying out Seafile. I know that I first tried synchronizing some test data with a bare minimum Seafile configuration, and I know that I upgraded that setup to use Nginx with SSL encryption later on.
I couldn’t decide if I actually set up my current encrypted libraries after I enabled SSL. Since the NSA is tapping the Internet backbone, I thought it would be best to err on the side of caution. I ended up wiping out my old libraries, choosing new passphrases, and reuploading all my data.
It wasn’t too bad. It took less than an hour to upload everything. My laptop caused a bit of trouble, though. It only took a few minutes to connect up the libraries that are shared between my two machines because the data was already on the laptop.
Seafile was spending an awful lot of time trying to index my ~/.local directory. I was surprised to find that my Steam library was stored in there! I guess Valve changed the default location at some point. There isn’t much value in backing up my collection of Steam games, so I added it to a seafile-ignore.txt file. The library uploaded in just a few seconds after that.
Seafile’s minuscule server requirements
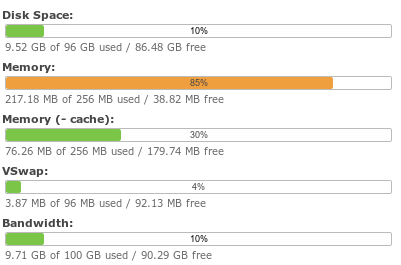
It shouldn’t come as much of a surprise that Seafile’s server component is very lightweight. They offer a build for the Raspberry Pi, and I bet it runs just fine on that tiny platform. My Seafile virtual machine is configured with only 256 MB of RAM, and more than half of that is free.
It would be no trouble at all squeezing Seafile onto even the smallest virtual private server.
Are you running Seafile on a Raspberry Pi or some other tiny piece of hardware? I would love to hear about how that’s working out!
I already generated a new 2048-bit RSA key pair for SSH this year, on January 3rd, to replace the 1024-bit DSA key pair that I had been using since October 23, 2010. I’ve been putting off generating a new key pair for use on my laptop because I didn’t want to have to go through the effort of figuring out exactly which hosts I need to copy the new public key to.
Since the NSA has been trying very hard to scare us recently, I’m not entirely certain that my existing 2048-bit key is strong enough. I read an article telling me that the NSA may have the magical ability to crack 1024-bit RSA keys in a matter of hours. I’m not so sure I believe this, but what’s the harm in going overboard and generating some fresh, new 4096-bit keys? I have to update a few dozen authorized_keys files with the new public key on my laptop, and it doesn’t require much more work to add a new key for my desktop at the same time.
Is authentication slower when using a 4096-bit key?
I was a little worried about this, so I did some testing. Connecting to my web server with SSH using my new 4096-bit key usually takes between 0.35 and 0.39 seconds. That’s only two or three hundredths of a second slower than when using my old 2048-bit key.
Using PKCS#8 for more secure SSH private key files (Ubuntu 13.10 and older)
Earlier this year, I saw Martin Kleppmann’s article about improving the security of your SSH private keys. Martin points out that brute forcing the passphrase on a private key created by ssh-keygen isn’t a very difficult task. You won’t have much time to remove your key from your servers if someone manages to get their hands on your private key.
Martin’s excellent write-up also explains how to convert your ssh-keygen generated PEM key file into a more secure PKCS#8 key file. I’m not exactly sure of just how much more security this is really buying me, but anything is better than using MD5, and I’ll take every bit of extra security I can get.
This is probably just about the as safe as you’re going to get if you have an older version of OpenSSH that doesn’t support the new key format. You should definitely skip this part iff your installed version of OpenSSH supports the new key format and PBKDF.
Creating and converting a new 4096-bit RSA key for SSH
wonko@zaphod:~$ ssh-keygen -b 4096 -f .ssh/id_rsa4096_2013 -C wonko@zaphod_4096_2013
Generating public/private rsa key pair.Enter passphrase (empty for no passphrase): Enter same passphrase again: Your identification has been saved in .ssh/id_rsa4096_2013.Your public key has been saved in .ssh/id_rsa4096_2013.pub.The key fingerprint is:ba:dc:39:af:d3:e5:d8:85:d6:f0:77:f0:cb:62:05:66 wonko@zaphod_4096_2013The key's randomart image is:+--[ RSA 4096]----+| || || || .E. || S o=.o || . + +.+|| . . * .o.o|| . oo.o oo o || o +=. . . |+-----------------+wonko@zaphod:~$umask 0077
wonko@zaphod:~$ openssl pkcs8 -topk8 -v2 des3 -in ~/.ssh/id_rsa4096_2013 -out ~/.ssh/id_rsa.new && mv ~/.ssh/id_rsa.new ~/.ssh/id_rsa4096_2013
Enter pass phrase for /home/wonko/.ssh/id_rsa4096_2013:Enter Encryption Password:Verifying - Enter Encryption Password:mv: overwrite ‘/home/wonko/.ssh/id_rsa4096_2013’? ywonko@zaphod:~$ head -1 .ssh/id_rsa_2013
-----BEGIN RSA PRIVATE KEY-----wonko@zaphod:~$ head -1 .ssh/id_rsa4096_2013
-----BEGIN ENCRYPTED PRIVATE KEY-----wonko@zaphod:~$
Using PBKDF for extremely secure SSH private key files (Ubuntu 14.04 and newer)
I’ve been waiting patiently for Ubuntu 14.04 to ship. It includes the latest release of OpenSSH, and this version supports a new key encryption method. This encryption method, called PBKDF, is much more secure, since it is designed to run slowly. This means it takes much, much longer to brute force a stolen key.
Immediately after upgrading my laptop, I found an excellent blog explaining the new key format and how to make use of it. I stole his command line, and his idea to use 1000 rounds. The more rounds you use, the longer it takes to decrypt your key. Increasing the number of rounds makes it take longer to brute force your key.
I think 1000 rounds is a bit excessive. It takes a solid seven or eight seconds to decrypt on my laptop, and that just feels like an eternity. I decided to cut that in half. That is still several orders of magnitude more secure than my old keys!
Creating a 4096-bit RSA key with 500 PBKDF rounds
123456789101112131415161718192021
wonko@zaphod:~$ ssh-keygen -b 4096 -f .ssh/id_rsa4096_test -C wonko@zaphod_test -o -a 500
Generating public/private rsa key pair.Enter passphrase (empty for no passphrase): Enter same passphrase again: Your identification has been saved in .ssh/id_rsa4096_test.Your public key has been saved in .ssh/id_rsa4096_test.pub.The key fingerprint is:3c:f1:43:62:b6:c8:fc:d0:86:67:65:29:93:14:7b:d9 wonko@zaphod_testThe key's randomart image is:+--[ RSA 4096]----+| o. || . o + || X B E || o B % || * S o || * . . || . || || |+-----------------+wonko@zaphod:~$
Updating a few dozen authorized_keys files
I needed to add my new public keys to a few dozen hosts, and I also needed to remove the keys. Lucky for me, I’m not sharing a login on any of these hosts, so I was able to do this the easy way.
All I had to do was remove the old keys from my local .ssh/authorized_keys files and add the two new public keys. Then I just used scp to push that out to all the other machines.
Pushing keys to remote hosts: the abridged version
1
wonko@zaphod:~$for host in patshead.com laptop tf2.patshead.com; do scp ~/.ssh/authorized_keys $host:.ssh/; done
There were a few hosts that I was a little more careful with, though. I didn’t want to lock myself out of any virtual server host machines.
More than just my SSH keys need updating
My personal GnuPG key is embarrassingly old and weak. I’m looking at it right now, and I don’t even want to say how old it is. My corporate GnuPG key is much less embarrassing. It isn’t even two years old yet, and it is a 4096-bit RSA key.
I’m going to have to correct this oversight in the near future. Once I get that taken care of, I can print QR codes of all my new private keys and lock them safely away in case of an emergency.
There’s a lot of speculation regarding Apple’s reasoning for using a 64-bit ARM processor in the iPhone 5s. Aside from the obvious fact that the 64-bit processor will allow Apple to include more RAM in future devices, there are all sorts of rumors ranging from easier cross-platform development all the way to an ARM-powered MacBook Air.
Everyone seems to be missing the simplest reason for the early move to 64-bit: the iPhone 5s’s “motion co-processor.” There isn’t any hard data available on how this co-processor works yet, but it sure sounds a lot like the NVidia Tegra’s power-saving “companion core.” Adding something like that to a processor is a pretty significant architectural change.
Apple isn’t likely to make a change this drastic to their ARM CPU for many years. Wouldn’t it make sense to also move to a 64-bit architecture at the same time? That way, they will be prepared to break through the 4-GB RAM barrier without any hassle.
Apple has been using the 32-bit ARMv7 instruction set since 2009. They most likely want to make sure they can use this shiny new 64-bit ARMv8 design for at least four years as well. I bet their road map has them hitting 4-GB of RAM within that time frame.
I started using Seafile over two months ago for all of my self-hosted cloud storage needs. I think enough time has passed, and I figured I should report back on how things have been going so far. Seafile has actually been working quite well for me so far. I’ve had a few snags, but they’re all minor, and they’ve all been pretty easy to work around.
How much data are we storing?
I have about 9 GB worth of files stored in Seafile, and Chris has around 24 GB up there. She’s beating me by a pretty wide margin, but she has her music collection stored up there. I’ll probably think about doing the same thing some day, but my music collection is ancient, mostly ripped from CDs, and is terribly unorganized.
I’m not entirely sure how Seafile determines the amount of storage space everyone is using. The web interface says we’re using a total of 32 GB between us. Even after manually running the garbage collector a few times, the server’s drive has over 40 GB of data. I’m guessing the extra 8 GB is taken up by our file revision history; most of our libraries are configured with 90 days of history.
My libraries are scattered all over the place, but Chris only has one, so hers are much easier to measure. Her local Seafile library is 31 GB, which is quite a bit smaller compared to what Seafile is reporting. I’m going to hazard another guess here, and I’m going to say that compression and deduplication are saving her some space. I wouldn’t be surprised if she has more than just a few gigabytes worth of duplicate songs and photos.
Are these discrepancies alarming?
Not at all. Most of my Seafile libraries are replicated to my laptop, and everything seems to match up just fine. Accounting for used space in the presence of compression and deduplication is a very hard problem. I’m happy as long as my data is replicating correctly.
How much bandwidth does Seafile use?
I figured my bandwidth usage for August would be pretty typical, and I was hoping to get a screenshot of my Seafile virtual server’s bandwidth graph to show off here. It was going great for the first three weeks or so. It was up at around 4 GB of traffic, and probably on its way to closing out the month with less than 6 GB of bandwidth consumed.
Then Chris’s new computer arrived, and she finally got around to moving all of her stuff up to the Seafile server. This upload pushed the bandwidth consumption for August up over 30 GB, and totally ruined the graph on me.
I ended up taking a screenshot of September instead. The image above covers September 1 through September 8, and we’ve already used up over 18 GB of data transfer. I’m not sure if Chris is just meaner to the Seafile server than I am or what, but we’ll be going way over the 6 GB I was expecting to see last month.
The data I have so far is pretty inconclusive, and I expect that everybody’s bandwidth use will vary quite a bit anyway. I’ll post some updated bandwidth numbers after I have a few more months to collect data.
Is it faster than Dropbox?
I have fast server hardware on a fast, reliable Internet connection in a data center that is less than 10 ms away—Seafile is significantly faster than Dropbox for me, and usually has no problem maxing out my 35 megabit-per-second FiOS connection.
Symbolic links are broken
I keep my Zsh configuration in a Git repository. There are a few symlinks in there, one of which is a link from my ~/bin directory. This one in particular ended up replicating in a pretty strange way, and I wish I paid more attention to what happened. I somehow ended up with infinitely recursing bin directories that looked something like this:
Near Infinite Recursion
1234
wonko@zaphod:~/.zprezto/modules/persist/files/bin/bin/bin/bin$cd bin
wonko@zaphod:~/.zprezto/modules/persist/files/bin/bin/bin/bin/bin$cd bin
wonko@zaphod:~/.zprezto/modules/persist/files/bin/bin/bin/bin/bin/bin$cd bin
wonko@zaphod:~/.zprezto/modules/persist/files/bin/bin/bin/bin/bin/bin/bin$
I manually cleaned up the receiving end of that sync, and it has been syncing correctly ever since.
I had another directory in there that was a symlink to one of its siblings. Seafile ended up syncing that one like it was two different directories. I’m pretty sure I was able to use a git checkout command to fix that. I should have been taking notes instead of just randomly trying out different ways to fix the problem!
There are replies to bug reports on Github that imply that symlink support will eventually be added to Seafile.
Git index files are often in conflict
I could probably list off a ton of reasons why synchronizing Git repositories between multiple computers is a bad idea. Git can push and pull for a reason. I tend to store lots of config files in Git repositories, though, and I’d like to have them synced up. When I’m on the road, I don’t want to be looking for a change that I forgot to commit, either.
I’m not a very advanced Git user, and I’m not entirely sure what is happening here. If I commit a change to my Zsh configuration, that change will be cleanly synchronized to my laptop, but I will end up with a Seafile conflict entry for the .git/index file.
I’m not exactly certain what is causing this, and it hasn’t actually caused any noticeable problems, but it does worry me a bit. Each copy of the ~/.zprezto repository seems to be identical before I start editing. Seafile should be synchronizing them every time I save a file.
I expect that the index file gets modified as I run various Git commands, but I would expect that my more recent, local copy should be pushed to the other machines. I’m not sure why Seafile even notices a conflict.
I’m the only person editing these files. This may be problematic if multiple people are editing files in a Git repository in the same Seafile library. That would be a bad idea even without this problem, and it would probably be a good way to lose some edits.
Update: One of the Seafile developers, JiaQiang Xu, was nice enough to address some of my concerns in the comments. I will have to do some testing to figure out exactly what is going on here.
Watch out for colons in filenames!
I knew that Seafile doesn’t sync files with colons, question marks, or dollar signs in their names. That didn’t stop me from wasting 20 minutes trying to figure out why a screenshot file with an actual time stamp in its name wasn’t syncing.
I don’t really care that Windows doesn’t support these characters in a filename. I haven’t used Windows in years. I’d really like to see this restriction removed, but it isn’t by any means a show stopper.
Update: JiaQiang Xu says that this restriction is going to be removed.
Seafile encryption and the NSA
I’ve been relatively paranoid about my data for a long time, and the documents that Edward Snowden leaked have brought quite a few people up to my level of paranoia.
I don’t actually know exactly how secure Seafile’s client-side encryption is, and I don’t know if it is even implemented correctly. If you’re paranoid enough, there is definitely a major flaw in Seafile’s encryption implementation.
If you want to access your encrypted data from a web browser, then your password will be sent up to the server and stored there for an hour. If you want to use encryption and the web interface, then you are required to trust the server. You’re also required to send your encryption passphrase up to the server at least once in order to set up an encrypted library.
My Seafile virtual server runs on a piece of hardware that I own. I am not too worried that my password was potentially stored in plain text in my server’s memory for a short time when I set up each of my libraries. If I were leasing a server, virtual or otherwise, I’d be more than a little concerned about this.
You’ll also need to send your encryption password up to the Seafile server if you want to access your file revision history. I find this even more problematic.
Even so, it is still a major step up compared Dropbox’s security.
Update: JiaQiang Xu mentioned that they are working on a new encryption scheme for Seafile that won’t require sending the password up to the server. He also tells me that a new QT based Seafile client is in the works, and this new client will be able to create new encrypted libraries without having to send your passphrase up to the server.
Are you having as much success with Seafile as I am?
Update: I got a bill from FedEx today for $37.20 to cover the customs fees. The invoice has no account number, so apparently I can’t pay it on their website. I sure wish they told me that before I spent twenty minutes bumbling around their website and setting up an account.
$37.20 is less than I would have paid in sales tax locally, so that seems pretty fair to me. That brings the total for these two beautiful monitors up to $651.00.
Update: It is now July of 2015, and one of these QNIX QX2710 monitors has failed. I’m still very happy that I decided to buy these monitors almost two years ago, and I just bought another QX2710 to replaced the dead monitor. I did briefly investigate some other options before ordering the replacement, but buying another QX2710 was still the best choice for me.
A couple of days ago, I upgraded from a pair of 21.5” 1920x1080 TFT LCD monitors to a pair of 27” 2560x1440 IPS LCD monitors. I’ve really wanted to make this upgrade ever since a friend of mine bought a QNIX QX2700 late last year, but my laptop didn’t have the dual link DVI-D port that is required to drive these inexpensive 1440p monitors from Korea. Since building my new Linux desktop, I no longer have this limitation, and I just couldn’t resist this upgrade.
Why the QNIX QX2710?
The least expensive 1440p monitor I could find was the Asus PB278Q 27-inch 1440p monitor for $553.99. It only ended up costing me about $60 more to purchase a pair of 27-inch QNIX QX2710 monitors. This was a much better value for me, but there are some caveats.
The more expensive monitors, like the Asus PB278Q, can be connected using HDMI 1.4, DisplayPort, or dual-link DVI, and they can display just about any resolution you choose. The QNIX QX2710 and other similar Korean monitors, like the X-Star DP2710, can only be used with a dual-link DVI-D port, and they must be driven at their native 2560x1440 resolution. They lack the hardware to scale other input resolutions up to their native resolution.
My Nvidia GTX 460 has a pair of dual-link DVI-D ports, so this wasn’t a problem for me.
I also ended up choosing a glossy screen. Glossy screens usually have a better contrast ratio than matte screens, and I have total control of the lighting in my office, so there’s never anything behind me to glare on the screens.
The QX2710 was not exactly plug and play on Linux
This actually surprised me a bit. This is the first time in over a decade that I’ve plugged a monitor into one of my Linux machines without immediately seeing a picture.
The problem seems to be that the EDID information returned by the monitor is completely invalid. Since Xorg didn’t know what the monitor was capable of, it ended up defaulting to an output resolution of 1024x768. The QX2710 didn’t seem to know what to do with this, and it seemed to run through a series of full screen test patterns.
I thought it would be as simple as adding a “modeline” for 2560x1440, just like we often had to do in the good old days. It was a tiny bit more persnickety than that, though. I also had to add a few options telling Xorg to ignore the EDID info.
I’m not entirely certain if all the EDID and the ExactModeTimingsDVI are required. I went through a few iterations of trial and error based on information from a number of sources. I tried various “modelines” that I found on the Internet, but I ended up using one generated by the cvt command line tool.
Everything is up and running smoothly, and my desktop resolution is now 5120x1440. This is a huge step up from the pair of 1024x768 LCD panels I had back in 2001.
Making use of the new screen real estate
I don’t use a tiling window manager, but I have some tiling scripts set up for my preferred window manager, Sawfish. With the old monitors, I usually had each monitor split up into two asymmetric columns. The narrow column on the left might contain Pidgin chat windows or terminal windows, and the large column on the right might contain something like a web browser or a text editor.
I’m completely amazed by how much room I have now. I decided to split each monitor up into three columns—one wide column down the middle with a narrow column to each side. I had to trim the width of the columns a tiny bit to make room for the new narrow column, but even the narrow columns are wide enough for an 80-column terminal window.
Those narrow columns are almost tall enough to stack three 80x24 terminal windows on top of each other—they only miss by a single row for each window. It is close enough for me to be very excited, though, because I can fit a giant Emacs window in the center column with three 80x23 terminal windows on each side.
This is so much better than trying to find a legible font that would let me squeeze four 80x24 terminal windows on a single 15” 1024x768 monitor.
Where to buy? Do I need a pixel perfect guarantee?
There seem to be plenty of QNIX monitors available through Amazon, but you’ll save a little money if you buy them through eBay. I bought mine on eBay from someone called dream-seller. There was a delay in shipping, though. They told me there was some pretty bad weather over there due to a typhoon, and Google sure seemed to agree with them. Once the monitors were shipped, though, they arrived in less than a week.
Some of the QNIX monitors are sold with a “pixel perfect guarantee”. I thought it was well worth the extra $20 to $30 to get that guarantee. The LG panels used in these monitors are from the batches that Apple, Dell, and Asus didn’t want to use in their monitors, so there may be quite a few dead pixels in these batches.
Many of the ones that were listed that didn’t have a guarantee said that they may have up to five stuck or dead pixels. If I had one dead pixel, I wouldn’t be able to stop staring at it. I don’t know what I’d do if there were five!
I also imagined a warehouse with two stacks of monitors, with perfect monitors in one pile and monitors with dead pixels in the other. I knew exactly which stack I wanted my new monitors to come out of.
These monitors were just too big for my dual-monitor stand. I hung them up there briefly, but it just wasn’t going to work out, and they seemed to be sitting up much higher than my old displays. I felt very small looking up at them.
They new monitors are on their stock bases for now, which is a little weird for me. My old monitors were mounted about five inches above the surface of the desk. Sitting on their own, these monitors are only a little over two inches above the surface of the desk. I feel like I’m looking down at them.
I’m planning on buying some unistrut and modifying my existing monitor stand to fit these gargantuan monitors. They really are quite large. They’re set up at about a 45-degree angle, or is it a 135-degree angle? I guess it depends on where you measure it from. They butted right up against each other, and together they measure over 45 inches from end to end.
Update: QNIX QX2710 and Ubuntu 14.04 (Trusty Tahr)
I had a little bit of trouble with my QNIX monitors after upgrading to Ubuntu 14.04. Whenever the screensaver would power down the screens, they would almost immediately power back up. This would be so bad if they weren’t also being set to an unsupported mode that makes them draw ugly, bright, green vertical lines down the right side of the screen.
I didn’t notice it the first time that it happened, and I ended up with burned in vertical lines that took about ten minutes to fade away. The problem turned out to be the new light-locker program that hands control of the display back to lightdm when the screen is locked.
I opted for the easy fix. I just uninstalled light-locker, and everything is working just fine now.
1
wonko@zaphod:~$ apt-get remove light-locker
Update – July, 2014: Dead pixel scare
I thought I found a dead pixel on one of the monitors. I found it within two inches of a mote of dust that seems to be stuck between the panels. I took a picture to post here, and in that close up, the dead pixel doesn’t look so dead. It looks like a little more than half of two different pixels are being blocked out.
I have no idea how dust finds its way inside of an LCD panel, but this isn’t the first time I’ve had this happen. A large chunk of something managed to work its way into one of my old laptop’s LCD panels.
I still plan to debezel these monitors, but I thought I should post this finding first. The dust was definitely not there when these monitors arrived last year, and I don’t want anyone thinking I did something stupid while I was removing the bezels!
I can only assume that the dust dropped into place while I was setting up my new monitor stand. Maybe it will shake loose when I’m taking them down to take the bezels off.
Update – August, 2014: Faux dead pixel update
Earlier today, I checked to see if that pixel sized dust mote was still there. I found a bright white window, and moved it over to the location of the dust mote. It was still there. I don’t know why, but I decided to give it a good solid thwap with my finger. The dust immediately vanished!
I must have worked it loose, and it fell out of site. The smaller speck of dust is still there, and I couldn’t dislodge it in the same way. It seems to be much more out of focus and fuzzy than the other one, so I’m assuming it is between the LCD and the backlight, while the bigger one was in front of the LCD panel. Maybe it will work its way loose on its own.
I recently built a new Linux workstation to replace my laptop, and that got me thinking that it was probably about time to upgrade Chris’s laptop as well. I did put an SSD in her very old Dell Inspiron 6400 last year, and that did breathe a bit of new life into it, but having only about 3.2 GB of usable RAM was really starting to feel cramped.
She hasn’t taken her laptop out of the house in over a year, so I figured it was safe move her back to using a desktop computer again. She doesn’t need as much horsepower as I do, but I wanted to make sure that her new machine would be a significant upgrade.
I thought it might be worthwhile to someone if I published this parts list. All the hardware is working just fine under Ubuntu 13.04, and this combination of hardware also managed to eke out one of the higher Geekbench scores for an FX-4130.
Even though I had to buy a new video card for this machine, the price was still over $200 less than my own 8-core machine. That’s a pretty significant savings, and for her purposes this machine won’t be noticeably slower, either.
Why an FX-4130 CPU?
Chris doesn’t often perform tasks that would benefit from the eight cores of an FX-8350—single core performance is much more important for her. The FX-8350 only outperforms the FX-4130 by roughly 15% in single threaded tasks. That’s a very reasonable performance hit to take in order to save $90.
I’m not a very advanced gamer, but none of the games I play seem to use more than three or four cores. The FX-4130 should work nearly as well for gaming as the FX-8350.
Taking a chance on a different motherboard
There was a combo deal on the motherboard and CPU when I ordered these parts last week. I ended paying about $30 less than what I listed up above. I’ve had good luck with Gigabyte motherboards in the past, and even if it ended up running a bit slower, that would be alright.
I’m actually quite pleased with this motherboard, even if the chipset is getting pretty old now.
Is 8 GB of RAM enough?
I think 8 GB is a little on the low side, but it is definitely enough to get by. Her computer has been up for a couple of days now, and she’s barely touching swap and has plenty of cache.
8 GB is a bit tight, but still pretty comfortable
123456
wonko@chris-desktop:~$ free
total used free shared buffers cachedMem: 8158820 4293420 3865400 0 208300 2359672-/+ buffers/cache: 1725448 6433372Swap: 31249404 3584 31245820wonko@chris-desktop:~$
If you’re primarily a gamer, you probably won’t notice much improvement today with anything beyond 8 GB of RAM. That is likely to change in the future, but hopefully memory prices will come back down by then.
32 GB feels quite cavernous
123456
wonko@zaphod:~$ free
total used free shared buffers cachedMem: 32896640 11416564 21480076 0 884124 6201292-/+ buffers/cache: 4331148 28565492Swap: 33554428 0 33554428wonko@zaphod:~$
The Raidmax RX-500AF power supply
The Topower power supply that I used in my computer seems solid enough, but its pair of small fans are pretty loud. The Raidmax power supply has less capacity than the Topower 650, but its single large fan is much quieter. The Raidmax is also less expensive.
Don’t tell Chris, but I ended up stealing her Raidmax RX-500AF, and I put the loud Topower ZU-650W in her new machine. My office is a noticeably quieter now!
Some benchmarks
I went into quite a bit of detail on the benchmarks I ran in my last workstation build entry. I’m going to try not to be as long-winded this time.
Benchmark/Test
FX-4130
FX-8350
Geekbench v2
7249
12981
Geekbench v3 single-core
1998
2313*
Geekbench v3 multi-core
5518
11870*
Kernel Compile -j 1
10:59
8:46*
Kernel Compile -j 4
3:38
2:54
Kernel Compile -j 8
1:36
The FX-8350 machine is only about 15% to 25% faster in the tests that stress only a single core and about twice as fast when they are maxing out all of their cores. The FX-4130 is one generation older and 400 MHz slower than the FX-8350, so I think the FX-4130 is doing a bit better than I would have expected.
There are some asterisks in that table next to some the FX-8350’s scores. My FX-8350 is currently overclocked by 200 MHz, and I don’t have scores recorded anywhere for those tests at stock speeds. Those numbers may be a little inflated, but they aren’t all that far off.
The NVidia GT 640
I was planning on replacing my NVidia GTX 460 with the new GT 640. I didn’t research this much at all. It was one of the better-looking cards at the price point I was aiming for. It has more CUDA cores than my GTX 460, but they run at a somewhat slower speed. Some quick math in my head said that would probably make it a wash as far as performance was concerned.
The GT 640 I ordered also has twice as much memory as my old GTX 460. Rumor has it that the extra video RAM is helpful with higher-resolution displays, and I’m waiting for a pair of QNIX 2710 2560x1440 displays to arrive. My own math and logic didn’t quite jibe with that rumor, but I didn’t think a video RAM upgrade that was effectively free would hurt.
It turns out that the GT 640 is quite a bit slower than the GTX 460. The first few games I loaded up were getting similar frame rates, so I figured I did a good job. The next day, though, I noticed some significant stuttering in Paranautical Activity, especially in the boss rooms.
The biggest difference between the GT 640 and the GTX 460 is memory bandwidth. The memory in the GTX 460 is clocked quite a bit higher and the memory bus is twice as wide. This difference in memory bandwidth doesn’t make for a noticeable change in frame rate in every game, but sometimes that difference is hard to ignore.
The GT 640 is a fine video card for the price, though. It may be slower than the GTX 460, but it costs less and uses significantly less power. My GTX 460 requires TWO PCIe power connectors, and the GT 640 doesn’t require any. That means the GT 640 makes for a cooler computer that costs a bit less in electricity to run.
The verdict
I’m very happy with this budget conscious Linux workstation build. When it comes to common office productivity or gaming, this FX-4130 desktop computer is almost as fast as my FX-8350 desktop. This is perfect because this is exactly what this new machine is intended to be used for.
It ended up costing me about 30% less to build this FX-4130 based machine than it would have cost to build another FX-8350 rig, and Chris won’t even notice the difference.
I had one bad stick of DDR3-1333 among the parts I recently used to build my new Linux workstation. That bad stick of RAM had me running many, many passes of MemTest86. I was surprised to see that MemTest86 was telling me that my RAM has quite a bit higher throughput than my FX-8350’s L3 cache.
This piqued my curiosity. Is DDR3-1066 faster than my L3 cache? If it is faster, then am I seeing any benefit at all from my DDR3-1333? DDR3-1600 should be faster still. Would I see any improvement if I overclocked the RAM to DDR3-1600?
After the replacement stick of RAM arrived, I ran MemTest86 and Geekbench 2 at all those speeds. The results weren’t surprising, but I am happy to report that all four of my 8GB Corsair XMS DDR3-1333 DIMMs overclocked to DDR3-1600. They survived three long nights worth of MemTest86 passes, and they’re still happily running in their overclocked state, but is there really any value in leaving my RAM overclocked?
The Geekbench results
I ran Geekbench 2 at each of the four speeds between DDR3-800 and DDR3-1600. These are the results:
DDR3-
Total Score
Int
Float
Mem Perf
Mem B/W
MemTest
L3 Cache
800
13767
11452
23736
5298
3924
7644
10500
1066
13900
11216
23870
5634
4982
10114
10500
1333
14025
11178
24071
5690
5507
12225
10500
1600
14244
11273
24511
5678
5841
13746
10500
I didn’t know exactly what the number would look like, but I have to say that the results were very predictable. Faster memory has been providing similar results for decades. Within reason, as long as you have enough CPU cache, it doesn’t really matter how fast your RAM is.
Just look at the huge bandwidth gap between DDR3-800 and DDR3-1600: DDR3-1600 has almost 50% more bandwidth. Yet there’s less than a four-percent difference in their overall Geekbench scores.
What about gaming performance?
I found a lot of anecdotes regarding gaming performance and memory speed on the Internet. Most claims use phrases like “some games” and “7 frames per second” without telling me what sort of frame rates they had to begin with. If you’re only getting 30 frames per second, then an increase of seven-frames-per-second is huge. Whereas if you’re already breaking 100 frames per second, then that same seven frames per second increase becomes tiny. These anecdotes are almost always lacking important information.
I didn’t use any proper science here, but I can say that I certainly didn’t see a noticeable increase in frame rate when I overclocked my RAM to 1600.
It would have cost me an extra $30 per DIMM if I had bought DDR3-1866 instead of DDR3-1333. That would have added $120 to the cost of my workstation build. If you want better gaming performance, then I say spend that money on a better video card.
The verdict
I’ve always said that if I have the choice between buying faster memory or more memory, I will always choose more memory.
This data probably only directly applies to AMD’s Bulldozer and Piledriver CPUs, but this line of thinking has been generally correct at least all the way back to the first 256 KB SIMMs I replaced in the early nineties.
My three-year-old Core i7 laptop gets better memory and cache scores in MemTest86 and Geekbench 2, so it is quite possible that Intel hardware squeezes a bit more performance out of faster memory. Even with Intel hardware, I bet you’d still get much better bang for the buck putting that $120 towards a better CPU or video card.
I’m going to keep my RAM running at 1600. It isn’t speeding things up much at all, but it also isn’t hurting anything.
The automated backup strategy that I’ve been using for the past three or four years was very solid, and it served me very well. I was using rdiff-backup to perform daily backups of my entire home directory to local storage, and I was using Duplicity to create and upload encrypted backups of my most important data to a remote server every day.
This was very stable and very bandwidth-efficient, but each backup only ran once a day, and rdiff-backup and Duplicity are both very heavy on I/O and CPU.
Moving my backups to the cloud
I started exploring various self-hosted cloud storage solutions a few months ago. After much consideration, I decided to use Seafile as my cloud storage solution. I had to rearrange my home directory a little to get everything important synced up to my Seafile server, but once I did, I realized that I didn’t need my old backup plan anymore!
A good backup plan needs to include history. It might take days or even weeks to notice a corrupt or missing file. It is important to be able go back into your backup history and recover that file Seafile definitely has me covered in this case. Seafile lets me set the number of days of history I want to hang on to for each individual library. My rdiff-backup and Duplicity backups only recorded a snapshot of my files once each day, while Seafile does that constantly throughout the day as files change. I consider that to be a very big win.
A good backup plan also needs to move your files off-site Seafile has me covered here. Changes to my files are pushed up to my server almost immediately after I save them. My computer could get fried right now, and I would probably only lose this paragraph.
Seafile doesn’t just give me a backup of my data, though. It is also keeping my important data synchronized between my laptop and my desktop. That not only gives me an extra full copy of my current data, but it also means that I don’t have to remember to take files with me when I leave the house.
Don’t forget to back up your self-hosted cloud!
In my opinion, a proper cloud-based storage solution has redundancy. Of the self-hosted cloud storage solutions that I checked out, the only ones that offered any real redundancy didn’t have client-side encryption. That made them pretty useless for me.
I don’t care if my Seafile server becomes unavailable for a while, but it is very important to me that I don’t lose all history that it is storing for me. I have some existing infrastructure in place to help keep my Seafile server safe.
My Seafile virtual server is stored on a RAID 10 to help protect against hardware failures
All my virtual servers are backed up to another local server every night
Those nightly backups are then synced off-site
This means that two copies of my current data exist at almost any given time: one on my local machine, and one on the Seafile server. I get even more redundancy if my laptop is powered up. It also means that my backup history is stored in three places: on the Seafile server, on the local backup server, and on the off-site backup server.
I’m probably doing a better job of managing my backups than most corporations at this point.
I’ve only been running Seafile for a little more than a month so far. I haven’t had any data loss, and I’ve been able to pull files out of my history. One month isn’t a long time. I’ll definitely report back regularly to let everyone know how things are going.