I’m probably stretching the word “workstation” a little further than I should. I’m talking about the machine I’m typing on right now. It’s my gaming PC, video editing machine, and the place where I sit when I work on blog posts. It feels like a reasonable word to use to convey the situation in which I’m running this immutable Linux gaming distribution.
I created this image with state-of-the-art image-combining AI last year, but I used Flux Context to swap the Radeon 6700 XT in last year’s image for my new Radeon 9070 XT. This image made me giggle last year, so I knew I had to bring it up to date!
I first tried Bazzite on the Ryzen 6800H mini PC that we use for gaming on our living-room TV. I had a good experience, and that got me thinking that an immutable distro might be a good fit for me moving forward, so I installed Bazzite in desktop mode on my Ryzen 5700U laptop. Bazzite makes some difficult tasks easy, like getting OBS Studio with hardware encoding working, DaVinci Resolve Studio playing well with ROCm and OpenCL with a Radeon GPU, and keeping itself reasonably updated with cutting-edge gaming drivers and libraries. The productivity stuff that I use is simple to set up compared to those things that touch the hardware so deeply.
Things have been going well on my laptop, and I knew I would eventually move forward with loading Bazzite on my desktop PC, but I’ve been procrastinating. I decided to order a 16 GB Radeon 9070 XT yesterday, and my aging Ubuntu install just doesn’t have new enough Mesa libraries for an RDNA 4 GPU, so I had incentive to bite the bullet.
I’m honestly only around 24 hours into my fresh Bazzite installation as I’m writing this paragraph. My plan is for this blog post to be an actual log on the web of what I’m doing, how things are going, and the quirks I’m working around. I’ve been running Sawfish as my window manager for something like 20 years. I have code to arrange my windows into columns, and I sometimes tile terminal windows vertically in those columns. I rely on all sorts of weird muscle memory and custom scripts, and I’ve been building this memory for decades.
I’m popping back in from a few days in the future to write this paragraph. I’m realizing that this is almost turning into a list of all the little oddities that a long-time Linux user switching to an immutable distro might encounter along with my workarounds. I think this writeup is more valuable than I expected it would be, but the audience of people who will find value here might be extremely small!
- Should I Run Bazzite Linux On My Workstation?
- Using A Ryzen 6800H Mini PC As A Game Console With Bazzite
The installation went smoothly
I store my Steam games on a volume backed by lvmcache that lives on my primary NVMe drive, and I store my recorded video footage on a volume with lvmcache on a separate and slower 1-terabyte SATA SSD. I had the NVMe split up with a little over 600 GB for boot, root, and home, and just shy of 300 GB for the lvmcache. My root volume was usually less than half full, so I decided to flip that around.
I haven’t set up the other volumes for Steam or video footage on the mechanical disk yet, and I haven’t configured the lvmcache. Everything I need to make it work is there. It just isn’t the priority yet. Configuration in /etc is not immutable, so I can add things to fstab and crypttab.
NOTE: My lvmcache is set back up, my Steam games are stored on the slow hard drive behind the NVMe cache, and the relevant bits are in my fstab and crypttab, but they are both set to noauto. Today was just not the day that I wanted to potentially troubleshoot a volume failing to mount during boot!
Everything worked. I installed the game I’ve been playing most recently on Steam, and it was running as smoothly or more smoothly under Wayland than it was on X11. I set up a basic OBS profile, and I was able to record my 3440x1440 screen at full resolution using VAAPI hardware-encoded H.265 without a problem. Maybe I’ll be able to try hardware-encoded AV1 when the new GPU gets here tomorrow!
I couldn’t use Bazzite at my desk without Distrobox!
Bazzite is an immutable distro. Just about the only acceptable way to install software is via Flatpak, and almost everything available as a Flatpak package is a GUI application. There aren’t really any command line tools in the Flatpak world, and you don’t want to try to shoehorn dozens of packages into your base install. I wouldn’t want to work without things like Emacs and zsh, and I need Ruby and rbenv to publish my blog using my ancient Octopress setup.
I knew this migration was coming. I set up a Distrobox Debian installation on my desktop more than a month ago with the intention of configuring it to be the place where I live at the command line. I used it as an opportunity to upgrade from Emacs 26 to Emacs 30, and I got most of my important Emacs packages and configuration working in there. I even used Distrobox’s FAQ to learn how to export my image on my workstation and transfer a copy over to my laptop.
Almost everything that I need to get by every day is installed on that Debian image.
I had some concerns about this when I was setting up OpenCode in the Distrobox container last week. All my Distrobox images share my home directory with the host, and OpenCode spilled its installation all over my home directory. That includes the executable file. I expected this was going to make things a little ugly, because calling into the Distrobox container from the host might wind up getting circular.
It turns out it isn’t going to be a big deal, because my terminal is now set to open my Debian Distrobox session by default. I’ll never run OpenCode, or any of the handful of similarly installed program, on the Bazzite host. There won’t be any development happening up there. Everything will be happening inside Distrobox.
I’m not at 100% of my usual operating capacity inside my Debian Distrobox, but I’m getting there. I’ve been using fasd for more than a decade, and it has been deprecated for a long time. I’ll have to look into replacing it with zoxide or fzf. Without fasd and autojump, my Go command no longer works, and I can tell you that I type g A LOT. Modernizing this is near the top of my list!
The majority of my productivity happens inside that Debian Distrobox, but I also have an Ubuntu 18.04 Distrobox just for Octopress and my blog. I’m not sure why I had to go back that far, because everything had been working on my much newer Ubuntu install last week, but going backward was easier than puzzling out the problem.
DaVinci Resolve Studio is working great
Another day has passed, and my Sapphire Pulse 9070 XT arrived this morning. I was holding off on running ujust install davinci-resolve because I wasn’t sure if it would install a different version of ROCm depending on the model of GPU I had installed.
I didn’t dig all that deep. I loaded a video. Playback worked. Simple edits worked.
I usually export a short video from an existing project when I upgrade Resolve to make sure the important bits are indeed working, but I don’t have any projects handy. This upgrade seemed like a good time to get rid of six years of podcasting projects that I haven’t touched in ages.
I will update this section if I run into any trouble exporting footage.
KZones is better AND worse than my custom window-management scripts
KZones is a lot like FancyZones on Windows. You define zones, you can drag windows into those zones, and KZones does the job of sizing the windows to precisely fit your grid. You can also configure keyboard shortcuts to move the current window into a particular zone.
I’m staring at the same sort of zones that I used to look at most of the time when using Sawfish. The screen is split into three even zones. Emacs is in the middle, a web browser is to my left, and a big OpenCode window is to my right. I’ve enjoyed my upgrade to a single ultrawide monitor because I get to have one wide window right in the middle.

I have a fourth zone that occupies the same space as the center and right zones for those times when I need something bigger that isn’t quite full screen.
I set up another KZones layout where the center window is around 45% of the width. I haven’t used this much, but KZones has a shortcut key to cycle through layouts and another shortcut to snap all the windows into the new zones. I kind of wish that would happen automatically, but two keystrokes isn’t bad.
There’s one thing I miss about my old configuration. I had things set up so pressing a shortcut once would put the window in the expected zone, but pressing it again when the window is already in the zone would move it to a different zone. That meant I had one key that would put a window in the center zone AND the wider 2/3 zone. Not a huge problem, but my muscle memory keeps trying to do this.
Gaming is fantastic
I’ve only installed one game, and it was already running slightly better on the Radeon 6700 XT than it was on Ubuntu. The graphical settings didn’t change, but the game asked me whether it should run with Vulkan or DX11 when I fired it up, and I can no longer verify that I was definitely using Vulkan before!
I dropped in the Radeon 9070 XT this morning, and everything just worked. This is not a surprise, but I’m definitely happy that I received a functional piece of hardware, and that things are running smoothly.
I’m playing Ghost Recon: Breakpoint on the hardest difficulty with no AI teammates. I played the game on the same day both before and after installing Bazzite, and I really do feel like the game felt more responsive on the same hardware. I have no equipment here to accurately test latency, so I have no way to know whether or not it is just my imagination. I do wonder if I’m noticing the new Vulkan anti-lag feature. The release notes indicate that it is enabled by default, and I see it listed in vulkaninfo on my machine.
I am able to record 144 FPS at 3440x1440 gaming footage using gpu-screen-recorder without any trouble. I was warned by gpu-screen-recorder that AV1 and H.265 may be problematic. It was correct about AV1. My game had some stutters and the recording was mostly dropped frames, but the H.265 footage came out perfect and I couldn’t even tell that the replay buffer was active.
- Sapphire Pulse Radeon 9070 XT at Amazon
Thunderbird was being problematic
The problem is that I’m doing it wrong. I dropped my old .thunderbird directory into /home/pat/ and pointed the Flatpak installation of Thunderbird there. It would lose the location of my profile every time I rebooted, and sometimes it just didn’t want to open my profile unless I brought a fresh copy back over.
A Google search suggested that I’m supposed to drop my old .thunderbird into ~/.var/cache/org.mozilla.Thunderbird/cache/thunderbird. I almost did what they asked, but I didn’t like how deep that directory was, and the usual location is already part of my backup plan.
It seemed like it would be easier to just run apt install thunderbird in my Debian distrobox, so I did that! I ran distrobox-export -a /usr/share/applications/thunderbird.desktop in the Debian container to make the application available to KDE up on Bazzite, and I was good to go.
Was this the right way to fix this? Probably not, but I got to test exporting an application from a Distrobox container instead of just a binary. That was fun!
A quick test of llama.cpp in Distrobox
Another day has gone by, so I believe I’m on my third day with Bazzite. I already wrote the conclusion section, but I thought my quick test with llama.cpp was worth including. This also means I get to procrastinate a little longer on hyperlinks and image editing for this post!
It has been a long time since I messed around with llama.cpp or ROCm. I knew I wanted to set myself up for this stuff in a Distrobox machine, but I wasn’t sure where I should begin, and I had no idea which ROCm stuff would work with my new 9070 XT GPU. I found this how-to on setting up a ROCm Distrobox machine, and they also had a how-to on setting up llama.cpp for ROCm on the same site.
1 2 3 4 5 6 7 8 9 10 11 12 | |
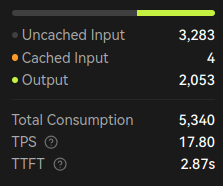
A friend in our Discord community recommended that I try Qwen 3 14B at Q6_K_L. He said it is a good model to fit into 16 GB of VRAM, though context would be a little tight. I managed to just barely squeeze 7,000 tokens of context at Q8 in my llama-bench run. I don’t know if there is anything I should do to optimize my settings, but I’m not unhappy with 600 tokens per second of prompt processing with my VRAM filled to the brim.
I did interact with the model, and it conversed with me just fine. When I gave it this entire blog post and asked for a summary, the model just kept repeating nonsense. I wound up swapping out Qwen3 14B Q6 for Qwen3 8B Q6. It was able to summarize this blog post just fine, and I was able to push the llama-bench up to 12,000 tokens of context.
I’m excited to have a working ROCm Distrobox image and a functional llama.cpp setup. That’s a good start, and it bodes well for future machine-learning shenanigans!
My zsh fix makes me feel dirty
I set Bazzite’s default terminal app to open new sessions inside my Debian Distrobox image. I have my shell inside that container set to /usr/bin/zsh. If I kill the container, my first session in the container fires up zsh just fine. Every subsequent connection winds up running bash.
1 2 3 4 5 | |
I found a lot of suggestions on Google, but none of them worked. The only suggestion I didn’t try was deleting my Distrobox image, starting from scratch, and passing in a SHELL=/usr/bin/zsh during creation. I’m not doing that today.
I wound up with a massive kludge of a fix. Since Bazzite doesn’t ship with zsh, I added a check to my .bashrc that checks for the binary’s presence. If it’s there, it will switch to zsh. If not, it will just continue to use bash.
I guess the upside is that I’ll get a free upgrade if Bazzite decides to ship zsh.
Conclusion
This isn’t truly the conclusion. I still have plenty of rough edges to sand down, and I’ll absolutely be running into missing software or configuration for months. I’ve never set up a brand new machine that had everything ready to go in the first week. I always run into a rare task that I’m not quite prepared to solve at some point in the future! I should probably note here that I upgraded the same Ubuntu installation at my desk from 2009 until 2023. I wrote a five-week follow-up post covering how things have been going since this initial setup.
I’m in a good place. Games work. Emacs is upgraded, though in a similar state of configuration completeness as my Bazzite installation. If you’re reading this, then my blog published successfully. I can also play games and edit video. All my major tasks are covered, so I’m ready to move forward!
Are you using an immutable Linux distribution? How has your experience been? I’d love to hear about your setup, the challenges you’ve faced, and any workarounds you’ve discovered. If you’re interested in learning more about Bazzite, immutable Linux distributions, or just want to chat about gaming on Linux, feel free to join our Discord community! We’d love to have you as part of the conversation and help you on your own Linux journey.