I have been wanting to remove the bezels from my QNIX QX2710 monitors since they arrived at my door last year. I became even more interested when my dual-monitor mount arrived, because a piece of the base of the QX2710 is a nearly permanent part of the monitor. To remove that piece, you have to open up the monitor. If I have to take apart the monitor, I definitely don’t want to put it back together.


There’s one thing that has been keeping this project on the back burner—the downtime. I am using JB Weld epoxy, and it takes 15 to 24 hours to fully cure. I didn’t want to lose the use of my monitors for an entire day. I decided to debezel one monitor at a time. That way I could still use my computer.
Why would you debezel a monitor?
There aren’t many circumstances in which I would go through the trouble of debezeling a single monitor. I did end up removing the bezel from the 24” monitor in my arcade cabinet to get it a few millimeters closer to the glass, but that is a special case. Most monitors are sitting on someone’s desk.

Removing the bezels becomes much more functional when you have two or more monitors on your desk, since you’ll be able to move them closer together. It is much nicer having as small a gap as possible between your monitors. My first pair of LCD monitors were 14” and had HUGE bezels. Had I known how easy it would be, I would have debezeled them as well!

I am hoping to see other improvements specific to these QNIX QX2710 monitors. The VESA mount is not attached directly to the LCD panel. It is attached to the rear plastic cover with four screws. The monitors can be made to wiggle quite a bit on their dual-monitor stand. I’m hoping that attaching the VESA mount directly to the LCD panel will eliminate some of that slop. I’m not terribly hopeful, though, because the mount is made of fairly thin sheet metal.
There is another small deficiency caused by the manner in which they attached the VESA mount. It causes the monitor’s plastic shell to flex and opens a small gap at the bottom between the monitor and the bezel. You can also see this causes some of the outermost pixels to be partially obscured by the bezel. You can’t see this problem unless you look for it, but I know it’s there!
Of course, there’s always aesthetics. I think narrow bezels look better, and that might be enough of an excuse to debezel your monitor.
This is not a how-to
I’m not going to spell out a step-by-step process for you. That’s already been done, and it has been done very well. I referred to some YouTube videos and forum posts while I was working to make sure I wouldn’t do anything stupid. It was a very simple process, and it probably took about an hour to get the first monitor all glued up. The second monitor went quite a bit more quickly. I spent most of the time carefully applying the JB Weld and making sure everything was glued up straight and even.
There is an excellent guide at overclock.net explaining the process in great detail. I did not follow his instructions, because I felt that using a piece of plywood to increase the surface area for the epoxy was overkill.
I will tell you about the things I didn’t expect, and that I didn’t plan for.
- Dismantling the QX2710 playlist on YouTube
- How To Create a VESA Mount After Debezeling Your Monitor at overclock.net
Is JB Weld strong enough?
My father has been building golf clubs for himself since I was a kid. He was always tinkering and doing things like changing the shaft on his driver, replacing grips, or changing the length of a club.
I remember one very important detail from my days of watching him work on golf clubs. The head of a golf club is attached to the shaft with epoxy. He didn’t use fancy, expensive epoxy. He used a simple two-part epoxy that he bought at K-Mart. I’d be surprised if there’s more than two or three square inches of contact surface there, and I’ve never seen the head fly off of any of his clubs.
What have Pat and Brian been up to lately? To find out you can check out the latest episodes of The Butter, What?! Show
I was hoping to supply some fancy mathematics here to show how much centripetal force the head of a golf club experiences during a swing. I found a lot of math that explains how much force is applied to the ball on impact, but that isn’t very relevant. I did find a chart that tells me that I swing a five iron at a speed of 90 MPH, and I also learned that the head of a five iron weighs somewhere around 9 ounces.
I decided that 9 ounces traveling around a 4’ arc in excess of 90 MPH generates “a lot” of force. My father can hit that same club a good 20 yards farther than I can, so his club head is traveling quite a bit faster. That same chart says the club head of his driver is moving at over 120 MPH, but I’m pretty sure drivers have a pin that holds the head in place in addition to epoxy.
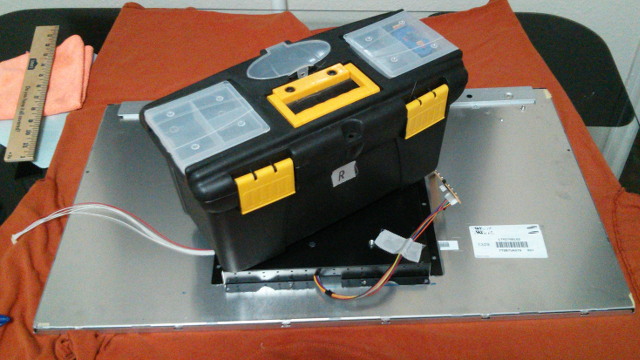
The component box I had to attach to the back of the LCD panel of the QNIX QX2710 only attaches around the edges. Those edges add up to a surface area close to 30 square inches. I am quite confident the JB Weld will hold.
I used regular JB Weld instead of the quick-set variety. This is only because I had some on hand, and I think these partially used tubes have been in my toolbox for over a decade. I did have some of Harbor Freight’s knock off version of JB Weld’s quick-setting epoxy, but the tubes had no information about curing times.
Painting the bezels
Disassembling the metal frame of the LCD panel for painting looks very simple, but I don’t plan on doing it. One of my monitors has a tiny dust mote stuck between the backlight and the panel. I fear that if I take the actual LCD panels apart that I’ll end up with a cat hair stuck in there.
I think the bare metal looks fine except for one minor flaw. There are lines across the frame on opposite corners of the screen. These are the points where they welded two parts together to create a single frame.
The truth is that I don’t notice the gray metal frame at all. The only time I fixate on it is when I’m talking about it. I’ve been repeatedly glancing at the corners of the monitor while writing the last few paragraphs, but I’ll forget about it soon enough.
How long does it take to debezel a monitor?
The first monitor took more time than the second. I was careful when unsnapping the bezel, and I referenced pictures and videos several times to make sure I wouldn’t accidentally rip any wires out.
I also had some confusion. I wasn’t sure which end of the monitor was up, so I didn’t know which way to orient the controller box. You’ll save yourself some time if you take note of which side is up. The innards don’t seem to be identical in all QNIX monitors, so be sure to pay attention.
The second monitor took no time at all. I had the whole thing disassembled and ready for the epoxy in less than five minutes. It probably took another five minutes to apply the JB Weld. I know it takes hours to harden, but I still worry. I wanted to get it coated and attached reasonably quickly.
The second monitor was problematic
After putting the controller box in place, I noticed a significant problem. Even with weight applied to the top, one side wasn’t making good contact with the back of the LCD panel. It just wasn’t straight enough.
The solution was simple, but my execution was poor. I lifted the controller box, and I applied a thick bead of JB Weld on that side. I did a pretty sloppy job, and ended up smearing JB Weld around the back of the LCD panel. It is a much less professional-looking job than the first monitor, but I’m sure it will function just fine.
In my hurry to get that all squared away, I unknowingly dipped my forearm in my mixture of JB Weld. I didn’t notice it at all until I later rested my arm on my desk. I smeared a giant glob of epoxy on my desk.
I thought this was going to be disastrous. I really like this desk. Lucky for me, JB Weld is easy to wipe off!
I don’t always follow directions
The other folks who documented their debezeling always roughed up the surfaces with sandpaper. I probably would have done the same, but I couldn’t find my sandpaper. I’m not worried about it. I’m confident that 30 square inches of JB Weld will hold.
I don’t just ignore important directions. I’m also impatient. The cure time for JB Weld is 15 to 24 hours. I hung the first monitor back up after twelve hours, and I was even more impatient with the second monitor. I think my patience ran out after about eight hours.
If the JB Weld fails and either of these monitors come crashing down, I will be certain to let everyone know.
The results
I have to say that I am extremely pleased with the results. When I disassembled the first monitor, it didn’t look like there was going to be much improvement. The metal frame on the QNIX QX2710 is quite wide compared to the 24” monitor in my arcade table. I measured the metal frame and the plastic bezel with my caliper, and the difference is less than half an inch. That doesn’t seem very impressive.

Then I hung the debezeled monitor next to the stock monitor. I couldn’t believe how drastic the difference was. It makes these 27” monitors feel so much less bulky.
To my amazement, I managed to glue those VESA mounts on at exactly the same height. The monitors line up on the monitor stand absolutely perfectly. This was one of my biggest worries.
They still wiggle
I was hoping the monitors would be more rigid on their mounts, but it’s still easy to wiggle them about. They might be a little more rigid, but not by much. I think the real problem is that the VESA mounting points are welded to a thin piece of sheet metal. It just has a lot of flex.
I was thinking about 3D printing a small brace to clip the monitors together. It is probably not necessary, but I’m always looking for an excuse to design something new.
Only look at the front
My desk now looks awesome from the front, but don’t try to peek around the back. There are some wires on the back of the QNIX QX2710 that you just can’t hide, and they are all thin, fragile looking wires. The cables that plug in near the top of the monitor are not a problem, because they only reach an inch or two out of the enclosure.
The wires that run to the bottom corner of the monitor to power the backlight are quite thin. I couldn’t do much with that other than tape them to the monitor to keep them from flopping about.
The bigger problem is the board with the power, volume, and brightness buttons. It needs to be there, because there’s always a chance that I’ll need to adjust the brightness. There just isn’t anywhere to neatly attach it. I taped it to the back of the monitor by its wires for now, but I’d like to find a better solution.
It should be simple enough to 3D print some sort of bracket for it. Maybe I can affix it to the monitor’s VESA mount where it can be hidden out of sight.
Conclusion
I’m very pleased with the results, and I’m glad that I finally did it. I’ve been putting off doing this mostly because of the fear that I wouldn’t glue the VESA mounts on at the same height, and that part actually worked out perfectly. When I rest my yard stick across both monitors and measure the gap with my feeler gauge, the distance is less than 0.004”!
I also think it was well worth the time and effort. If you don’t count all the waiting, I spent more time and A LOT more labor on wire management over the last two days.
Have you debezeled your monitor? Is it a QNIX QX2710 like mine? I’d like to see pictures and hear about your experience!
- QNIX QX2710 27” 2560x1440 Monitors at Amazon
- Mount-It! Dual-Monitor Stand at Amazon
- JB Weld at Amazon