One Month with Bitwarden

| Comments

It almost feels too soon to be handing in a report on how well Bitwarden is working out after only a month of use. I’ve learned something important since migrating from Keepass. Something that I managed to completely gloss over when making my decision to migrate. It may have made me change my mind, so I think it is important to tell you about it!

Hosting your own Bitwarden server has a weird caveat

Bitwarden is open source, and you can host your own Bitwarden server. I’m excited about having the ability to host my own server, but I didn’t want to go down this road. My initial investigation didn’t go terribly deep. Once I saw that the documentation looked good, and the process was pretty simple, I put in check in the “ability to host your own server” box on my list.

I’ve since noticed that you can’t just host your own Bitwarden server. Your server needs a key that is provided by bitwarden.com. At a glance, this feels sketchy to me. This is what the Bitwarden documentation has to say about server keys:

Each Bitwarden installation requires a unique installation id and installation key. The installation id and key is used to:

  1. . Register your installation and contact email so that we can contact you in case of important security updates.

  2. . Validate licensing of paid features.

  3. . Authenticate to push relay servers for push notifications to Bitwarden client applications.

You should not share your installation id or installation key across multiple Bitwarden installations. They should be treated as secrets.

They want to protect their revenue stream, and they’re allowing you to use their push notification infrastructure so that your server can communicate with the Android and IOS clients.

There is an alternative to the official Bitwarden server

There is an unofficial Bitwarden-compatible server written in Rust. If you feel that having to obtain a key to host your own server is weird or creepy, Dani Garcia’s Rust server looks like a fantastic option.

Bitwarden

This isn’t the only reason to look at Dani’s Bitwarden server implementation. The official Bitwarden server is rather heavy. It requires 2 GB of RAM and quite a bit of storage. You probably won’t be able to just throw an official Bitwarden server up on a random VPS that you already have. You’ll probably need a RAM upgrade.

The unofficial Bitwarden Rust server only requires 10 or 20 megabytes of RAM. You can squeeze that in just about anywhere, and it even runs on a Raspberry Pi!

Everything else has been fantastic

I’m impressed with Bitwarden so far. I haven’t had any problems. Once I learned the control-shift-L hotkey to automatically fill in passwords, it has been smooth sailing.

The Firefox extension works great. All my passwords were imported from Keepass without any issues. After an initial hiccup, the Android app has been doing a fantastic job of populating username and password fields.

My cheap Blu phone’s battery-saving nonsense was goobering things up at first. It was killing the Bitwarden app, and when it did, the app would lose its accessibility status. It wasn’t obvious right away why this was happening, but once I dug into my Android system settings to disable battery-saving features for the Bitwarden app, everything has been working perfectly.

Conclusion

Within a few days of posting about my migration to Bitwarden, three comments showed up recommending three more open-source password managers that I never heard of. This space seems to be crowded, and I plan to do more research in the near future. It might be time for a password-management version of my old cloud storage comparison blog!

Bitwarden has all the features I was looking for, but what pushed me into the migration was when I learned about the third-party audit of Bitwarden that was conducted late last year. It didn’t get a perfect score, but they quickly addressed the serious issues, and they put plans in place to address everything else.

What do you think? Did I make a good move when I migrated to Bitwarden? Do you prefer Lastpass or 1Password? Do you use an open-source password manager? Let me know in the comments, or stop by the Butter, What?! Discord server to chat with me about it!
EMAX TinyHawk Freestyle: An Awesome Upgrade Path For Beginners?

| Comments

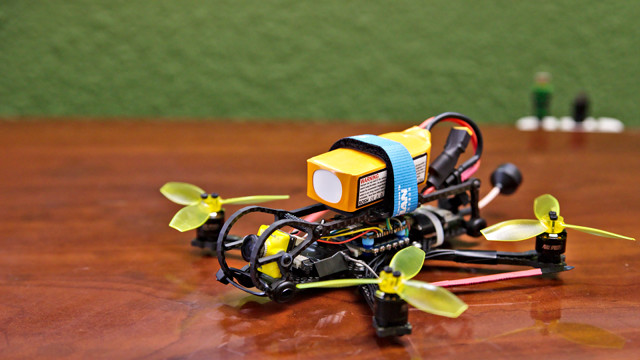
I am excited about the new EMAX TinyHawk Freestyle micro drone. It is fast, fun, and relatively safe. It is also inexpensive, and it is a fantastic upgrade for beginners on their path towards flying full-size FPV miniquads.

We finally have an awesome upgrade path for beginners!

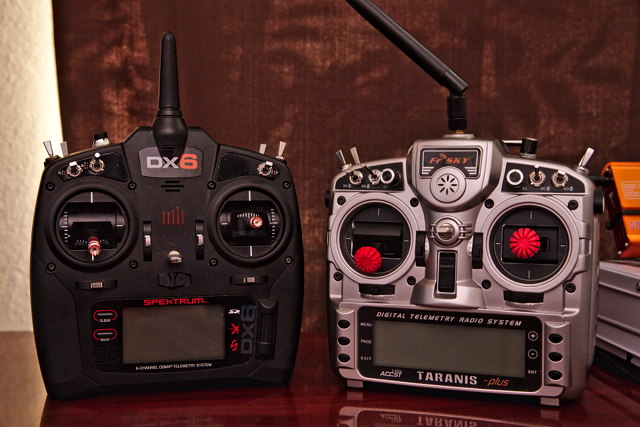
I started flying with a Spektrum DX6 radio. I believe they cost about $230 at the time. That was only the radio. Then I bought a toy quadcopter with no FPV camera, a Blade Nano QX, for $60.

The TinyHawk and TinyHawk Freestyle

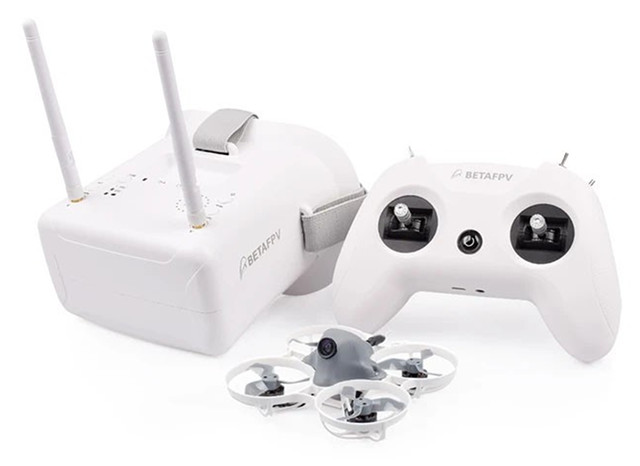
Today, you can buy the TinyHawk Ready-To-Fly kit for $165. That bundle includes the original indoor TinyHawk drone, a set of FPV goggles, a radio, one battery, and a charger. My old DX6 is an infinitely better radio than the one in the TinyHawk bundle, but that doesn’t really matter. Throw in a 6-pack of extra batteries for $25, and you’ll still be under $200.

Not only will you still be under $200, but you’ll already be flying FPV. When I bought my radio, that $230 just gave me the ability to fly something. I still needed to buy quadcopters, goggles, and chargers. I spent so much money!

Until the TinyHawk Freestyle showed up, the upgrade path from the TinyHawk kit was bumpy. You could stick to micros, like the Diatone GTR349, or something like my 3” Kestrel. Maybe you’d want to skip that, and move up to a real 5” miniquad. Your goggles will work well enough, but the radio in the EMAX kit isn’t ideal for something so big, aggressive, and dangerous.

This is where the new TinyHawk Freestyle comes in. Unlike the original TinyHawk, you can fly the TinyHawk Freestyle outside, even when it is windy. In fact, that’s the only place you should fly it. It is much too powerful to fly indoors. If you’re a beginner, though, you may have trouble flying the Freestyle on a windy day. It took my friends and I lot of practice before the wind stopped being an issue for us, even with our heavy quads!

If you’re a beginner, here’s what I suggest you buy:

UPDATE: You might want to skip the original TinyHawk RTF bundle. Emax has released the TinyHawk II Ready-To-Fly Bundle. You can check out Jeremy Cook’s post about the TinyHawk II at Butter, What?!

That’s $295. You certainly don’t have to buy it all at once, but all that stuff costs less than what I spent on just [my Spektrum radio][dx6] and a toy quadcopter with no camera. This blows my mind. You can get into the air flying actual FPV, and you can have the tools to practice in the simulator for less than I paid for my first radio.

NOTE: I’ve read and watched in several places that you can bind the RTF kit’s controller up to the TinyHawk Freestyle, but a friend of mine has been having some trouble. It seems possible, but it may not be as easy as I hoped. Stay tuned, and I’ll let you know how it goes!

I wish this was available when I started flying three years ago. Having to spend $500 or more just to get started flying FPV required some deliberation. Spending $165 would have been an impulse purchase. I would have bought a TinyHawk RTF kit immediately after seeing my friend Alex fly his old Blade Vortex 250!

Are the TinyHawk and TinyHawk Freestyle the best in their classes?

It probably depends on your definition of best, but I would have to say that they are not. The whoop-like TinyHawk isn’t the fastest or best handling brushless whoop. It does hold its own, though, and it is probably the most durable brushless whoop you can buy.

The TinyHawk Freestyle falls into the toothpick class of drones. Toothpicks are supposed to be small, light, fast, and safe. The more weight you add to a quad, the more damage it will do to a person when you accidentally fly into their face. KababFPV has a video where he flies his 35 gram toothpick build into his face at full speed. This is the sort of toothpick I want.

The TinyHawk Freestyle pushes the definition of a toothpick a little past KababFPV’s specifications, but it isn’t too bad. I should point out that EMAX doesn’t claim the TinyHawk is a toothpick-class drone.

There are bigger, heavier, insanely faster quads than the TinyHawk Freestyle that claim to be toothpicks. By some definitions, those quads are much better than the TinyHawk. If you want something quick, snappy, and relatively safe, the TinyHawk Freestyle is probably the quad for you—especially if you’re already flying a TinyHawk or TinyHawk S!

Did you buy a TinyHawk Freestyle? What do you think of it?

I did buy a Freestyle, and I like it a lot. When I saw the specs, I was excited. The first thing I thought of was my old KingKong 90GT—my first micro FPV quad.

The motors are the same size and of a similar KV. My modified 90GT ran 2.5” props, just like the Freestyle. They’re similar enough in weight and size. Micros have made a lot of progress in 2 years. I figured the motors on the TinyHawk are more powerful, and I was confident that the ESCs are a huge upgrade, too.

I was right. It is a huge upgrade over the KingKong 90GT.

Pat created a problem for himself

I plugged in my TinyHawk, unlocked the VTX, bound it to my Taranis X9D, and pasted the configuration for my OSD and switches into Betaflight. I was ready to fly, so I put my batteries, goggles, Taranis, and TinyHawk Freestyle into my little backpack, hopped on my electric bike, and rode to the park.

I’ve had a concern since placing the order for my TinyHawk. After I started using TBS Crossfire, I wound up taking my Taranis apart to tuck my FrSky antenna inside the radio. This hasn’t been a problem with the original TinyHawk, but I was concerned that I wouldn’t have enough range outside.

My worries were quickly confirmed at the park. I lost my control link as soon as I went behind a big tree. I couldn’t powerloop or S-turn any trees, but I still gave it a bunch of stick, and I ran it through its paces in the open space.

How does it fly?

I hear the Freestyle flies better on gentle 65mm biblade props. I don’t have any of those yet. I’m pleased with how it flies on the heavy triblade props that it ships with. They seem to have good grip down low, and they handle propwash way better than I expected, but they quickly run out of steam at full throttle.

If you’re a beginner, this won’t matter. You won’t be breaking any speed records, but it sure isn’t slow. I think EMAX chose the right props. The TinyHawk Freestyle is targeted toward beginners. You don’t want to lose a 95 MPH drone on your first flight!

I think it feels great. It is quick, crisp, and responsive. I saw that AndyRC has a tune to eliminate some of the high-throttle oscillations, but I didn’t even get a chance to hear them. The little guy is so quiet, and I’m an old man. I’ll have to do a full throttle punch right next to myself and listen for it!

Did Pat choose the right toothpick?

The original TinyHawk isn’t the best brushless whoop, but it is the best brushless whoop for me.

The TinyHawk Freestyle isn’t the best toothpick. It is a bit on the tubby side for a toothpick, but it isn’t the biggest. Being heavy makes it a little slower and a bit less safe than the lightest toothpicks. That said, I think the TinyHawk Freestyle is a good compromise and a great value, especially if you’re already a TinyHawk or TinyHawk S pilot!

Ever since KababFPV showed off his first toothpick, I’ve been wanting one. Specifically, I wanted a toothpick that could make use of the batteries and charger that I already have for my TinyHawk. Batteries and chargers are one of my biggest investments. Sure, whoop batteries are cheap, but I don’t want a fourth set of batteries to maintain and carry!

At any rate, I needed to try the TinyHawk Freestyle, because I want to be able to recommend it to you. I don’t like recommending things I haven’t used myself.

I suppose the answer is yes. I definitely chose the correct toothpick for my purposes!

I have to complain about a few things!

The TinyHawk’s camera is awful. The Freestyle seems to have the same camera as the original TinyHawk. It is fine for whooping around the house, but it was a real disappointment outside. My FPV camera standards are pretty high, though. I doubt I’d be happy with any of the whoop-size cameras.

I’m also disappointed that the VTX is only 25mw. One of the reasons that I upgraded from the Leader 120 to the Leader 3 was the higher power VTX. I would feel more comfortable with a 200mw video transmitter. It isn’t the end of the world, though. When you fly a tiny drone so far away that you need 200mw, it usually becomes extremely difficult to locate your quad after a crash. They’re so tiny!

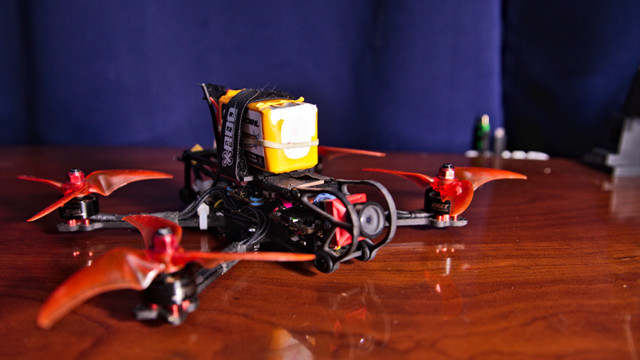
EMAX TinyHawk

I know a lot of people will be excited about the nice carrying case. It is the same case that the original TinyHawk ships in. The trouble is that the TinyHawk Freestyle doesn’t fit in the foam insert with the props on. I took the foam out, and it just barely fits in there.

I’m not excited about the carrying case. I’d rather have cheap packaging and an extra battery or something. I assume I’m in the minority!

Conclusion

I’m way too excited. EMAX has just made life so much easier for new pilots. You don’t have to think about it. You can just buy a kit with everything you need to get in the air and also practice in a simulator. When you outgrow the indoor TinyHawk, you can easily upgrade to your first outdoor FPV quad.

This is so much better than when I got started!

What do you think? Do you like the original TinyHawk, or do you prefer a different brushless whoop? Are you looking to upgrade to a toothpick? Is there a toothpick that you like better than the TinyHawk Freestyle? Do you think this is as fantastic for beginners as I do?

Let me know in the comments, or stop by the Butter, What?! Discord server to chat with me about it!
Open-Source Falcon Miniquad Frame: Road to Version 1.0

| Comments

I am excited! Frame design is going well. The Shapeoko is doing a fantastic job cutting carbon fiber. The first prototype of the Falcon is flying well, and I’m quite pleased that I’ve uploaded another open-source miniquad frame for the world to enjoy.

There were some minor issues with [the first prototype][]: some holes were too small, the inner arm mount screws are inconveniently spaced, and the carbon fiber plate shifted while cutting the arms.

My Open Source Falcon Prototype

I was able to pause the CNC machine, then reposition and lock down the carbon fiber, and resume the cut where it left off. It looked like I got the plate lined up pretty well, but it was off by enough that I couldn’t mount the arms. Some filing fixed that, but I didn’t get to test the Kestrel-style arm wedge. Instead, I used two screws per arm.

Changes since the prototype

I feel that I should mention that the prototype Falcon frame is flying great. There’s a slight measuring guesstimate error on my part that lets you see some of the top plate in the FPV video feed. Aside from that, I don’t think I’d be able to tell you whether I am flying my Falcon or Flowride in a blind test.

I was a combination of happy, surprised, and relieved that the battery strap locations on the Falcon were almost perfect. I’m using the same model for the top and bottom plate, so I have to rely on the slots in the center of each stack for battery straps. I was worried that this would position them in an awkward location.

The fuselage is shorter

As I was assembling the prototype, I realized that I had a lot of room between the FPV camera and the ESC board. I took a guess as to how much room the 20x20 stack in the front would require, and I guessed a little high.

I was worried that pushing the front and rear stacks closer to the center might goof up my battery strap locations. To check my work, I printed the full-length and partially-truncated top plates on paper. On a laser printer. Can you believe it?!

Battery Strap and GoPro Location Comparison

I wound up bringing each stack 5 or 6 mm closer to the center. My builds have the ESC power lead going out the side of the quad, but there’s plenty of room if you prefer to point the power lead towards the front or back of the quad. I tested this by putting spare ESC, an old 20x20 flight controller, and a busted Caddx Turtle on the paper.

This gave me a chance to check where the battery straps would land on the full-length frame. I don’t want to fly the full-length frame, so I’m happy that I didn’t have to cut one for testing! The battery straps line up great, and the battery sits in a good position.

While I was editing the top and bottom plates, I added a pair of cutouts around the center stack that can be used if you want to fly with your battery mounted in the toilet-tank style. I’m not sure if the exact center is the ideal spot for that, but I figured it couldn’t hurt to add the option. Especially since it saves a bit of weight!

The arm brace plate holes are fixed, and the mount points are wider

I left holes in the bottom brace plate that were supposed to be big enough to fit a 2mm hex driver. These holes are there to allow you access to your stack screws. I goofed. They were too small for my tool. This has been fixed.

When testing the fitment of components on my printout of the bottom plates, I noticed that the central arm mounting screws would be almost directly underneath the ESC power leads if you chose to orient the ESC towards the front or back. This seemed dumb.

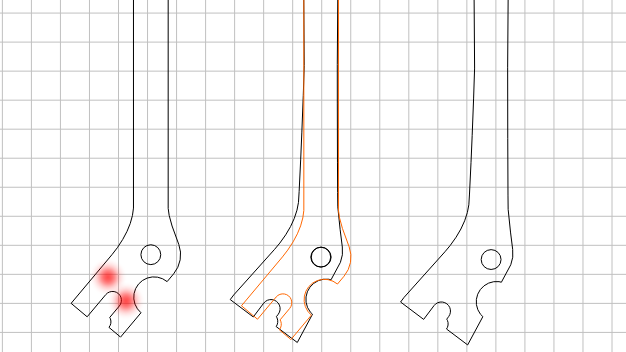
Old and New Falcon Bottom Plate Printouts

First, I moved the outer four arm screws farther from the center. Then I moved the inner screws closer to the sides of the fuselage. They now clear my Holybro Tekko32 ESC power lead by about 2mm.

This new layout results in a wider fuselage and shorter arms. It isn’t a huge difference, but this winds up trading a short length of 4mm carbon for two short lengths of 2mm carbon. It is probably a wash, but my gut tells me that it will make the frame less likely to resonate. I’m no expert, though!

The arms got longer, too!

The arms have a sort of L-shape to them. They come into the fuselage, then make a sharp turn at the first screw. If you imagine that screw as the fulcrum of a lever, you’ll see that this isn’t the best setup.

For arm rigidity, the best place for the second screw would be along a straight line that goes through the motor and the first screw.

We could share a screw with the 30x30 stack in the center, but that transfers vibrations to the flight controller. We don’t want to do that.

The new Falcon arms with beefier centers

I could put an extra screw hole in each arm. If you’re using a 30x30 flight controller, you could lock the arm in with a screw through the 20x20 stack holes. If you break an arm, this will be awful. Your electronics will be in the way of the screw!

Every frame makes compromises. You need to choose your frame based on the compromises that matter most to you. This is one of those compromises. I want to be able to easily swap arms in the field.

I decided to extend the base of the arm closer to the center of the quad. The sandwich of the bottom plate and brace plate will still keep the arm locked in place. Probably not quite as solidly as if we had a screw through there, but it should be an improvement!

Should I keep the Kestrel-style dogbone wedge?

I haven’t taken the wedge out of the design. The weight is negligible, and I bet it will make the arms more rigid, even if I have to use two screws per arm. The wedge is the part that allows me to get away with just a single screw for each arm on the Kestrel.

Kestrel arms and wedge

This works great on the tiny Kestrel, but I’m not convinced that the Falcon would be sturdy enough with just four screws holding the sandwich of arms together. I couldn’t test this on the first prototype, because of the mishap while cutting the arms.

For now, I’m leaving the wedge in the design. It will be easy enough to test when I cut the next prototype. I can just leave the inner arm-mount screws out of my build, and see how it feels!

The arms still need a weak point

I’m writing about this as a reminder for myself. The Falcon’s arms are 12mm wide from the base to the motor mount. This could be problematic in a bad crash.

I’ve seen this happen on Brian’s FlosStyle. His arms have cracked right at the motor mount. He’s had to replace motors, because the carbon crushes the motor wires into the motor bell. I’d like the arms to break somewhere else!

I plan to put some sort of taper on the arms, so they will be a little wider near the motor mounts.

Making room for the DJI FPV Air module

The DJI FPV Air module is huge. The width isn’t too bad, but that sucker is long, but I think I’ve come up with an interesting way to make room for it.

No matter what I do, the DJI module is going to require a longer fuselage. There’s just no way around that, but I’d like to use every trick I can think of to keep the front end from sticking out too far. Even with a DJI FPV module, I would still want to run a GoPro, and you don’t want all that weight sitting too far forward!

What if I replace the arm brace plate with another bottom plate? That would move the DJI module lower by 6mm.

Almost enough room to squeeze in a DJI FPV module

Your FPV camera tilts upward, so the bottom of the camera sits farther forward than the top. If I move the Air unit 6mm lower, maybe the camera will fit without pushing it forward?

I’m going to keep puzzling this out. It will definitely require at least one new bottom plate. This one will need to include only the rear and center stacks. I hope I can fit the Air module and its FPV camera without extending the front end too far forward.

I’m pretty confident that the DJI module would fit in my prototype frame, especially if I had that extra 6mm of vertical clearance. Maybe I will be undoing some of that fuselage-shorting work?!

When can I buy a Falcon frame?

The most likely answer is that you’ll never be able to buy a frame. I’m not a manufacturer. I don’t know where to have quality carbon fiber cut for a good price. I’ve heard good things about CNC Madness in Canada, and I’ve gotten rough quotes from them for cutting my Kestrel frame.

Their prices are fine in quantity. They offer good service. They gave me a quote for a single frame and for a large enough quantity to get down to their lowest bulk-order pricing.

Even at their lowest price per frame, you would have to pay me roughly the price of an Ummagawd Acrobrat for me to make a small profit and still feel safe enough to make the attempt. If I remember the pricing correctly, you could order one of my Kestrel frames from CNC Madness for almost $10 less than the price of an Acrobrat.

The Kestrel is unique. It is heavily inspired by the Acrobrat, but it fills a different niche, so I am still exploring the idea of finding a way to have it manufactured.

My Falcon frame isn’t unique. I’ve borrowed ideas from all my favorite frames. There’s a little bit of Hyperlite Flowride, FlosStyle, and Glide in my Falcon. I don’t think you should buy my frame when one of those three frames will probably meet your needs.

The only unique feature that I might be offering is the lowered deck specifically engineered to hold the DJI FPV module. I won’t be surprised if I get the CAD files to cut a Falcon frame that fits these big modules up on Gitlab before similar frames hit the shelves, but it won’t be long before this is a common feature.

If you can’t sell frames, why are you designing them?!

I’m having fun. That alone is more than enough reason for me to be doing this. I’m also excited about sharing my work with the community. My frames are all open-source. If you want to cut your own, you can. If you want to manufacture them, you can.

There is one feature that the Falcon and Kestrel share that I haven’t seen in any other frames. The designs are parametric. That means that all the angles and dimensions are clearly defined in the source code.

It is easy to accidentally make a terrible parametric design. I have plenty of OpenSCAD programs that went off the rails, and tweaking the core parameters winds up making the model come out all weird and wrong.

Early Kestrel Parametric Arm Sample

I was careful with both the Falcon and Kestrel. The important parameters all work well for any reasonable range of measurements. If you want to run 7” props on a Falcon, you can simply increase the length of the arm by around 13mm. If you want a stretch-X Kestrel, you can make the arms longer and adjust the angle. If you want to put huge 2508 motors on your tiny Kestrel, you can tweak the measurements of the motor hole spacing, and the end of the arm will scale itself up.

Even if I don’t think the Falcon is unique enough to manufacture, I think there is a lot of value in having the ability to quickly adjust the dimensions of the frame to suit your needs.

Conclusion

I’m excited. I hope that is obvious. The Falcon has seen a lot of small improvements since cutting the first prototype, and I expect it to see at least a few more improvements before I cut another one.

I’m not in a hurry! I need to fly the first prototype more. More importantly, I need to crash the first prototype more! Seeing where it breaks will be of tremendous value!

What do you think? Am I doing a good job? Would you like to fly a Falcon or Kestrel? Do you think I’ve made any serious mistakes?! Let me know in the comments, or stop by Butter, What?! Discord server to chat with me about it!

Are Inexpensive Mechanical Keyboards Worth It?

| Comments

I am a huge fan of mechanical keyboards. I type thousands of words every day. I write blog posts. I write emails. I’m constantly sending instant messages or chatting in Discord.

If you use a piece of hardware several hours each day, you should definitely invest in good hardware. If you sit at your desk for eight hours every day, invest in a good desk, and buy yourself a nice chair like an Aeron. Your back will thank you, and your Aeron chair will still be in near mint condition in ten years!

Expensive mechanical keyboards

My favorite mechanical keyboard is the venerable IBM Model M keyboard. As far as I’m concerned, there’s just no substitute for buckling-spring keys. My current Model M keyboard is stamped with a manufacture date of April 17, 1993. It was used in an office for roughly six years. I even know exactly which office!

These used to be cheap. In the late nineties, I remember ordering ten of the rare Model M keyboards that lacked number pads. It was about $100 shipped for the lot, and they were all in perfect shape. Today, those same keyboards are listed on eBay at prices ranging from $250 to $450 each!

My Model M Serial Number

If we can trust my blog, I used that keyboard for about five years starting in 2013. About two years ago, an old friend sent me a Razor BlackWidow keyboard with Cherry MX Green switches. I’ve been using it ever since.

The green switches aren’t bad. Whenever people ask me how they feel, I always wind up saying they feel crunchier than the Model M’s bucking springs. I often think about switching back. In fact, I’m thinking about it right now. Writing about keyboards makes me ponder this stuff!

Similar Razor keyboards are around $100 or so. Used IBM Model M keyboards are vary in price, but they can be had for $100 or less on eBay.

What about cheap keyboards?

I recently posted a couple of keyboard deals on Butter, What?!. Both keyboards use a clone of the Cherry MX switch made by a company called OUTEMU. I don’t like to recommend products I don’t use myself, but both keyboards were priced under $30. It seemed like a great way for someone to decide if they like mechanical keyboards, so I thought it was worth telling everyone about the deal.

I ordered the DRECO Durendal keyboard with OUTEMU MX Red switches for my wife. That means I have had an opportunity to test it out.

I prefer the more tactile switches like the Cherry MX Blue or Green, but other than that, her cheap keyboard feels fantastic. It has some heft to it, the keys feel fine, it has N-Key rollover, and it has all sorts of preprogrammed RGB LED modes. My only complaint about her keyboard would be that the wrist rest is molded into the keyboard, and it cannot be removed.

I use a cheap mouse!

I tell everyone they should invest in the gear they use the most. I use my mouse every day, but I use a cheap mouse. This seems a little hypocritical to me, especially when you consider that I manage to spend several hours on at least three or four nights each week playing Team Fortress 2!

It is an E-Blue Mazer wireless gaming mouse. They’ve been using one since 2015, and they’re priced at around $20 with free 2-day Prime shipping at Amazon.

It works just fine. Mice aren’t exactly rocket science. There are microswitches in the buttons, an optical encoder on the wheel, and a camera of some sort underneath. When you upgrade to a better mouse, you aren’t getting entirely different technology like you are with a mechanical keyboard.

My Cheap Wireless Gaming Mouse

These wireless mice are cheap enough that we keep one in every laptop bag, and there’s one on each our desks. I’m on my second E-Blue Mazer mouse. One of the Teflon pads started to come off my first mouse. I have extra Teflon skates in a drawer, but I didn’t bother sticking any on. Why bother? A new mouse is $20!

It works great. It is a bit lower profile than most mice, but that stopped bothering me after two days. It is comfortable, and the battery lasts for months. I don’t turn on the gaudy blue lights, though.

I tentatively support cheap mechanical keyboards!

I don’t see any reason to be down on cheap mechanical keyboards. Just like with mice, the cloned Cherry switches are now just a commodity. The expensive mouse might have higher quality microswitches, and I’m certain that Cherry has better quality control than OUTEMU. They feel similar.

Will the cheap keyboard last as long as a Razor BlackWidow? Probably not. Will my Razor BlackWidow last as long as my IBM Model M from 1993? Probably not. Will they last long enough? Most likely!

Mechanical keyboards are like underwear. You need to choose your own style. Some people prefer boxers. Others are more comfortable in tighty whities.

My Wife's Inexpensive Mechanical Keyboard

I like the heavy, solid Cherry MX Green switches. Maybe you won’t. Maybe you’ll prefer one of the softer keys, or the linear keys. Who knows?

You’re going to have to try more than one switch. You can buy small boards with five or six different keys attached. I don’t think this is a good way to really get a feel for what it is like to type with these switches, though. You’re going to have to try more than one keyboard.

Maybe your friends have keyboards you can try. Maybe you can stop by Micro Center and feel up some of their keyboards. Maybe you can just start buying cheap keyboards just to see what you like. They can get so inexpensive these days that they don’t cost much more than membrane keyboards!

Conclusion

Chris has only had her inexpensive mechanical keyboard for a week or so. We’ll see how it holds up. I’ll be surprised if she breaks a key. In my experience, keyboards tend to be pretty durable. Even the cheap, garbage keyboards I’ve bought in the past have held up well. Wired electronics are pretty simple, eh?

What do you think? Do you have a keyboard with off-brand Cherry MX clone switches? Should I keep posting inexpensive mechanical keyboard deals on Butter, What?! There’s no way I can test every keyboard, but I still think I should keep you apprised of these deals anyway. Let me know about it in the comments, or stop by the Butter, What?! Discord server to chat with me about it!

My Open-Source FPV Freestyle Miniquad Frame: The Falcon

| Comments

These projects keep moving along faster than I expect. I thought I had a few months at my disposal when I started designing my previous open-source frame. I started the design work in January, and I didn’t expect to be placing an order for my Shapeoko CNC machine until March. It didn’t work out that way. I ordered the Shapeoko before January was over, and I had it up, running, and cutting carbon fiber in less than two weeks.

The same sort of thing seems to be happening with my new frame. I’m not in a hurry. I figured the first prototype wouldn’t be cut for at least a month, but the design was starting to look relatively complete rather quickly! I cut a prototype on a Saturday evening, transplanted one of my working freestyle quad’s guts over to that frame on Sunday evening, and I was out for a test flight on Monday.

Yet Another 5” Freestyle Miniquad Frame

Why am I designing a 5” freestyle frame? I’m quite pleased with the Hyperlite Flowride quads I’ve been flying. The Hyperlite Glide looks fantastic. They’re all reasonably priced, sturdy, and extremely well-thought-out frames. Does the world really need another frame?

My motivation was quite simple. I own a CNC machine. I can cut carbon fiber. I have experience designing things, and I enjoy design projects. It just seemed like something I just had to do!

Falcon

I don’t feel like my frame design is all that innovative, but I’m starting to think that I’m at least starting down the path towards innovation. I’m bringing together design elements that I like from several sources. I’m also excited that my design wound up offering three different styles of freestyle frame, but so many of the parts are compatible between each configuration.

In any case, the world needs more open-source miniquad gear!

Why is it called the Falcon?

My previous frame is called the Kestrel. Since it is meant to carry an HD camera like a Caddx Turtle or Runcam Split, I thought it would be appropriate to name it after a bird with good eyesight. Runcam is already using eagles and owls in the names of some of my favorite cameras, so they were scratched off my list quickly.

Then I noticed a news blurb about an injured American kestrel being released back into the wild at a park near my house. Kestrels are tiny falcons. Falcons are birds of prey. Birds of prey have keen vision. This all tied together really well, didn’t it?

I tried my best, but I couldn’t find any other specific falcon with a moniker that I found pleasing. So I took the lazy way out. The Kestrel’s bigger, heavier, fatter, tougher sibling is going to be called the Falcon.

What features drove the design?

The Falcon needed to be something that I want to fly, so all of the initial guesstimates for measurements came from my 6” Hyperlite Flowride. I fly 5” props on a 6” frame. I don’t need a compact frame, I enjoy the way it feels, and I like having the option to use 5.5” or 6” props when needed.

I borrowed the TPU GoPro mounting holes from the Hyperlite Floss, Flowride, and FlosStyle. There were going to be two standoffs about that far apart anyway, and adding a third hole in the right spot was easy. I have so many of the TPU mounts printed already, so I may as well be able to use them!

The Flowride has room up front between the camera and stack for my VTX, but it doesn’t have holes for a 20x20 stack up there. I wanted to correct that situation.

I like modern frames with room for three stacks: a 20x20 up front, holes for either a 20x20 or 30.5x30.5 in the center, and another 20x20 in the rear. I don’t think I need three stacks, though, but I want the option to be available.

I really enjoyed the idea that the Hyperlite FlosStyle used the same plate for the top and bottom of the quad. I wanted to do the same, but I was worried about getting the battery straps into the right position.

Stop talking about what you were thinking, Pat! Just tell me about the Falcon already!

Is this where I give the elevator pitch? The Falcon is an open source, parametric, freestyle miniquad frame. It has one of those familiar, long fuselages that you see on most freestyle miniquad frames, and it has 5” or 6” arms in a true-X configuration. The arms are fully parametric, so you can easily cut them to any length, any angle, or scale the mounts for any motor configuration you can think of.

I settled in on three different top-plate configurations. Any of the three plates can be used as a top or bottom plate.

The three bottom plates for the Falcon

The full-size plate would remind you of the Hyperlite FlosStyle. It has room for three stacks and two battery straps. I haven’t cut one of these yet to see if I’m truly happy with where the rear battery strap sits!

The fully truncated plate has room for two stacks and one battery strap. I’m using this as the bottom plate on my prototype.

The partially truncated plate has room for two stacks and two battery straps. I’m using this as the top plate on my prototype.

Using a combination of the partially and fully truncated plates gives you a layout similar to a Hyperlite Flowride. If your goal is to save weight, using a partially truncated bottom plate won’t make much sense. If your goal is to stock fewer spare parts, flying with a few extra grams might not matter to you. Choice is good, right?

Side view of the Falcon

So far, I’ve configured two sets of arms. Both the 5” and 6” arms are at perfect 45-degree angles, and they have 16mm hole spacing on the motor mounts. This is the first time I’ve flown a true-X quad in a long, long time!

The frame only has room for micro FPV cameras, and the camera is held in place with small TPU mounts. This is by far my favorite camera configuration.

I dislike frames with carbon fiber side plates holding the camera, because they limit your options so much. If I want to slam my deck, I can just swap in shorter standoffs. If some important piece of hardware won’t quite fit, I can swap in taller standoffs. I don’t have to worry about a piece of carbon fitting in place!

Are you going to have these manufactured?

I doubt it. There’s little reason to compete with KababFPV. He’s selling fantastic frames at great prices. The Flowride is $45, and it is cut from high-quality carbon fiber. At my scale, it would likely cost me $35 or more to have each frame manufactured, and that isn’t including standoffs, screws, and the tiny TPU mount for the FPV camera.

I can’t compete, and I’m not sure I would want to. I am still thinking about having the Kestrel manufactured. The sub-250 gram market is growing, and I believe the Kestrel is still a fairly unique offering. I might have to figure this out!

Is the Falcon really open-source?!

Yes! It is. In fact, the Falcon and the Kestrel are derived from the very same piece of source code!

This made the early work a bit harder, but I quickly realized that the Kestrel and Falcon are more alike than they are different. The arms are identical aside from a single cylinder that’s cut out of the Kestrel’s arms!

Instead of copying the duplicated functions out of the Kestrel, I thought it would be less work in the long term if the Falcon was built right on top of the Kestrel.

I think the work was worth the effort, but it made me a bit of a liar for a while! I didn’t want to break the Kestrel when pushing the Falcon up to Gitlab, so I wasn’t doing it very often.

That situation has been corrected. The frames coexist quite nicely now. The build script has been cleaned up well enough. The exact parts I cut for my prototype are currently available on Gitlab. There are a few minor problems I need to correct, but nothing that is keeping me out of the air!

You can check out the source code on Gitlab. I would appreciate any sharing and liking you might want to help me out with over there!

What’s next?

I came up with a new idea as I was writing this blog post. Maybe I need to include a set of racing-style plates for the fuselage?

I quite like the idea that the FlosStyle freestyle uses the same arms as the Floss racing frame. Wouldn’t it be awesome if the Floss, Flowride, FlosStyle, and Glide all used compatible arms?

I completely understand why they don’t, but I’m at a point in the design process where I can make that happen. The arm mounts are definitely not finalized yet. Once the Falcon hits version 1.0, I’d like to set that configuration in stone.

There are a couple of problems I need to correct. There are tiny holes in the arm-bracing plate on the bottom of the quad. These holes are there to let you tighten the screws in your stack. I made the holes too small! My 2mm hex driver doesn’t fit! This will be an easy fix.

The carbon of the top plate sits a little too far forward of the front standoffs. You can see it in frame in your goggles! This is also easy to fix. I took a guess at how far the frame should extend past the standoffs. My guess was a bit off!

I want to adjust the arms of both the Falcon and Kestrel. For either frame, you define an arm width in the configuration. For the Falcon, that is currently 12mm. It will be 12mm from the base of the arm right up to the motor.

When an arm breaks, I would prefer that it not break right at the motor. That’s a good way to destroy the motor wires when they get pinched between the carbon and the bell! I plan to add a slight taper near the middle of the arm. With any luck, they’ll break at the weak point!

Conclusion

I’m excited. I designed a 5” freestyle frame. I cut a 5” freestyle frame. I am flying my very own 5” freestyle frame. It feels great!

If you want to know more about the Falcon and the Kestrel, there’s plenty to read about here on my blog, but I’m also posting smaller updates on my progress over at Patreon.

What do you think? Am I on the right track? Do you like where I’m headed? Is this the sort of thing you’d like to fly? Let me know in the comments, or stop by the Butter, What?! Discord server to chat with me about it!
Recovered kestrel released in Oak Point Park”

I’m Managing My Passwords with Bitwarden now!

| Comments

Passwords are hard work. We can’t use simple passwords, because they’ll be easy to guess or brute force. We can’t reuse passwords, because when a random Internet forum’s database is compromised, we don’t want anyone to use that data to steal our Slashdot, Reddit, or bank account. What should we do?

Bitwarden Window

I’ll be surprised if you’re not already using a password manager. You’re probably using something like 1Password or LastPass to store your passwords. Maybe you’re an old man like me, and you’re still using KeePass. It almost doesn’t matter what you use. You need to be using something, right?


What have Pat and Brian been up to lately? To find out you can check out the latest episodes of The Butter, What?! Show


My life up until today

I’ve been using KeePass for a long, long time. I couldn’t even take an educated guess about when I started using it. The only change I made was to upgrade to KeePass2 at some point. Even that was a long time ago!

KeePass is an encrypted password database. Your password database is stored locally, and KeePass has a crufty but usable interface that lets you keep track of usernames, passwords, and URLs. There are plugins to integrate KeePass2 with various web browsers, and it has the ability to automatically type your username and password into various dialog boxes.


Syncing your database between your devices is a problem you have to solve on your own. I store my KeePass database file in an encrypted Seafile library. That keeps the database in sync on my desktop, laptop, and tablet. The Android Seafile client doesn’t actually sync files, so I use SyncThing to keep the database on my phone up to date.

The storage devices on my desktop, laptop, tablet, and phone are all encrypted. The KeePass database is encrypted. My Seafile library is encrypted. There’s encryption all over the place, and for the most part, the database doesn’t leave my control. I don’t own my Seafile server, though.

What’s the problem?

All this stuff works fine. All these layers of encryption are nice. KeePass’s integration with Chrome and Firefox works just fine. Getting sync going was easy, but required a bit of effort syncing to Android. Once I had it set up, it worked just fine. Why not keep using KeePass?

To tell you the truth, I probably would have kept using KeePass for years. Last week, I saw Bitwarden mentioned in a comment thread somewhere. I didn’t think much of it. I just assumed it was another attempt at a KeePass replacement.

Then I saw it mentioned again a few days ago, and I realized that Bitwarden is attempting to be a replacement for LastPass or 1Password. That piqued my interest. An open source LastPass equivalent that I could host myself sounds awesome!

Bitwarden Family Collection Sharing

1Password and LastPass have one particular feature that KeePass will never be able to have. They allow you to share passwords with your friends and family. This wasn’t a deal breaker for me, but I imagine it will come in handy. With Bitwarden, our Netflix and Hulu passwords won’t get out or sync between mine and my wife’s KeePass databases!

I’m using Bitwarden, but I’m not hosting my own server

A few nights ago, I did a bit of research on Bitwarden. I’ll tell you some of the details of my findings soon, but I didn’t find anything that scared me away. I signed up for an account, upgraded to a premium account for $10 per year, and I imported my KeePass2 database.

The process was painless, and I haven’t had any problems signing into anything yet. I’ll keep you updated over the next few months.

You can host your own Bitwarden service, and it looks easy enough to set up. If you already have a server out there somewhere, they offer a Docker image that you should be able to have up and running in no time.

When I had a server colocated downtown, I would most definitely have set this up. I’ve been trying to offload most of that work to other companies, though, and this is definitely inexpensive enough to outsource.

The free Bitwarden account would meet my needs, but the premium account was inexpensive enough.

Password hygiene and vault health reports

These services are available with a premium Bitwarden account, but what on Earth does that mean?! Bitwarden will correlate information in your password vault with leaked password databases. Have your email addresses been compromised in a password leak? Are you using passwords that are commonly found in those leaked databases? Are you still using weak passwords anywhere?

Bitwarden can give you this information. I have a lot of old cruft in my KeePass database. Ancient websites that I will probably never log into again. Websites that are long gone. Old garbage. Bitwarden’s health service threw up a lot of red flags on that old junk!

KeePass is better in many important ways

BitWarden will always be a little scary. Just like 1Password and LastPass, the BitWarden browser extension has full access to your password vault. Once you enter your passphrase, all that important information is sitting around in memory in an unencrypted state. Not only that, but that unencrypted data is part of your Chrome or Firefox browser process.

You’re relying on Firefox or Chrome to keep malicious web pages or extensions out of your password vault. You could be one compromise away from your password database being gobbled up.

KeePass is always a separate process. The browser extensions for KeePass don’t store your data. They communicate with a KeePass process to request a particular username and password. When the request is made, the KeePass desktop app will ask you for confirmation.

If you’re logging into Reddit, you might check the button to remember this decision. Next time you log in, KeePass will hand that password over to the browser without prompting. Maybe you would want to be more careful with your bank password, so you might require confirmation each time.

I know I’m oversimplifying things when I say this, but I’m trying to keep this post under 2,000 words. Bitwarden, 1Password, and LastPass may have your bank password in memory in the browser process whenever the vault is unlocked.

KeePass may have the password in memory, but it is further protected from the browser by your operating system’s kernel’s memory protections. That’s a much bigger wall to break down or climb over, and just having an additional wall is nice.

Does this really matter?

It depends who you ask. Security and ease of use are almost always at odds. It would be simplest to just use a password everywhere for your password, but that wouldn’t be safe. It would be extremely safe if you could memorize a different 128-character password for every single service that you use, and type it in manually each time, but that’s never going to happen.

I’ve thought about this problem for years. I’ve done my research. I’ve decided that the level of protection and convenience provided by Bitwarden, LastPass, or 1Password is the right compromise for me.

Yes. I most definitely gave up some amount of security for the sake of convenience when I switched from KeePass to Bitwarden. I’m pleased with this compromise.

Bitwarden’s pricing structure is weird

I was confused when I looked at their pricing charts. I quickly zeroed in on the $1/month family plan listed under organization accounts. It says it includes 5 users, and that’s only $2 more per year than the premium plan. Seems like a no-brainer, right?

That’s not how it works. Organization accounts are something completely different. Each user has to have either a free or a premium account. The organization accounts are where the shared password vaults live.

I have a premium account. My wife has a free account. I believe you could say we’re using a separate organizational account for the passwords we share with our family. It is just the two of us, so our organizational account is free as well. We will likely be setting up an organizational account for Butter, What?! to make it easier to share important passwords with Brian.

Is Bitwarden safe?

I suppose it depends on what you’re trying to protect yourself from and your definition of safe, but I believe it is more than safe enough for my use. I did some research. I tried to find as much terrifying information about Bitwarden as I could. The scariest stuff isn’t that scary.

I found this short security review of Bitwarden. He found that the password to log into the service and the password used to encrypt your database are the same. He has a heading that says your password is sent to the server, but it appears that some sort of salted hash is actually sent to the server.

That’s not too terrible. It would be nice if two different passwords could be used, but I understand the design choice. A single password is much more convenient for the user!

He also noted that Bitwarden loads quite a bit of Javascript from third-party sources. It seems that this has been addressed to some extent by the Bitwarden developer in recent months.

Bitwarden was audited by a third-party security company last year. There were definitely some problems. The major ones seem to have been addressed quite quickly.

Conclusion

I’ve only been using Bitwarden for a few days. I’ve been holding off on migrating from KeePass to something like LastPass, because I prefer to use open-source software. I especially prefer to use open source software for my most important infrastructure. My virtualization, my web servers, my file sync server, and all my computers run on open-source software.

Bitwarden has been a welcome surprise, and I look forward to giving you an update in a few months. I expect that there won’t be much to tell you about. If it is working fine today, I expect it to continue to do so in three months!

What do you think? Are you a KeePass holdout like me, or have you already moved on to something like LastPass or 1Password? Did you already discover Bitwarden long before I heard of it? Tell me about your experiences in the comments, or stop by the Butter, What?! Discord server to chat with us about it!

My First Attempt to CNC Aluminum on My Shapeoko XXL

| Comments

I have no idea what I’m doing. I’ve broken two endmills so far; thank goodness they were cheap ones! If you want to learn how to CNC aluminum on your Shapeoko, check out Winston Moy on YouTube. He already knows what he’s doing. If you want to learn about the mistakes I’m making, then I encourage you to keep reading!

My CAM software is still rather simple. I’m going to need to buy something better, but I haven’t decided what that will be. The choices in CAM software that runs on Linux are few and far between. For now, I’m running Carbide Create using Wine.

Team Fortress 2 Engineer Logo in Aluminum

I bought ¼” and ½” sheets of 6061 aluminum on Amazon last month. The Shapeoko can handle aluminum, so I have to give it a try. What sort of thing should I cut out of aluminum?

I decided to go with something simple and decorative. Brian and I have played quite a few hundred hours of Team Fortress 2. I figured it would be fun to machine a medallion with the logo of one of the classes from TF2. They’re round. They’re simple. Seems like fun.

Most of the emblems have too much detail

Small details sound easy. That’s what vcarving is for. I converted a Demoman emblem to an SVG, imported it into Carbide Create, and tried to figure out how to carve that sucker out. I couldn’t figure out how to do it. It only wanted to run my v-bit near the edges of the SVG.

Team Fortress 2 Engineer Logo in Carbide Create

I’m not smart enough to somehow combine a vcarve pass and a pocketing pass with a different bit. Even if I knew how to do it correctly, I’m not sure things would line up.

So I decided to keep my first carve into aluminum simple. I chose the Engineer’s emblem. It is less detailed than the Demoman’s stickybomb emblem, and once I scaled it up enough, it looked like I would have no trouble carving it with a 2mm endmill!

My cheap 2mm endmills

I didn’t buy these endmills for machining aluminum. I’ve been using cheap 1/16” endmills when cutting drone frames out of carbon fiber. They seem to work as well as nicer mills. They get dull quickly, but everything dulls quickly when cutting carbon fiber! I’d rather dull cheap mills, right?

When I was shopping at Banggood, I came across a 10-pack of 2mm carbide endmills. That’s about 25% larger in diameter than my 1/16” endmills, and also just small enough to cut my Kestrel frames. These should be sturdier, and they should cut more quickly than my 1/16” mills, so I figured I’d give them a try!

My collection of cheap endmills and taps from Banggood

My emblem is cutting with one of these endmills right now. It is on the final pocketing pass, and it will probably be working on the countour cutting operation to free the disc by the time I finish writing this blog.

I didn’t get to this point immediately. I broke two endmills last night! I believe it was my fault, though, and not the cheap mills!

Feeds and speeds are hard!

The first thing I did after firing up Carbide Create was head over to YouTube to see what Winston Moy thought I should be using for my settings. He told me what feed rates to use with a 1/8” endmill from Carbide 3D’s store. I’m a smart guy, right? I can make an educated guess. I can just use smaller numbers for my 2mm endmill, right?

I could, and I did. Except I goofed up. I also didn’t document my failures well.

I made it through at least two passes before breaking the first endmill. I lowered my feedrate and depth per pass, and I tried again. I attempted to pick up the job roughly where it left off, and I broke another endmill.

Where did I goof? I goofed up the stepover. I left it at Carbide Create’s default of 1.4mm. That must be acceptable when cutting MDF, but it was killing my mills when cutting aluminum! I lowered the stepover to 0.8mm, and it seems to be doing a much better job.

These are the settings I’m using successfully right now:

  • 0.187 mm Depth Per Pass
  • 0.8 mm Stepover
  • 355 mm Feedrate
  • 7.144 mm Plungerate
  • Dewalt DWP611 set to 1

I’m certain this isn’t optimal. With last night’s settings, the job was going to take about three hours. The second endmill broke after an hour of cutting. I started today with roughly 0.6mm already pocketed out, and I had set the depth of that pocket to 1.5mm.

I did my best to pick up right around where I left off, so there was 0.9mm left to pocket out. Today’s estimate was another three hours, so this is definitely going slower!

Can you use a bigger endmill to remove most of the material?

This would save a lot of time, but I don’t think I can do this efficiently with Carbide Create. For this to work well, your CAM software needs to be aware of the material that was already removed on the previous pass.

It would be possible to simulate this with Carbide Create. You could make another SVG with lines covering the area that would have been hogged out on the first pass with the big ¼” endmill. That way you could create a toolpath using the 2mm endmill that avoids that area.

I need to invest in software that will do this for me. The savings in machine time and my own time means it will be a worthwhile purchase!

My contour operation failed, so I abandoned this project for now

The 2mm endmill did a fantastic job pocketing out the void around the wrench. You can see the pattern of marks left behind by the tool, but it is quite smooth to the touch. In fact, the machined surface feels smoother than the top surface of the extruded aluminum!

The 2mm endmill ran into trouble while trying to machine the disc out of the block of aluminum. I noticed that at a depth of around 1.5mm, things started to get noisier. Then the shape of the cut started to get wonky. I wound up canceling the job.

The tiny endmill just couldn’t clear the chips of aluminum. Maybe I need a high-pressure air nozzle to blow the chips clear. Maybe I could have used my ¼” endmill for this operation. An air nozzle will definitely be a future upgrade, but next time I attempt a cut like this, I will use the bigger endmill.

The relatively huge flutes on the ¼” endmill are probably three times deeper than the flutes on the 2mm endmill. I bet that would have solved all my problems!

Another option would have been to use a pocketing operation to remove a ring of material slightly wider than the endmill. Making contact with aluminum on two sides of the endmill while it is moving along gets more and more problematic as the tool cuts deeper into the material. Taking two passes to clear out a wider channel would have helped with this!

Conclusion

I’m excited. My Shapeoko is considered a hobby-grade machine. Its biggest downside is its use of pulleys and belts instead of heavy-duty lead screws for movement. Sure, I won’t be cutting steel with these belt-driven gantries, but it is obvious that they won’t be limiting my ability to cut aluminum!

I’m working on a larger drone frame, so playing with aluminum is going to be on the back burner for a few weeks. I’m happy with my test cuts, and I look forward to putting what I’ve learned to good use next time!

What do you think? Am I doing a good job? Was this a good failure? Do you have any questions? Let me know in the comments, or stop by the Butter, What?! Discord server to chat about it!

Designing a 3-Inch HD Micro FPV Quadcopter Frame

| Comments

What the heck is up with this blog post? Did I already write about designing my HD micro quadcopter frame? Isn’t it already finished and nearly ready for production?

Yes. This is all true, but I was thinking about creating a video talking about all the early design decisions that shaped the layout of the Kestrel. I don’t know if I could do a good job talking about all this stuff without at least a loose script.

My 4-inch Kestrel build

I don’t know how to write a script. I have a decade of experience writing blog posts. So here we are!

Everything goes back to McMaster-Carr

I like simple sandwich frames. Four arms with a bottom plate and a top plate separated by aluminum standoffs. It is a simple design. It works quite well. It is versatile—if your stack doesn’t fit, you can just use taller standoffs!

There are dozens upon dozens of sandwich-style micro quad frames. I don’t need to design one. They’re already everywhere!

The most innovative 3” frame I know of is the Ummagawd Acrobrat. The Acrobrat isn’t the frame for me, though. I wanted something lighter. I wanted individual, replaceable arms. I wanted arms for both 3” and 4” props. I also wanted to design something myself, so why not design exactly what I want to fly?

The Grommet Hole in the Kestrel FPV Frame

I needed rubber bushings for my suspension. I thought about buying some Acrobrat bushing kits, but they seemed expensive, and they would make it difficult to sell my own frame kits. So I went to McMaster-Carr.

I found a rubber grommet with reasonable dimensions. It would plug a hole in a piece of material 1/8” thick. That’s just barely thicker than a 3 mm piece of carbon fiber.

This is where the design work began. If my grommets fit into a 3 mm sheet of carbon, then the Kestrel’s side plates are going to be 3 mm thick.

When the grommets arrived, I reached for my 3D printer. Carbon fiber is thin, so you need to turn that round bushing into an oval. How tall and wide is does that oval need to be? I printed a variety of holes and tabs to get an idea of where to start. It wasn’t perfect. It needs to be snug, but not tight. The grommet needs to absorb vibrations, but not jiggle around.

This testing made it obvious that I needed to use 2 mm carbon for the Kestrel’s bottom plate. Any thinner, and my bottom plate would be too weak. Any thicker, and my soft suspension wouldn’t work very well!

Mounting your electronics

I wanted to make room on the bottom plate for three 20x20 stacks. Running your motor wires is easier if your 4-in-1 ESC board is in the center, so I knew I would have a stack right in the middle.

To keep the props out of view, the FPV camera needs to be way out in front. That left me plenty of room for a second 20x20 stack up front.

I’m trying to maintain balance, so why not stick a third stack in the rear and have a long fuselage? That might help offset the weight of the camera that has to stick out so far in the front.

That was enough thinking to get me through my first two prototypes. When I wanted to build my first 4” Kestrel, I realized that some ESC boards with 20x20 mounting holes are huge, so I needed to move the front and rear stacks farther away from the center.

I’m jumping ahead a bit, but I also realized that four of the bolts I was using to attach the Kestrel’s arms were quite close to being spaced correctly for mounting 30.5x30.5 parts from 5” and larger quads.

I haven’t used this option in any of my builds yet, but it was a simple change to make! The Kestrel has room for a 20x20 stack in the front and rear, and either a 20x20 or 30.5x30.5 stack in the center.

From 8 screws to 4 screws for mounting the arms

Using replaceable arms was a must. The Kestrel is open source, and the OpenSCAD source code makes it easy to configure arms in any way that you’d like. Do you want stubby arms for 2” props? Do you want ridiculous 6” arms? All you have to do is input different lengths and angles for the arms, and you’ll be all set to have a fresh set of arms cut!

My goal is to have the fuselage of the Kestrel be as static as possible. So far, I have cut 3” and 4” compatible arms, and those same arms will fit any of my Kestrel fuselages. I expect there will be a 5” experiment in the near future, too!

On the first few prototypes, I took the easy way out. Each arm was attached to the frame with a pair of M3 screws and lock nuts. This worked just fine, but when I decided that I wanted room for a full-size stack in the center, half of those screws were going to be in the way.

I eliminated one screw from each arm, and I replaced it with an I-shaped piece of carbon fiber—the wedge. The wedge keeps the arms from rotating forward and backward around the M3 mounting screws, and the 2 mm bottom plate and 1 mm bottom bracing plate keep the wedge from falling out.

This saved nearly three grams of weight, made the arms easier to replace when they break, and the arms are just as solid and sturdy as they were before!

My first broken arm

I’m trying to save weight wherever I can. If there’s material that serves no useful purpose, it needs to go. There are two round cutouts near the base of each arm. One of those cutouts leaves you room to put M2 or M3 screws into your center stack.

The other cutout is to save the tiniest amount of weight. It seemed like a great idea. In a crash, most of the stress on the arm will be at the M3 mounting screw, right? How much stress could there be on that tiny length of material from the M3 screw to the wedge?!

This mistake seems so obvious with the benefit of hindsight. In some crashes, most of the force will be pushing the arm against the bottom plate or the brace plate. If you hit an arm while traveling parallel to the bottom plate, though, the arm acts as a lever around the M3 screw.

I broke an arm on my 4” Kestrel right at that weak spot.

It was easy to fix the design. If you’d like to watch, I walked through the design process on YouTube. All I had to do was put that piece of material back in. I imagine the arm is going to break somewhere completely different next time!

Everything is a tradeoff

Most of the time, I expect the tradeoff to be related to cost or time. With a quadcopter, the design decisions are almost always trading weight for durability. Carbon is cheap. Weight is problematic.

The first fuselage that I cut on my Shapeoko was fat. The side plates are 3 mm wide, because that’s how thick the material is. How thick do they need to be? I took a guess. It looked reasonable on my screen. That first prototype was so sturdy that I couldn’t flex the assembled fuselage at all!

The first fat Kestrel prototype fuselage

The goal is to make the Kestrel just sturdy enough to survive most impacts, but no sturdier. I knew after assembling that first fuselage that my instinct to err on the side of being too sturdy would be a mistake. I don’t have fancy software to analyze the weak points of the Kestrel. I have to built it, fly it, and see where it breaks. That’s the best way for me to find the weak spots!

Convenience is also important

I imagine there’s quite a bit of weight to be saved by eliminating the rear 20x20 stack. Sure, I’d have to make the fuselage a little taller. The side plates are extremely long, so they have to be rather durable to resist flexing.

Is saving five or six grams worthwhile? For my builds, I don’t think it is. Spreading out the components makes the Kestrel easier to work on. That long body gives me plenty of room to mount a tiny GPS module up high in the back. I wind up putting the ESC and FC in the center and the Caddx Turtle board up front.

I can save weight by mounting a 200mw 20x20 VTX in the back, but there’s plenty of room back there for a 1,000 mW RaceDayQuads Mach3 VTX back there. Even with the GPS module.

More than a year ago, I help Brian build a 3” micro quad with a Runcam Split. It was awful to work on. It only had one stack with an ESC, FC, VTX, and both Runcam Split boards all piled up on top of each other. Then we had to find room to fit the R-XSR. Not only that, but all these boards had to be wired to each other. It was a mess.

Spreading things out makes maintenance so much easier!

What’s next? Why haven’t I ordered a batch of these so I can sell them?!

I have absolutely no idea how many frames to order. I’m not a store. I’ve never had anything manufactured for me before. I have no idea what I’m doing.

I was talking to Brian last night and today. We’ve run three quadcopter build classes at our local makerspace. The first time, the class built five or six 450 mm quads. At the second, we built six of my PH145 quadcopters. At the last class, we built six 5” FPV freestyle quads.

Things have come a long way since our last build class, and we think we can help get people started even more cleanly than before. Buy a Taranis radio. Practice in the simulator. Buy a Tinyhawk. Have fun. If you’re enjoying yourself, and you want to go farther, we’ll help you build a 3” Kestrel with an HD camera.

Outside of the parts list, we haven’t really hammered out any details. Maybe I’ll cut the frames for the class in my garage. That sort of thing is cool if the class is being held at a makerspace! Maybe the class will use the first batch of production Kestrel frames from CNC Madness. We’ll see!

Conclusion

All our Kestrels are flying great, except for my poor 3” Kestrel. She’s needed lots of extra filtering ever since the crash that burned out her first Caddx Turtle. I’m thankful that this isn’t the fault of the frame! I expect to upgrade her to the same parts we use in our upcoming Kestrel build class!

The arms are stronger than ever, and I think she’s just about ready to go into production. What do you think? Should I send the CAD files off to CNC Madness and have a batch of frames cut? How many do you think I need to order? Let me know in the comments, or stop by the Butter, What?! Discord server to chat with me about it!
Three Months With The Osmo Pocket: The Perfect Vlogging Camera?

| Comments

I’ve been using my DJI Osmo Pocket for three months. I’m almost willing to say that I couldn’t be happier with this thing. There’s always something that could be improved, but the Osmo Pocket is definitely the only product on the market that so perfectly fits my portability, ease of use, and comfort needs while still producing video of acceptable quality.

I bought the Osmo Pocket for vlogging

Before the Osmo Pocket, I was using my smartphone on a Zhiyun Smooth 4 gimbal. It works quite well. I could get a nice, steady shot of myself while I’m walking. The Smooth 4 wasn’t all that heavy, so it wasn’t difficult to hold it up in front of my face for extended periods.

What is the upgrade path from a smartphone on a $120 gimbal? I’ve used my enormous Canon 6D paired with my Zoom H1 mic to record here at my desk. That’s just about the only place I’d ever record myself with this setup. The camera and lens weigh just over 4 pounds. It doesn’t autofocus while recording, and the screen doesn’t flip around, so there’s no way to tell if I’m even in focus.

The upgrade that was in my sights before the Osmo Pocket was announced would have been the Sony a6400 or a6500. The screen on the a6400 flips around, it is just light enough to hold in front of my face, and the quality is definitely close enough to what I can get out of my Canon 6D. Not quite as good, but it would do the job!

The best vlogging camera is the one you have with you

Vlogging with your phone is smart. You always have your phone in your pocket. Sure, the guy hauling around a Sony a7ii with a giant gimbal is going to capture much better footage, but he has to carry that setup around with him. When I crash my quadcopter, am I going to remember to pick up that camera to take it with me? I rarely remembered to pick up my Smooth 4 gimbal when I crashed!

The Osmo Pocket literally fits comfortably in your pocket. The form factor is a bit different, but it is comparable in size and weight to your smartphone. I designed a little 3D-printed cover that I stick on mine, and I put it in my front pocket with my cell phone. The Osmo Pocket is smaller and weighs less than my Zhiyun Smooth 4 gimbal, and the Osmo Pocket has a camera built right in! Not only that, but the Osmo Pocket’s camera is definitely an upgrade over my budget Android phone.

When I crash my quadcopter, and I have to take the walk of shame to hunt for the wreckage, my Osmo Pocket is already with me. Since it is small enough to fit in my pocket, I don’t have to remember to pick it up. I can have it out of my pocket and recording in roughly five seconds. This is fantastic!

Vlogging in the car with the Osmo Pocket

This is my favorite thing to do with my Osmo Pocket. We have a little gravity-assisted phone holder in the car. I kludged together an Osmo Pocket stand thing from Thingiverse with a simple rectangle. This lets me drop the Osmo Pocket right into the phone holder in the car.

It works quite well! The angle is a bit lower than I’d prefer, but it isn’t too far off. I enjoy the Osmo Pocket’s face tracking. People talk to the camera in the car quite often, but their journeys are more static than mine. As I turn corners, the Osmo Pocket attempts to stabilize things while also attempting to track my face. That makes for a slightly more dynamic experience for the viewer.

I expected road noise to be a huge problem. In our box of a tiny SUV, wind noise is a huge problem at 70 MPH on the highway, so I don’t vlog on those longer trips. The speed limit on the country road out to Brian’s house is 55 MPH, and that doesn’t cause problems at all. Somewhere between these two speeds, the noise in our SUV increases dramatically. Your mileage may vary, of course!

Vlogging at home

I vlog at my desk with the Osmo Pocket. I’ve even been using the Osmo’s internal microphone for that, too. I have a Zoom H1 mic, and I’ve thought about recording the audio on there, but I’m almost pleased enough with the quality of the Osmo Pocket’s mic. The increase in quality when using the Zoom H1 isn’t big enough for me to justify the extra step of synchronizing separate audio and video tracks in post!

In the car, I have the Osmo Pocket set to fully automatic with D-Cinelike enabled. At my desk, I manually control all the settings. These are the settings I use.

  • 1080p30
  • D-Cinelike
  • 4500K white balance (approximately)
  • 1/30 or 1/40 shutter speed
  • ISO 400

My office has three light sources: two lamps with 150-watt equivalent daylight LED bulbs, and a fixture on the ceiling with a 175-watt equivalent daylight CFL. I can’t use the light on the ceiling, because it just makes the top of my head glow.

My Canon 6D has me spoiled. Video recorded on the Osmo Pocket at ISO 400 has nearly as much noise as the Canon at ISO 1600 or 3200. This is to be expected. The full-frame Canon’s sensor dwarfs the sensor in the Osmo Pocket.

I would say the Osmo Pocket’s video is acceptable at ISO 400, but it isn’t ideal. I’d like to add more lighting to my office so I can bring the ISO down to 200 or even 100.

Just like in the car, I enjoy the Osmo Pocket’s face tracking in the office. It makes the vlog just a little more dynamic. It is almost like I have a cameraman in the room with me.

With a lot of manual work, my Canon 6D with my Tamron 28-75 f/2.8 lens can capture video that rivals just about anyone’s vlog. It is just too much work for me to record with the Canon 6D. If I had a Sony a6300 or a Canon 6D mk2, I would definitely use them for vlogging at my desk. Attempting to manually focus my first- generation Canon 6D from the wrong end of the lens is just too difficult!

I wish the Osmo Pocket had WiFi

Yes, I am aware that I can spend $100 or so for the WiFi module. So far, though, I only have one use case where I’d like to actually make use of the WiFi, and I could just run a cable to my phone.

I have a webcam attached to an arm taken from an IKEA arm lamp. It is affixed to my dual-monitor mount. I learned that I can strap my Osmo Pocket to this arm, and it has no trouble holding the extra weight! I plan to use this to record things from directly above my desk in the future.

Looking up at this rigging to see what’s in focus requires some terrible gymnastics. It would be nice if I could mirror the Osmo Pocket’s screen to my smartphone over WiFi for this. I will probably just run a cable when I do this instead.

What about the DJI Osmo Action?

When I saw the Osmo Action announced last month, I was worried that I made a mistake in buying the Osmo Pocket. The Osmo Action has the same sensor as the Pocket, but with a slightly wider field of view. The mic seems to be of similar quality, and the Osmo Action’s RockSteady image stabilization is as good as a gimbal—sometimes even better!

So what? Just about the same things can be said about the GoPro HERO7 Black. That was available when I bought my Osmo Pocket. What’s so exciting about the Osmo Action?

It is the front-facing screen. It is hard to vlog well if you can’t see yourself. If you’ve ever tried vlogging with a GoPro, you know that you just have to guess that you’re in frame. Adding that front-facing screen eliminates that problem.

The Osmo Action could most definitely handle all my vlogging needs. The more I think about it, though, the more happy I am about owning an Osmo Pocket.

The Osmo Pocket is like having a robot for a cameraman. I can set her on a tripod, and she’ll follow me around the workshop. I can set her on my desk, and she’ll follow my face around as I move around my desk. That feels a little more organic to me, and I like it.

The Osmo Pocket can also record motion timelapse videos. You can choose two points on the Pocket, set the timing options, and it will slowly pan from one point to the other as it records the video. You can add additional point using the app on your phone. I don’t use this feature nearly often enough.

Conclusion

With my tiny YouTube channel, the Osmo Pocket is easily the best vlogging camera for me. It fits in my pocket. The quality of the video is better than my phone’s camera. Recording video with the Osmo Pocket is much more comfortable than holding a phone.

Maybe someday I will graduate to the point where I need to improve my video quality to improve my YouTube channel, but I’m not there yet!

Is the DJI Osmo Pocket the perfect vlogging camera? Probably not, but it is the perfect vlogging camera for me!

What camera setup do you use for vlogging? Are you using an Osmo Pocket? Or are you using your Osmo Pocket for something else entirely? Let me know in the comments below, or stop by the Butter, What?! Discord server to chat about it!

Roasting Coffee Beans at Home: One Month Later

| Comments

This is awesome. I never thought I’d be roasting coffee beans at home. I can’t believe how quick and easy it is, and I’m surprised by just how delicious the coffee actually is!

I’ve been drinking Craft Coffee almost exclusively for the past 5 years. In fact, the anniversary of my first coffee delivery from Craft Coffee should have been about a month ago. At some point during the past five years, Craft Coffee pivoted.

In the beginning, they were delivering unique, gourmet coffee every month. At the time, their service would have been more comparable to Angels’ Cup. Today, Craft Coffee is set up to be a fresh replacement for your daily coffee.

Craft Coffee Latte

Both Craft Coffee and Angels’ Cup are fantastic coffee delivery services, and I am somewhat relieved that they no longer offer products that compete so directly. I enjoy both, and I enjoy telling you about both of them.

Since pivoting, the light roasts from Craft Coffee have gotten darker. They’re still light, but I didn’t notice how much darker and oilier they had become until I started roasting my own beans.

I’m using a popcorn popper and beans from Sweet Maria’s. You can get a popcorn popper with a four-pound sampler of green beans from Sweet Maria’s for less than $30. It is a fantastic value. I pay $20 or more for a 12-oz bag of roasted beans of a similar quality.

There’s the equivalent of roughly five 12-oz portions of beans included in the bundle from Sweet Maria’s. That works out to around $6 for 12 ounces of coffee. That’s cheaper than the store brand stuff at the grocery store!

Sure, you have to spend some time roasting the beans. It takes me about four minutes for me to roast two days’ worth of beans. It would take about twice as long if you prefer a darker roast. I know that time is money, but you’re not just saving money. You’re also enabling yourself to drink the freshest coffee possible all the time.

How much have you roasted so far?

I’ve just finished consuming two pounds of coffee that I roasted myself. That’s a lot more than I usually drink in a month. The coffee loses weight as it roasts, but even if you account for that, I went through a lot of coffee this month!

I’ve been drinking more lattes than I should, and I’ve been sharing more often than usual.

First batch of roasted coffee from Sweet Maria's

I’m roughly eight ounces ahead in my roasting. At first, I was making sure to roast only enough for the next day or two. Then I pulled two bad shots in a row. I wanted to have a bit of a buffer built up to prevent that, and I also wanted to see if I could notice a difference in the beans as they age.

I’m not being scientific enough. I know some of the flavor develops over the first week after roasting, but I’m never sure what I’m drinking! I know which beans I’m brewing, but I’m never sure how old they are. The good news is that they definitely don’t taste worse up to a week after roasting!

Two bags down, two to go

I roasted the beans from Costa Rica first. Of the four green beans in the sampler pack, they seemed like the most pedestrian bean. The Costa Rican coffee tasted fine, but it was boring. The Ethiopian bag I roasted next was a nice upgrade. Definitely not the best Ethopian coffee I’ve ever had—it sure didn’t taste like Frankenberry cereal! Even so, I bet I would have guessed its origin if I didn’t already know.

The next bag is a honey-processed coffee from Sumatra. I’ll be tasting this for the first time tomorrow, and I can hardly wait. It smells different when roasting. Chris says it smells like honey, but I don’t believe her. Even when I pull them off just after I hear the first crack, they’re coming out darker than the other two bags of beans.

I ordered more beans!

I couldn’t wait. I enjoyed the Ethiopian coffee so much, and Sweet Maria’s was having a sale on Ethiopian beans. What do I do when there’s a sale on Ethiopian green beans?

That’s right. I ordered a bunch of coffee. I wound up buying four more pounds of coffee. I thought about ordering even more, but even at the regular prices, it isn’t much more than $6 per bag. Unlike roasted coffee, green coffee beans can survive for months or even years before roasting, but I don’t need to get too far ahead of myself!

Ethiopian assortment from Sweet Maria's

If I slow back down to my usual pace, I should have enough coffee here to last me until Thanksgiving! I still have an unopened bag of beans from Craft Coffee sitting on top of my refrigerator!

That bag of Craft Coffee will be interesting

I’m having a good time roasting coffee. I’ve learned a lot, and I haven’t invested much. Will I continue to roast all my beans, or will I go back to letting Craft Coffee do it for me?

Calium Free Latte

How good of a job am I really doing? I haven’t had any professionally roasted coffee in a month. Will I be disappointed in the beans I’m roasting when I open my next bag from Craft Coffee? There’s only one way to find out. I’ll probably go through another two or three pound of coffee before I do that, though!

Conclusion

Roasting your own coffee at home is easy, fun, and educational. Not only that, but it can be a great way to save money, and you can make sure that your beans are always freshly roasted. It only takes me four or five minutes to roast two days’ worth of beans, and if I work that into my usual six-minute latte-making process, it only adds two or three minutes to my routine.

What do you think? Are you roasting coffee at home? Are you interested in trying? What’s stopping you? Do you prefer to just use a subscription service like Craft Coffee? Let us know in the comments, or stop by the [Butter, What?! Discord server][bw] to chat with me about it!