One Month With My Gigabyte G34WQC A Ultrawide Monitor

| Comments

My plan was to write a single follow-up blog about upgrading my monitor, GPU, and processor. I made it most of the way through writing that post when I noticed that I was already over 3,000 words. I hadn’t even mentioned everything I felt I should mention, so I am going to split this update up into two or three posts.

I have a feeling this will be the shortest of the three blogs.

Why did I upgrade from two 2560x1440 IPS monitors to a single 3440x1440 monitor?

Does that even qualify as an upgrade? I was running a pair of QNIX QX2710 monitors at my desk since 2013. They were really cheap monitors, but they were quite nice! They looked good. I had them overclocked to 102 Hz for gaming. They were still working great!

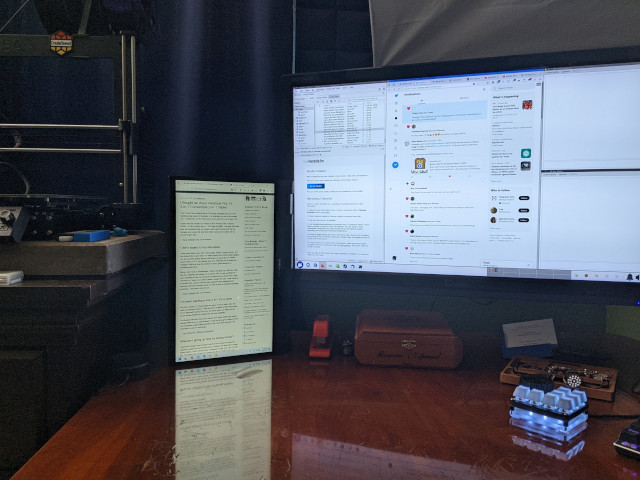
Gigabyte G34WQC at my desk

NOTE: I definitely won’t be winning any photo contests at r/battlestations. The green walls are ugly. The big soft-box light for podcasting, the permanent camera rig, and the microphone arm will always make my desk look cluttered no matter what I do!

The problem is that the QX2710 only has a single video input port, and it is a dual-link DVI port. I have been needing to replace my Nvidia GTX 970 for at least a year or two, and you can’t buy a modern GPU with DVI ports. The monitors were holding me back.

Having two 27” monitors on my desk made it challenging to find room for my podcasting camera. I was hoping I could make do with a single ultrawide monitor.

Why buy a VA monitor instead of an IPS? Why not a 38” ultrawide?

I talked about this a lot in the previous blog about the Gigabyte monitor, but I will summarize it again here.

The Gigabyte G34WQC A might be the best ultrawide gaming monitor under $400. It might even be the best choice under $500 or even $600. I am pretty sure I only saw a single IPS ultrawide gaming monitor under $700 while I was shopping, and it was an older model that topped out at 100 Hz.

There were a handful of ultrawide IPS gaming monitors starting at around $800, but I didn’t spend much time looking at them. If I am going to spend $800 on a single monitor, then I may as well spend $1,000 on a 38” 3840x1600 IPS ultrawide monitor.

So then why not spend $1,000 on one of those really nice 38” ultrawide monitors? I was a little concerned that this would be too big for full-screen gaming. I am not the least bit concerned about that after gaming on this 34” ultrawide for the last five weeks. I kind of wish I did buy a 38” ultrawide!

What I really want is a 38” ultrawide OLED display, but they don’t exist at this time.

Is an ultrawide too wide?

I hear this question a lot. There are some productive people that like to rotate their widescreen monitors so they can have a huge vertical column of source code in their text editor. In practice, having a 21:9 ultrawide monitor is a lot like having three 7:9 monitors.

I am staring at an Emacs window right now that is taking up the center third of the screen. It is set to a slightly large font, and the window is about 90 characters wide and 50 characters tall.

Pat's Desktop

The third of the screen on the left is a Firefox window. That is where I am Googling things and skimming through the previous monitor blog to make sure I am getting my facts correct here.

The remaining third is split in half vertically—my window manager does this for me automatically. The top half is an extra Emacs window where I am pasting in links to other blog posts. The bottom half is a terminal where I am using a couple of shell scripts to hunt down links from old blog posts.

Sometimes you don’t want three monitors. Sometimes you’re using something like Davinci Resolve that has a huge user interface that takes up a ton of space. Resolve is fantastic on an ultrawide monitor.

I can treat the 34” ultrawide like one big monitor. I can treat it like three narrow monitors. I can split it in half. I can split it asymmetrically. It is extremely versatile.

How is the Gigabyte G34WQC monitor?

I was at least a little concerned that downgrading to a VA panel would be a bummer. The VA ghosting that everyone complains about is extremely obvious when you fire up the UFO test. I am excited that I don’t notice any ghosting while gaming. I have completed DEATHLOOP, played all the way through Severed Steel again, and spent a few hours playing Team Fortress 2. Ghosting is definitely not something I feel the need to complain about. I am just not noticing it while gaming.

FreeSync is working great. The Gigabyte monitor definitely has trouble with maintaining its brightness level when shifting between the extremes, but I have only noticed the problem on loading screens. I have not noticed the brightness shifting around during gameplay.

Stable Diffusion

There are some good things you can say about the Gigabyte G34WQC that I can’t test. I read that it has just about the best input latency and response time you can get from an ultrawide 3440x1440 in this price range. It is also supposed to have better color accuracy and more dynamic range than other HDR gaming monitors in the same price range.

It looks pretty good to me, but I have no equipment for testing any of that. I do feel like I made a good choice. This is almost definitely the best monitor for what I do that costs less than $400.

The cheapest IPS ultrawide gaming monitors start a few hundred dollars higher, and the more modern offerings with better specs cost even more than that. It is really easy to dismiss all the monitors between my 34” Gigabyte monitor and one of the amazing 38” ultrawide monitors that regularly go on sale for around $1,000.

I kind of wish I splurged on a 38” ultrawide 3840x1600 IPS gaming monitor, but I am also quite pleased that I saved $630. Those were the only two choices I had. I didn’t like any of the rungs on the pricing ladder between the two!

Is 144 Hz enough?!

I am certain that shaving off every millisecond of latency possible will be a help to someone. Anything that helps you pull the trigger before your opponent can in a multiplayer game gives you an advantage. These advantages keep getting smaller and smaller, but they are there.

I definitely don’t want to say that I would do a good job picking out the difference between Team Fortress 2 running at my old monitor’s 102 Hz and my new monitor’s 144 Hz. I have no confidence that I could tell the difference with any degree of confidence. I would have no trouble picking out 60 Hz.

AI Evolution Chart

While I was farting around with Borderlands 3 settings, I did figure out roughly how many frames I need to be pleased with a first-person shooter. Anything under 80 Hz feels very much like 60 Hz, and it just doesn’t seem smooth. Anything over 90 Hz feels pretty good, and I am not certain that I could tell the difference between 110 Hz and 144 Hz.

There is probably a missing link on the evolutionary chart between 80 Hz and 90 Hz where things start to feel much better than 60 Hz, but I didn’t try hard to find it!

Is VA really OK?!

Here’s what I think I know. All VA panels should have better contrast ratios than most or possibly all IPS panels.

All VA panels have ghosting issues. That is where you can see a fading ghost of the previous image a few frames after it has already moved. Some are worse than others.

I know for certain that there is at least some ghosting on my Gigabyte G34WQC. I can see it in the UFO test.

UFO Test of the Gigabyte W34WQC A

NOTE: This photo was taken at 1/2000 second shutter speed. Bright cyan to black or bright yellow is probably about as awful as you can possibly make the ghosting look. You can definitely see a couple of frames of ghosting with your naked eye, but nothing looks even remotely this bad for me while actually gaming.

I also know that some VA panels have really horrible ghosting, while others handle it pretty well. I suspect that my Gigabyte handles ghosting pretty well. I have not noticed it while playing any games so far.

I am also under the impression that VA panels have more ghosting at higher brightness levels, and IPS panels can usually reach much higher levels of brightness. I have total control of the lighting in my workspace. I don’t need my monitor to reach brightness levels to compete with sunlight.

The Gigabyte G34WQC’s maximum brightness is only 350 nits, and I run it with the brightness set to 40%. My 14” 2-in-1 Asus laptop has a rather dim IPS display that can only manage 250 nits, and I run it at about 35% brightness in my office.

I don’t know if the Gigabyte G34WQC would be as nice if you have to crank it up to the maximum just to see it in your bright environment, but it is quite good in my moderately lit home office.

Conclusion

I didn’t even mention the other contenders this time. There is a Sceptre ultrawide that is sometimes just under $300. It is probably a good value at that price, but I wouldn’t pay much more for it.

When I was shopping, the 144 Hz AOC CU34G2X was $340, and the 165 Hz AOC CU34G3S was $400. I suspect either of these are fine monitors, as long as you can get them for a good price. The Gigabyte W34WQC A is said to have better contrast ratio, better HDR, and lower input latency that either monitor from AOC. I think I made the right choice when the Gigabyte was priced at $380.

What do you think? Should I have splurged on a 38” ultrawide? Or did I do the right thing buying a $400 34” ultrawide to tide me over until I can buy a 38” OLED ultrawide at a reasonable price? Do you also own a Gigabyte W34WQC? Or are you looking to buy one now? Let me know in the comments, or stop by the Butter, What?! Discord server to chat with me about it!

I Bought The Cheapest PEI Sheet On Amazon For My Prusa MK3S
| Comments

My Prusa MK3S has a problem, and I believe it has had this problem to at least some degree since I bought it. I have trouble getting good first-layer adhesion on certain edges of the bed. If I remember correctly, there is a stretch down the left edge of the bed that is about an inch wide where parts just don’t like to stick. The opposite front corner is also problematic.

I don’t print large parts all that often. When I do, I say a little prayer to Optimus Prime, and I might have to restart the job a few times until it sticks.

I got frustrated with this a while back. I tried tweaking Prusa’s bed level correction, but I just couldn’t get it to a point where I was pleased. I wound up adjusting my profiles in PrusaSlicer to have really wide extrusions on the first layer. This helped a lot, but it wasn’t exactly a fix.

I almost ordered a new PEI sheet, but Prusa branded PEI sheets at Printed Solid are $49.99. My original sheet LOOKS fine. I would feel dumb if I ordered a replacement only to have the same problem again.

tl;dr

The $20 double-sided textured PEI sheet I ordered from Amazon has fixed all my problems. It is textured on one side, and it is smooth on the other. The coatings are close enough in thickness that I can just flip it over without adjusting my first layer calibration.
If you are having problems in certain areas of your stock Prusa PEI sheet, and I think you should just go spend $20 and see if the cheap textured sheet fixes your problems.

Tom Sanladerer’s interview with Josef Prusa got me wondering

The Nextruder on the Prusa MK4 and the Prusa XL is really cool. Instead of using an induction probe to measure the distance to the steel sheet under the PEI coating, the Nextruder senses when the nozzle comes in contact with the surface.

I wouldn’t go so far as to call this a game-changer like the auto bed leveling that was introduced with the Prusa MK2, but it is a nice improvement. During Tom Sanladerer’s interview, Josef Prusa says something interesting about my own PEI sheet that shipped with my Prusa MK3S.

My machine shipped with a build plate where sheets of PEI are glued to a piece of steel. Josef Prusa says that the tolerances of the PEI sheet vary, and the tolerances of the adhesive vary. Is this why my stock PEI sheet has a couple of low spots near the edges?

How long has Josef Prusa known that this hasn’t been ideal? He could have switched to powder-coated build plates when he found out. He could have mentioned this to the community. If he did, I would have immediately spent the $50 on a Prusa-branded powder-coated PEI sheet instead of wasting time trying to tune the problem away.

The Sovol SV06 encouraged me to order something immediately

I have to imagine that the refurbished Sovol SV06 that I bought must have shipped with the cheapest PEI build plate available. It is textured on one side and completely uncoated on the other.

Sovol’s manual suggested adjusting the Z-offset until the nozzle was 0.2 mm above the bed. I dialed it in until it was just touching a 0.3 mm business card, then turned the knob 0.1 mm farther before starting my test print. I ran one of the test models that puts nine squares on the bed.

First calibration print on the Sovol SV06

NOTE: The first square was on the bottom left. I think I did a pretty good job getting close to correct on the final square, which is at the top of the photo. Can you believe the first one managed to stick at all?!

The first square was printed 0.3 mm higher than my final offset. The gaps between the lines of extrusion were huge, but every line stuck to the PEI. Three or four of those test squares would never have stuck on the Prusa MK3S. That first square would have just been a blob of filament dragging behind the nozzle.

That is when I knew I needed to order a cheap textured sheet to try on the Prusa MK3S.

I love my cheap PEI sheet, and I am never going back

I literally picked the cheapest PEI sheet for the Prusa MK3 that I could find. It isn’t quite as cheaply made as the Sovol plate. The sheet from Amazon is coated on both sides, and the spring steel feels thicker and stiffer.
Cheapest PEI Sheet for a Prusa MK3 on Amazon
NOTE: The squares printed counter-clockwise starting from the bottom left. I was really close to correct for the third square, then I overcorrected and got just a little too close to the bed. I am aware that you can’t really tell in the tiny photo. It is mostly just here to show that all four corners and all four edges had no trouble printing correctly.

I would absolutely believe you if you told me that all the powder-coated PEI sheets are made in the same factory. They all have a sort of bronze color. They seem to have the same texture. They are all cheap. Maybe someone is making a better grade of sheet in metallic bronze, but I don’t know how you would tell the difference.

Conclusion

I am only one anecdote with one cheap PEI sheet. I am having a much improved experience over the stock Prusa MK3S build plate, but I want to hear about your experience! Are you having good luck the original Prusa PEI sheet? Or have you also been having trouble getting a good first layer around the edges? Did you try a powder-coated sheet? How is it working out for you? Did you go cheap like I did, or did you buy a powder-coated sheet from Prusa? Let me know in the comments, or stop by the Butter, What?! Discord server to chat with me about it!

I Am Worried About Prusa Research

| Comments

I am a happy owner of a Prusa MK3S 3D printer. It has been in service here in my home office for nearly three years, and I haven’t had any major problems with it. I had a stretch last year where it was running for about five hours a day, three or four days a week for five months. Prusa Research really does make a workhorse of a 3D printer.

Look at that old thing!

Before that, I had been running an old MakerFarm Prusa i3 that I bought used in 2014, but it was starting to feel old, and it was starting to fail. Buying a fully assembled Prusa MK3S in 2020 was an easy choice. I could write 2,000 words explaining exactly why the Prusa MK3S was by far the best option for me at the time.

Would I buy a Prusa printer today?

I think about this a lot when talking about 3D printing on our Discord server. I wasn’t sure of the answer to this question until today.

I bought a Sovol SV06 last week. I can’t imagine that printer being my only 3D printer. It is cheap. It is loud. I don’t expect it to be terribly reliable. It was just so inexpensive that I just couldn’t say no.

They are the same printer!

I have been considering adding a Bambu P1P to my office for a while. The price is good. It is a much faster, much more modern printer than my Prusa MK3S. The Bambu P1P ships fully assembled at a price very close to a Prusa MK3S+ or Prusa MK4 kit. I don’t have much use for the AMS on the Bambu X1C, so the Bambu P1P seems like a no-brainer.

I always assumed that a Bambu P1P would have a home next to my proven workhorse of a Prusa. Even if my Prusa MK3S disappeared in some sort of calamity, I assumed that I would replace it with a similar machine from Prusa Research. I am not so sure I would do that anymore.

They are treating the Prusa XL like a slow, lumbering dinosaur

The Prusa XL looked extremely exciting when it was announced two years ago. Prusa Research was making a Core XY printer. It looks like a giant Voron! How awesome is that?! Vorons were printing rather nice benchies in 15 or less. It was exciting that we were going to get a fast, reliable Core XY machine from Prusa.

Except that isn’t what they are delivering. I just installed the Prusa XL profiles for PrusaSlicer. They are faster than the stock Prusa MK3 profiles, but they are far from fast.

I just installed a 0.6mm CHT nozzle on my Prusa MK3S. The Prusa XL ships with a 0.6mm nozzle. I have not finished tweaking my own profiles for speed yet, but I think I am at a reasonable point for now. I don’t have input shaping like a Voron or Bambu. My own 0.22 mm layer height DRAFT settings estimate 48 minutes to print a Benchy. The Prusa XL 0.25 mm layer height SPEED profile estimates 43 minutes.

Prusa MK3S Prints

I also sliced a 1x1x3 Gridfinity bin. With my 0.45 mm DRAFT profile, the estimate is 17 minutes. With the Prusa XL’s 0.40 mm DRAFT profile, the estimated print time is 24 minutes.

This is disappointing to me. The Prusa XL is a $1,999 printer. You can find videos of clean Benchy prints on the Bambu P1P in about 18 minutes. That is a $699 printer. You can slice the Benchy in Bambu’s ludicrous mode to get the print time down to around 12 minutes, but it won’t look as nice.

Vorons have been running with an input shaper for years. Marlin has an input shaper now. The Bambu printers have always shipped with an input shaper. This is how they get up to 20,000 mm/s² of acceleration, and that acceleration is how they print fast.

I limit my Prusa MK3S to 2,500 mm/s² when printing infill. Prusa Research limits the Prusa XL to 3,000 mm/s² when printing infill. We have this limit because the Prusa MK3S and the Prusa XL both currently lack an input shaper.

They missed their release date target for the Prusa XL by a year. The competition has been using input shaping during that entire time. How are they not shipping the Prusa XL and the Prusa MK4 with an input shaper?! Did they only just realize this week that people are craving faster printers?

The Prusa MK4 is shipping without an input shaper

This is the first weird. Josef Prusa sent out an email blast bragging about the Prusa MK4. The very first bullet point is bragging about their 20-minute Benchy. You need to use their input shaper to print a Benchy in 20 minutes.

Jo Prusa's Email

Guess what? They are shipping the Prusa MK4 without the input shaper. If you receive a Prusa MK4 today, you will not be able to print a Benchy in 20 minutes. They aren’t shipping that capability.

This is the very first bullet point. This is one of the things Prusa Research brags about in their intro video for the printer. The printer can’t yet do what has been advertised.

The Prusa MK4 is not yet open-source

This is also one of the bullet points in Jo Prusa’s email blast. He is bragging that the Prusa MK4 is open source. He said on his blog that they aren’t yet releasing the Prusa MK4’s control board schematics.

You should read his blog post about Prusa Research and open source. It left a bad taste in my mouth.

Open source is like a business partner that you don’t have to negotiate with. He built his company on top of the RepRap project, the Marlin project, and Slic3r. These all allowed him to get a jump start without also hiring a team to create firmware and a slicer from scratch in order to get his product out the door. He got a lot more from these open-source components in the early days than he does today.

Bender on my Sovol SV06

Open source is a two-way street, and he seems to be unhappy about that now that others are benefiting more than he is. Other companies can do the same things with his project as he was allowed to do with Marlin and Slic3r. Josef Prusa is in the position of power today, and he isn’t excited about sharing.

He seems to specifically be unhappy that there are exact copies of the Prusa MK3 kit on Aliexpress at half the price. I don’t know why he thinks these vendors need any form of source code to produce these copies, and I don’t know why he thinks a license change will make any difference.

You only need to buy one original Prusa MK3S kit to duplicate it. Most of the hardware is just off-the-shelf components like stepper motors, stepper drivers, and an LCD screen. The most complicated component is probably the controller, but that isn’t exactly rocket science to duplicate, and there are other open-source controllers that could be used in its place.

Trying to cancel their existing-customer discount

This one is a bummer, and it doesn’t make me feel good about the state of things. There was a composite of a bunch of screenshots posted on Reddit. I haven’t attempted to trace back to all the sources to verify that everything is completely accurate, but Josef Prusa left a comment in the thread, and he didn’t call any of it out as being fictitious. I am not a hard-hitting investigatory journalist, so that is good enough verification for me.

Here’s what the screenshot is explaining: The older Prusa i3 printers from the MK2 through to at least the MK3S listed a 5% or 10% discount on any future printer orders. That means my fully assembled Prusa MK3S entitles me to 10% off my next purchase of a Prusa i3.

Jo Prusa's response to the filament debacle

They don’t offer that discount any longer. Josef Prusa said on Reddit that he doesn’t want to offer this discount any longer, so they just took it away. Since being called out on it, he wants to “run it in a limited version in the future.”

I am sorry, but no. Absolutely not. As far as I know, when I bought my Prusa MK3S, part of the deal was that Prusa Research would be giving me a 10% discount on future Prusa i3 orders. This deal has already been made. You can’t just change the terms after money has exchanged hands. That is completely dishonest. I can think of some worse words to say about someone who tries to secretly change the terms of a previous deal.

Prusa Research isn’t some mom-and-pop shop that made a mistake that they can’t afford to buy their way out of. Forbes estimated that Prusa Research was worth €236,000,000 in 2016 based on €33,000,000 in annual revenue. Prusa’s website says they sold four times as many printers in 2021 as they did in 2018. Their blog says they sold over twice as many printers in 2021 as they did in 2018.

There is a gap in my data. I am sure it is available somewhere, but I think I have found enough information to prove my point that Prusa Research is a big business. They can afford to hire people to help prevent these kinds of pricing mistakes. They can also afford to pay for these mistakes after they happen.

What is the absolute worst case? Is it that Josef Prusa is somehow being scammed, and every single Prusa MK4 they ship out qualifies for the 10% discount? If that is the case, he has to raise the price of the Prusa MK4 by 11%. That is it. The fully assembled Prusa MK4 would have to cost $1,220 instead of $1,100.

We don’t know how many orders qualify for the discount, but it can’t possibly be every order. The worst case isn’t so bad, and the reality is likely much better.

Even so, I understand that Josef Prusa is in a tight spot. He has to compete with faster, larger printers that cost a lot less.

The Prusa MK4 comes with a spool of filament, except that it doesn’t, but now it does?

This is absolutely bonkers. What do you think it costs Prusa Research to manufacture a spool of filament? Maybe $10? Do they think there is no such thing as bad press?

I don’t think this apology would have rubbed me the wrong way a month ago.

He is apologizing for the confusion. Except no one is confused. The product page said the Prusa MK4 came with a 1 kg spool of PLA. People placed orders. Prusa Research decided they weren’t going to include 1 kg of filament with those orders. That isn’t confusion. That is a bait-and-switch.

Josef shouldn’t be apologizing for our confusion. He should be apologizing for changing the terms of the sale after the sale has already been made. This is turning into a pattern, and I don’t like it.

He says he is doing this to thank you for your preorder. No one should be expected to be thankful for receiving what they paid for. That is gross.

I like the technology in the Prusa MK4 and the Prusa XL!

I absolutely love the load-cell sensor for bed leveling on the Prusa XL and Prusa MK4. It isn’t a game changer like the PINDA probe or BL Touch were, but it is a really solid incremental improvement in quality of life. This is the upgrade I want more than any other, and I am excited to see what else they can do with this sensor in the future.

Bambu has been shipping equivalent technology for 11 months already. Instead of one load-cell sensor in the extruder, Bambu has three load sensors on the bed. I don’t know which is better, but both allow the printer to find the point where the nozzle makes physical contact with the bed to give us a perfect first layer.

It is exciting that Prusa is finally on board with input shaping and speeding up print jobs. They have been dragging their feet on that for years. I have always gotten the impression that Prusa Research doesn’t think people are interested in printing fast.

Bambu has been shipping a ridiculously fast 3D printer with input shaping for the past 11 months. Everyone I know is excited about how fast the Bambu printers are, or they are already excited about how fast their own Bambu printers are.

This is the first time Prusa Research hasn’t been the leader

There have always been fancier and more expensive 3D printers than the ones Prusa sells, but the more advanced printers always costs at least two or three times more. That isn’t the case any longer. Prusa Research is miles behind.

I don’t think Josef Prusa knows how to react. The Prusa MK2 and MK3 were easily the best printers under $3,000 for years. Then, suddenly you could buy a much more advanced Bambu X1C with a multimaterial unit for around the price of a fully assembled Prusa MK3S+ or Prusa MK4, and then you could buy the cut-down Bambu P1P for around the price of a Prusa MK3S+ or Prusa MK4 kit. He isn’t in the lead any longer. He isn’t even close.

Stable Diffusion

I do feel for him. He is in a tough spot, and he has at least 700 employees that are relying on him to keep his company in the lead.

They have been working on the Prusa XL for years, but I don’t believe Prusa has focused on speed. I don’t understand why they would design a Core-XY printer without focusing directly on speed. Did they really think the market didn’t want faster printers?

I like the Prusa MK4 as advertised

I don’t think $1,100 for a fully assembled Prusa MK4 is a bad value if it can print a Benchy in under 20 minutes. Especially knowing how little effort it has taken to keep my Prusa MK3S printing for two and a half years.

Bambu Lab can beat that 20 minutes with a printer that costs $750, and it can do it today. You don’t have to wait for a firmware update. We don’t even know when the firmware update for the Prusa MK4 is coming. We can print an 18-minute Benchy on a Bambu Lab printer right now.

The roughly equivalent competition costs less than the offerings from Prusa, and there are some amazing offerings from other companies at even lower price points today. My backup printer is a Sovol SV06 that I bought refurbished for $169. My only complaint about the Sovol so far is how loud it is. I don’t even need new printer slicer profiles. I send the exact same files to my Prusa and Sovol.

I haven’t had the Sovol long, but it has survived around 36 hours of printing a giant MINI 13 Bender. That doesn’t make it a good printer, but it does at least make me feel like it isn’t total junk.

Conclusion

This has been difficult to write. I always figure that if I can’t say anything nice, then I should just not say anything at all. The problem is that I am invested in my Prusa MK3S, the Prusa community, and the future product releases from Prusa Research.

Josef Prusa has spent years building trust with the community. It feels like he is tearing that trust down a little more every day. It is really bumming me out, and sometimes it even makes me angry. I would have been done with this blog two days ago if I didn’t keep getting grumpy, but then I would have missed out on including the Prusa MK4 filament debacle!

Bambu has yet to really earn my trust, but everyone I know who decided to buy one of their printers is having a great time. I am not someone constantly trying to chase the newest 3D printer. I use my printer to support my other hobbies. As long as my current machine is doing its job, I don’t have any reason to order a Bambu P1P or Bambu X1C.

Prusa hasn’t exactly lost all my trust, but this pattern is going in the wrong direction. Why would I pay $350 more for a Prusa MK4 than a bigger, faster Bambu P1P? It looks like the Prusa MK4 will only be begrudgingly open sourced, so the only reason left for me to buy my next 3D printer from Prusa Research is trust, and Prusa is spending that currency rather quickly right now.

My Sovol SV06 - Can It Match My Prusa MK3S?

| Comments

A lot can happen in a week. My neighbor stopped by to ask which of the 3D printers at Microcenter he should buy. I told him no way. These all cost too much. Spend $250 and order yourself a Sovol SV06! He wound up pre-ordering the Sovol SV06 Plus instead.

They are the same printer!

I asked everyone on our Discord server if they agreed with my advice. Someone noticed that you can even get a refurbished Sovol SV06 for $169. I put myself on the waiting list. I got an email two days later and immediately ordered another 3D printer. Today I am printing a scaled-up Bender MINI 13 toy on my new Sovol SV06.

The Sovol SV06 matches a Prusa MK3S+ on paper

The Sovol SV06 has a slightly smaller build volume, but otherwise has so much in common with the Prusa MK3S. They both ship with spring steel PEI sheets for a print surface. They both use an induction probe for automatic mesh bed leveling. They both use silent Trinamic stepper drivers. They both use similar motion systems and have direct-drive extruders.

They really are extremely comparable. I duplicated my Octoprint server, plugged my Sovol SV06 in, and sent a file sliced for my Prusa MK3S straight to the Sovol. That first part came out exactly as I expected.

I am beyond impressed with the performance of the Sovol SV06.

Two suggestions for new Sovol SV06 owners

Hello! This is Pat from a week or so in the future adding this section.

My Sovol SV06 was getting persnickety before the last set of Bender MINI13 parts. It was crashing continually crashing the X-axis while attempting to home. Go to Configuration –> Advanced Settings –> TMC Drivers –> Sensorless Homing on the printer’s control panel. My X-axis was set to 65, and my Y-axis was set to 68.

I bumped my X-axis up to match my Y-axis. That solved the problem, but I didn’t want it to happen again, so I set it five clicks higher.

Sovol SV06 Printed a dual extrusion filament Bender Mini 13

I had printed a strain relief part for the Sovol SV06 bed before the printer even shipped. I saw that mine seemed to have an adequate strain-relief part installed from the factory, so I didn’t worry about it.

I was poking around at the printer after Bender was finished, and I decided to add the strain relief print. I like the way that it pushed the cable for the heated bed upwards so it won’t drag back and forth across the frame of the printer.

What is wrong with the Sovol SV06?

I have a short list of complaints about the Sovol SV06. Most of them are minor, but one of these problems really stands out to anyone who has spent the last few years printing with their Prusa MK3S.

The fans on the Sovol are ludicrously loud. Just plugging the thing in and turning on the power is loud. By far the loudest thing in my home office.

NOTE: The video isn’t to show off the noise. The recording barely picks up the fan at all. I have a plan to demonstrate the difference in volume between the Sovol and the Prusa, but it will take some effort to execute well!

Then you start heating up the printer and the heat break’s fan spins up to full speed. I was surprised that it is even louder than the Sovol’s power supply fan. It is the same size as the fan on the Prusa MK3S, but this fan has so many more blades, and I wouldn’t be surprised if it is spinning at a higher RPM.

I wasn’t even sure if the Trinamic stepper drivers were running in silent mode. All you can hear are the fans. Good gravy! Those fans are LOUD!

I don’t think the fan noise is a deal breaker. We will get back to the noise shortly.

What do you get when you pay more for a printer from Prusa Research?

You get something amazing with the extra money you pay Prusa Research when you buy a Prusa MINI+ or a Prusa MK3S, and it isn’t just a difference in noise level.

If you order a fully assembled Prusa MK3S+ today, I have an extremely high confidence level that you will receive a printer a functional and test 3D printer. It will be ready to go out of the box. You can send it a file straight out of PrusaSlicer, and I will be absolutely amazed if you don’t get a good print on the first try.

Yes. You are going to pay $800 more for a fully assembled Prusa MK3S+ than you will for an easy to assemble Sovol SV06.

Sovol is building a pretty good reputation as far as low-budget 3D printers go, but the bar they have to reach isn’t all that high. You’re going to save $800 if you buy a Sovol SV06, but you are most definitely rolling some dice.

All my other complaints are minor

It is easy to see some of the places where Sovol cut corners to keep the cost down. The spring-steel build surface only has PEI on one side. They saved a few nickels by only shipping one spool holder instead of two. They used really noisy fans. They didn’t bother to put a cover on the back of the display.

I keep reading that the linear bearings aren’t packed with grease from the factory. If that is true, it is a bummer. It can be fixed, but it is a bummer. I just assumed they were noisy because they are cheap.

Sovol also made a few minor design mistakes. The inductive bed probe can’t detect the bed when the extruder is in the home position. A lot of people have had trouble getting the auto z-axis calibration to work correctly, and it didn’t work for me. The extruder gets in the way of the calibration. There are ways to do the calibration manually. I saw one guy using a couple of cans of soup.

I did the same calibration from this YouTube video by hand. I just disabled the steppers, pushed the extruder to the far sides of the bed, and adjusted the z-axis by hand.

I think what I have been saying is true

The Sovol SV06 has nearly all the features of a Prusa MK3S+, but it costs less than a Prusa MINI+. A lot less. The Sovol SV06 may be loud, and it may be crunchy, but it is less than $300.

Maybe you run your printer in a workshop. Maybe it doesn’t matter how loud your 3D printer is.

I run my printer next to my desk. I make design changes, run a print, and repeat. I do want to put a few spools through the Sovol, but I won’t be running it often in its current state.

Sovol SV06 MINI13 Bender Scaled Up

There are three fans on the printer. Quieter replacements can probably be had for a total of $20 or $30.

You are going to have to put in some work modifying your Sovol SV06 if you want to quiet it down. Modding printers is a common hobby, and something you almost always need to do with the inexpensive models. Building and modifying 3D printers is a fine hobby, and if it is one you would enjoy, then quieting a Sovol SV06 might be fun!

One of my favorite things about owning the Prusa MK3S is that I have only had to take a screwdriver to it two or three times. I had to pop the cover off the extruder to clear filament jams. That is the most work I have ever done to it since it was assembled by the team at Prusa Research. The Prusa MK3S is a workhorse.

Do I recommend the Sovol SV06?

I have to say that the Sovol SV06 is my favorite printer at under $700. It has all the most important features that I have been enjoying for years on my Prusa MK3S. It is an amazing machine at this price point.

If you’re spending $700, you can get yourself a Bambu P1P. That gets you a bigger build plate. That gets you load-cell sensor bed leveling, very similar to the new Prusa MK4. It also gets you one of the fastest 3D printers on the market.

So far, all the folks on our Discord server have been choosing the more expensive Bambu X1C, so I have yet to see a Bambu P1P in person.

NOTE: This would be a fantastic place to link to Brian Moses’s Bambu X1C blog post, but he hasn’t written one!

Let’s talk about the fan noise one last time

I wrote most of this blog yesterday. I woke up today, turned the Sovol SV06 on, and started printing more Bender pieces. It is loud, but I am not sure it is as offensively loud as I thought it was yesterday. Am I just getting used to it?

The Sovol fans are louder than my air conditioning, the eight fans in my PC case, and my Blueair filter running at its lowest setting. I cranked the Blueair up to max speed, and it is for sure louder than the Sovol. It is pretty comparable at medium speed. I believe the filter in my office is a Blueair Pro M.

Sovol SV06 MINI13 Bender Scaled Up

I don’t have a good way to measure this. I have set up 1U servers in my office before. Those servers have two dozen tiny fans that spin at ridiculous speeds, and those servers are just so loud. Even when the fans spin down to idle, they are still loud. The Sovol isn’t nearly that loud.

I am on my way to half way through printing my gigantic MINI 13 Bender. When I walk back to my office, I can hear those fans before I even get close to the door. When the eight-hour print that included Bender’s head finished last night, I was relieved to once again hear the silence of my office.

NOTE: I hope I am at least half way through! I keep running 6- and 8-hour print jobs. I just added them up, and I will be at just over 24 hours of printing Bender parts when this job finishes. I still have to print hands and the entire skeleton!

UPDATE: The 13” Bender MINI 13 figure printed with gold and silver dual extrusion silk PLA took around 36 hours to print. Everything metallic was printing on the Sovol SV06. I was impatient and printed the eyes and mouth on the Prusa MK3S. The eyes required two color swaps. Bender weighs 390 grams.

UPDATE: I am being too critical of the fan noise!

I am more than a little spoiled by my Prusa MK3S. My Prusa MK3S sits next to my desk. It is less than two feet away from the shotgun microphone I use when recording podcast interviews. I would never run my printer during an interview, but I have used the mic while the printer is running, and it barely registers. You would barely notice that I am printing on the Prusa if it were running during one of our YouTube videos. You might not even notice!

The Sovol is loud, but I am learning that it might not be any louder than all the other budget 3D printers. The Sovol SV06 uses the same loud 40 mm blower fans as the Ender 3.

I hate the fan noise, but it seems as though this isn’t unexpected at this price point.

Conclusion

This definitely isn’t the real conclusion. I scaled up a MINI 13 figure to three times its size. It is going to take way more than 24 hours of printing time to complete this giant Bender Bending Rodriguez action figure. It is printing as I am writing these words, and it is so loud.

If this succeeds, then I figure we are in good shape, and I can feel pretty good about recommending this Sovol SV06 budget printer to my friends and to you! The fact that it has already been printing for more than 24 hours without a hiccup has me feeling pretty good about it.

What do you think? Do you own a Sovol 3D printer? What do you think of it? Is it as loud as mine? Are you thinking of buying a Sovol SV06 or a Sovol SV06 Plus? Tell me about it in the comments, or stop by the Butter, What?! Discord server to chat with me about it!

I Bought a Sovol SV06 3D Printer

| Comments

I can’t believe I did this. I am not entirely sure why I decided that I had to pull the trigger. I suspect it was the price of the refurbished Sovol SV06 that made me do it. How could I not snag a wannabe Prusa MK3 for $169 shipped?!

I started 3D printing nine years ago. I have had my Prusa MK3S for more than two years now. Aside from some trouble getting prints to stock at the extreme edges of the PEI sheet, my Prusa MK3S is working just as well as it was when they ran a test print on it at the factory. Did I really need another printer? And should I really be writing about the new printer before it even ships?

I am writing this to help keep me honest. I am going to be telling you why I decided to order the Sovol and what I am expecting from it. We will see how close reality gets to my dreams here.

Is the Sovol SV06 a Prusa MK3 for less than half the price?

These are not easy experiences to compare. You can get the Prusa MK3S+ kit for about $650 plus shipping, and you will receive a package with a few hundred parts that you will spend hours or days assembling.

You can spend $899 plus shipping for a fully assembled Prusa MK3 that is ready to print right out of the box. That is what I did. When I bought my fully assembled Prusa MK3S, I paid about $110 in shipping, which is more than half the total cost of my refurbished Sovol SV06. I was printing on the Prusa within fifteen minutes of opening the box. I even had my first successful TPU print going within the first hour. It was fantastic.

NOTE: Brian and I are for sure going to need to record an episode of The Butter, What?! Show about my Sovol SV06 and his new Bambu X1C.

The Sovol SV06 needs to be assembled, but you only have to bolt three or four large pieces together. The retail price of the Sovol SV06 is $299. It is currently on sale for $239 on their site, and I paid $169 for a refurbished SV06. Shipping is free.

Both the Sovol and the Prusa have the inductive probes for automatic bed leveling, direct-drive extruders, silent stepper drivers, and PEI build plates. The Prusa’s build plate is a little bigger, but they are both in the same league.

The Sovol SV06 has a 32-bit microcontroller that seems to be running Marlin. This could be a huge step up over the Prusa MK3’s 8-bit Einsy controller. I am looking forward to eventually messing around with Marlin’s new input shaper on the SV06 because I can’t do that on my Prusa MK3S.

I won’t miss the filament runout sensor

I have had to open up the extruder to sneak the filament out of my Prusa MK3S the last two times a spool of filament ran out on me. There’s always a little kink in the filament where it attaches to the end of the spool, and that little kink gets stuck at the top of the extruder.

If I am not there ahead of time to cut a clean end onto the filament before it runs out, then I am going to have to work hard for the filament swap.

If I have to be there anyway, why would I wait to swap the filament? I am just going to do it right away and save time.

Will what’s on paper match reality?

The Prusa MK3S and its predecessors are proven workhorses. My Prusa worked perfectly when it arrived two years ago. My Prusa works today. I expect my Prusa to continue to be working just as well two years from now. I have never had to do any significant work to keep my Prusa going. It just keeps going.

3D Printed Dudes

I could literally buy a farm of six refurbished Sovol SV06 printers with the $1,111.31 I spent on my Prusa MK3S, and I would have almost enough money left over to buy a spool of PLA filament to hang off each of those Sovol printers. I realize that this is comparing apples and oranges, but that is probably what makes this so interesting to me.

The Sovol SV06 is comparable to a Prusa MK3S, but it costs less than a Prusa MINI+.

The printer isn’t the hobby for me

I know there are a lot of people who enjoy assembling, tweaking, tuning, and troubleshooting their printers. I know that some of these folks really enjoy the day a Prusa kit arrives and they get to spend the afternoon building a printer from scratch.

That is not me. I am glad that I had to tear down and rebuild so much of my first printer because it taught me a lot about how these printers work. I don’t want to have to do it again.

Designing and printing things is my hobby. Sometimes designing and printing things augments my other hobbies. I just want the printer to show up, and I want to spend as little time as possible getting it up and running.

Known issues with the Sovol SV06

I have come across two potential problems with the Sovol SV06. There’s no strain relief for the high-amperage cables running to the heated bed. I already printed a strainirelief part to install on my new printer when it arrives. If the Sovol SV06 is your first printer, you can print one as soon as you get it up and running.

3D printed brackets for Tindie

Some folks are having trouble with the Sovol’s automatic x-axis calibration. This would be a bummer if I never used a 3D printer before, but calibrating the x-axis manually looks easy enough for me.

Inductive bed probes are old and busted

Load cell sensors are the new hotness. The Prusa MK4 and Prusa XL have a load cell sensor in the hot end to detect when the nozzle physically touches that build surface. The Bambu P1P and Bambu X1C both have load sensors on the bed to detect when the nozzle physically touches the bed.

This is a huge improvement. If you regularly print things that take up most of the area on the build plate, then you should definitely be looking at one of these printers. As far as I know, these are the only popular printers using load cell sensors.

The induction probe on the Prusa MK3 and Sovol SV06 doesn’t actually know where the PEI surface is. It is sensing the steel sheet underneath that plastic layer. If there are any imperfections in that layer of plastic, the induction sensor won’t be able to adjust for it.

Induction bed leveling is still quite good!

My Prusa MK3S uses an induction sensor for bed leveling. It has trouble getting a good first layer within the last 10 mm or 15 mm of the edge of the bed. The probe can’t even reach the left side of the bed.

Even so, Prusa’s PINDA probe and automatic mesh bed leveling are a massive upgrade over manually leveling the bed. I also prefer an inductive probe to something mechanical like a BL Touch probe simply because it means fewer moving parts.

The Sovol SV06 ticks all of the most important boxes on my checklist

There were three features that really stood out when I upgraded from my ancient MakerFarm Prusa-style i3 to the Original Prusa MK3S: the PEI build plate, automatic mesh bed leveling, and the silent stepper motor drivers. You can print without these things, but all of them improve the day-to-day operation of the printer.

The Sovol SV06 has all these things that the Prusa MK3 had.

Isn’t the Prusa MK3 old news now?!

The Prusa MK4 looks like a really nice upgrade over the Prusa MK3S+. The new bed leveling that promises a perfect first layer on every single print looks amazing, and a bed-slinging 3D printer shipping with preconfigured input shaping that allows acceleration of 8,000 mm/s² that can print a beautiful benchy in less than 20 minutes is astounding!

I get annoyed when I need to print something large, and my Prusa MK3S doesn’t manage to get good adhesion close to the edges of the bed, but I don’t print large parts all that often. It would be nice to fix that problem, but I wouldn’t spend another $1,111.31 for a fix.

Two guys unboxing an imaginary 3D printer

Printing faster would be nice. I believe the Sovol SV06 runs Marlin. If it doesn’t ship with Marlin, it can definitely be flashed with Marlin. Marlin has a working input-shaping feature now. I am excited about trying the latest Marlin features out on my Sovol SV06.

Do I think the Sovol SV06 will reach the same speeds as the Prusa MK4? Absolutely not. It is obvious that Prusa has beefed up many of the parts in the transition from the MK3 to the MK4, and the Sovol SV06 doesn’t look as rigid as my Prusa MK3S. It will be fun seeing how fast a $169 refurbished printer can go!

There is no official support for Marlin on the Prusa MK3’s Einsy control board.

We’ll see how it goes!

I have already cleared some space on my 3D printer workbench for a second printer. I even have a concrete paver in place for the Sovol SV06. I haven’t even gotten my tracking number yet.

I keep talking and thinking about the Sovol SV06 as if it is a $169 3D printer. I have been saying that it looks like a steal of a deal even at its full price ever since I saw the first review of the printer from Maker’s Muse. The Sovol SV06 compares quite favorably to the Prusa MK3 while being priced lower than a Prusa Mini.

When the new printer gets here, I will be sure to let you know how it goes.

Putting a Ryzen 5700X in My B350-Plus Motherboard Was a Good Idea!

| Comments

I’ll tell you about everything I’ve learned so far, but let’s start with what you really want to know. Should you upgrade your Ryzen 1600 in your first-generation AM4 motherboard to a Ryzen 5700X? No. I am pretty sure that you should save $30 or $40 and buy yourself a Ryzen 5600 or Ryzen 5600X.

Bender with a Ryzen 5 1600

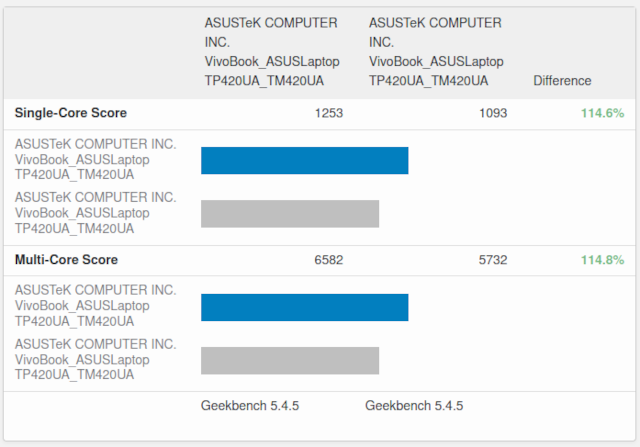
I restricted Geekbench to just six cores, and the full eight cores was only 8% faster. A real Ryzen 5600X is clocked about 8% higher than my Ryzen 5700X. I don’t have one here to test, but I wouldn’t be surprised if the 5600X would beat my 5700X’s single-core score and tie my 5700X’s multicore score.

This 5700X is roughly 70% faster than my overclocked Ryzen 1600. Some games are running a little faster after the upgrade. Some games perform almost exactly the same. A couple, so far, have improved dramatically. This was a good $189 upgrade for me, but I suspect it would have been a great $156 upgrade if I had gone with a 5600X.

Prices on the parts fluctuate a lot!

We post a lot of exciting deals on our Discord server, and we pay a lot of attention to our favorite components. As I am writing this blog, a Ryzen 5600 is $140 on Amazon and a Ryzen 5700X is $212. When I bought my 5700X a few days ago, it was $186.

The entire Ryzen lineup won’t be on sale at the same time, and if you are reading this six months from now, the same processors may not even be in stock any longer.

This is one of the reasons I am mostly talking about percentages. As I am writing this, a Ryzen 5600 costs very nearly 50% more than a Ryzen 5700X, but the 5700X only has 23% more multicore performance. When I bought mine, I only paid 32% more.

How did I wind up making this upgrade?

I have mostly been held back lately by my Nvidia GTX 970 GPU. I knew I was going to upgrade that when GPU prices settled down, and I did upgrade to a Radeon 6700 XT last week. I even upgraded to a Gigabyte 144 Hz 34” 3440x1440 ultrawide the week before just to prepare myself for the GPU upgrade. The GPU was a huge improvement, and I didn’t really have to do the CPU upgrade.

Even so, a CPU upgrade has been on my mind. There was a deal on a Ryzen 5600 a couple of months ago for around $120, and the latest BIOS version for my ancient Asus Prime B350-Plus motherboard now has support for every single Ryzen CPU that fits an AM4 socket. I definitely didn’t need a CPU upgrade before a GPU upgrade.

Stable Diffusion Nonsense

That would have been an excellent value, though, and a great way to extend the life of my first-generation Ryzen build.

The GPU upgrade didn’t help with my Team Fortress 2 performance. I didn’t expect that it would, because Team Fortress 2’s OpenGL rendering engine is very dependent on single-threaded CPU performance, and that is the only rendering engine available to me on Linux.

I was looking forward to playing DEATHLOOP with my new GPU. It seemed to be running great at first. Well over 100 frames per second with fairly high settings. Until I hit a particular intersection in Updaam. No matter how low I drop the settings, there are parts of the game that dip down under 60 frames per second with my Ryzen 1600.

I can’t find the site again, but I saw some benchmarks of games using my 6700 XT graphics card with both my old Ryzen 1600 and a Ryzen 5600. There were enough improvements that it seemed like a good idea, especially since I knew my Team Fortress 2 performance would greatly improve with a big CPU upgrade.

How did I talk myself into the Ryzen 5700X?

You have to be careful! AMD has the entire Ryzen lineup priced so well that it is really, really, REALLY easy to nickel and dime your way to nearly the top of their product lineup. That is for sure what I have done. Thank goodness for me that the 12-core and 16-core Ryzen CPUs cost a couple of hundred dollars more! I am convinced that the Ryzen 5600 would have been a fantastic upgrade for me.

A few extra dollars over the Ryzen 5600 gets you to a Ryzen 5600X with an extra 6% clock speed. Then a few dollars past that is the Ryzen 5700X with two extra cores. How can that not be a good idea?!

I didn’t think it was a good idea to go past eight cores. The more cores you have, the more contention there is for that memory bus, and that bus isn’t getting any faster. Even on a premium AM4 motherboard with high-end RAM, the 12-core 5900X and 16-core 5950X show quickly diminishing returns. A 16-core 5950X build is only about twice as fast as a 6-core 5600X build, and that is with appropriately fast RAM.

I don’t have fast memory. I have two 16 GB sticks of DDR4-3200. It sure does look like returns diminish A LOT after 6-cores with my older motherboard and memory.

The memory in your old B350 is probably slower than mine!

My desktop used to have four 8 GB sticks of DDR4-2666. My machine froze up one day and wouldn’t boot. Some troubleshooting showed that one of my sticks of RAM was no longer functioning. I ran single-channel on three sticks of RAM for quite a while.

Crucial’s website said I had to send all four sticks back to get a replacement on my lifetime warranty. I couldn’t take them all out, because I needed to use the computer.

I got a good deal on two 16 GB sticks of DDR4-3200. They would only run at DDR4-2933 on my overclocked Ryzen 1600, but it was still a nice little upgrade.

If you still have DDR4-2666, then you should probably skip the 8-core upgrade and stick with a Ryzen 5600 or Ryzen 5600X.

NOTE: I didn’t trust my intuition here. I ran Geekbench on my Ryzen 5700X with the memory configured to DDR4-2666. The 6-core and 8-core results weren’t any slower.

What kind of data do I have for you?!

I am not a hardware review guy with a bunch of test machines at my disposal to run all sorts of benchmarks for you. I have some information I wrote down before doing the upgrade, and I can test things now after doing the upgrade. I won’t be swapping processors just to gather more data.

  Ryzen 5 1600 Ryzen 7 5700x
Base clock 3.55 GHz 3.4 GHz
Boost clock 3.55 GHz 4.6 GHz
RAM 2x16 GB
DDR4-2933
2x16 GB
DDR4-3200
Geekbench 5
Singlecore
966 1667
Geekbench 5
Multicore
5761 9649

NOTE: My Ryzen 5700X restricted to six cores to mimic a 5600X scored 8979 on the Geekbench 5 Multicore test.

Most of my findings aren’t solid and repeatable numbers. Most of the games I play don’t have benchmarks. Borderlands 3 has a benchmark, but I am confused about my numbers. I said I scored 77 frames per second in the blog about my GPU upgrade, but I am pretty sure I was hitting 81 frames per second after upgrading to the nightly builds of Mesa. Without changing the settings, the benchmark managed 88 frames per second today. Am I 100% confident that the settings were identical between runs so many days apart? No, but they likely were.

Let’s talk about DEATHLOOP

I might not have put in the effort to upgrade if it wasn’t for the conundrum of DEATHLOOP. The Ryzen 5700X didn’t just cost $186. I also had to spend an hour or so crawling around on the floor, unplugging cables, swapping processors, and then making sure everything was still working. It isn’t a Herculean effort, but it was way more work than making a latte.

DEATHLOOP wouldn’t run at even 10 frames per second on my Nvidia GTX 970 because it needed more VRAM. When I fired it up on the 6700 XT, I cranked the settings up quite high and was getting over 100 frames per second for the first twenty minutes or so. That is when I hit a point where the controls felt like they were stuck in the mud, and the game was dropping down to 50 frames per second.

DEATHLOOP

I dropped all the settings as low as I could go. I was still hitting spots where the game would drop to 60 frames per second, but it was definitely playable. This particular performance problem put that cheap Ryzen 5600 back in my head.

After upgrading to the Ryzen 5700X, I immediately fired up DEATHLOOP, bumped up the settings a whole bunch, loaded the map where I first encountered the problem, and I walked to that nearby intersection that puts my frame rate in the toilet. The faster processor fixed most of my problems here. It doesn’t drop below 90 frames per second here any longer!

DEATHLOOP isn’t perfect. There are still spots where the frame rates are high and the frame-time graph is steady, but the game feels less than smooth. Dropping the resolution a few more notches and letting FSR scale things up for me helped a lot there.

Team Fortress 2

I think I have written four different blogs where I explain why Team Fortress 2 performance is a bummer on Linux. I don’t want to repeat all of that again.

I will say that with the Ryzen 5700X, so far I am finally able to keep the game well over 144 frames per second. I was able to scrap my old potato settings from mastercomfig.com, and I have turned everything up to the max. Having 72% more single-core performance is such a huge boost here.

Team Fortress 2

NOTE: I was seeing some dips under 144 frames per second while recording gameplay with OBS. I broke GPU-accelerated encoding when I installed bleeding-edge Mesa libraries, so OBS was using two or three CPU cores. That was definitely lowering the CPU’s maximum clock speed.

This performance improvement didn’t even need the GPU upgrade. I am pretty sure Team Fortress 2 is chugging along at 200 frames per second while the GPU is sitting at under 10% utilization. This is all CPU.

How bad was it running before? Team Fortress 2 doesn’t understand 21:9 aspect ratio resolutions. I had it running under Gamescope to make the game think my monitor had a resolution of 1720x720. I was still using my old potato-quality settings from mastercomfig.com, and it was doing a good job staying up at around 144 frames per second, but it did drop a bit if there were a lot players with unusual hats with crazy effects.

I haven’t been in any proper matches with lots of unusual hats running around since upgrading to the Ryzen 5700X. I expect everything will be fine, but I will report back if I have any bad news.

Borderlands GOTY Enhanced

I fired up the enhanced version of the original Borderlands while waiting for my new processor to arrive. It isn’t quite as old as Team Fortress 2, but I was pretty sure it would need more single-core performance than my Ryzen 1600 had available.

I maxed out all the settings at 3440x1440, and the game just couldn’t maintain a solid 144 frames per second to match my monitor. GPU utilization was quite low, and CPU utilization was at a constant 20%. The CPU utilization never went higher or lower. If I had known I would be writing this paragraph, I definitely would have checked htop to see if there was a single thread tying up one CPU core. I would be surprised if that wasn’t the case.

Borderlands Dwight

Borderlands is up over 200 frames per second since popping in the Ryzen 5700X. I have no plans to play another run through the original Borderlands, but I am excited to know that it will be a fantastic experience when I do!

I am starting to wish that I had faster DDR4 RAM!

I don’t want faster RAM for the small gain in performance. I wish I had faster RAM so I could run Geekbench at a handful of different RAM speeds so I could tell you at what point it makes sense to buy an 8-core CPU instead of a 6-core CPU.

I just learned that maybe this is a moot point. I rebooted my computer, set the RAM to DDR4-2666, and ran Geekbench. My results were right in the middle of all my other tests at DDR4-3200. I even had a lucky single-core test way up at 1726. That is the highest number I have written down so far.

This surprised me, but it wasn’t a huge surprise. The way a CPU and its cache interact with memory is complicated. Just because a synthetic benchmark doesn’t change with memory speed doesn’t mean that some games won’t gain quite a few extra frames per second. We might find out more if I were a proper benchmarking guy doing science.

Which processor upgrade? The Ryzen 5600, 5600X, or 5700X?

I clicked on a lot of results on Geekbench before ordering my CPU. There are tons of results for my ASUS B350-Plus motherboard. I didn’t think it was a good value for me, but I was impressed with how well the Ryzen 5800X3D does on a B350-Plus board. That gigantic cache really makes up for having slower memory! Is 25% more multicore performance worth 72% more money? Maybe for someone, but not for me.

I am certain that I would have been pleased with the upgrade if I bought a Ryzen 5600 for $140. That one even comes with a decent CPU cooler that you could sell for $10.

AI Generated Ryzen CPU

The Ryzen 5600X is only clocked 4.5% higher than the 5600. Is that worth paying 12% and not getting an extra CPU cooler?

None of the games I am running are making use of all eight cores. Six would be fine. In fact, six faster cores might even be better. Is it worth paying 19% more for a 5700X to get a 7% bump in Geekbench multicore score?

The increase in single-core performance when upgrading from any 1000-series or 2000-series Ryzen processor to any of these processors is going to be amazing. The increase in performance between the 5600 and 5700X is quite small.

If I could make the choice over again, I would go with the 5600X. I have a lot of confidence that the 5600 would be enough, but I still have a small fear that I need that extra 4.5% single-core performance of the 5600X or 5700X for Team Fortress 2, and that is easily worth $16 or even $47 to me!

Conclusion

I don’t want to keep talking about processor upgrades, and I feel like that previous section was a pretty good conclusion. As far as I am concerned, this upgrade is a no-brainer. If you can afford the $140, just go do it. It is an excellent value, and it puts you in a good spot. A full Ryzen 7600 build will only be about 20% faster.

I think this would still be a good upgrade if you have something more modern like a Ryzen 3600, but then it is no longer a no-brainer. You’ll already be on a newer motherboard with faster RAM, though, so it is definitely possible that you’ll eke a little more performance out of the same chip. If that is the case, then it might even be a better value for you, but I am just not at all certain!

It Is My Network Cupboard Now!

| Comments

It was about eleven years ago when I helped my friend Brian Moses run Ethernet to every room in his house. Once he decided that the router and switches would live in an actual cupboard in his laundry room, Brian and I ran all but one of the cables to the laundry room ourselves.

Getting the first string over the vaulted ceiling in the attic to help pull most of the actual cables probably took one entire evening. The roof just isn’t tall enough to allow for much arc on a throw, and the longer the string gets, the more drag you get. Today it would take us two minutes to fly an FPV drone across the attic towing a string.

How did I end up with Brian Moses’s network cupboard?!

We were sitting in Brian’s kitchen one evening about five years ago, and I remember him jabbering about being interested in moving into a bigger house. He was complaining about how much work it would be getting things ready to be listed, and clearing out of the house whenever a potential buyer wanted to see the house.

My Network Cupboard

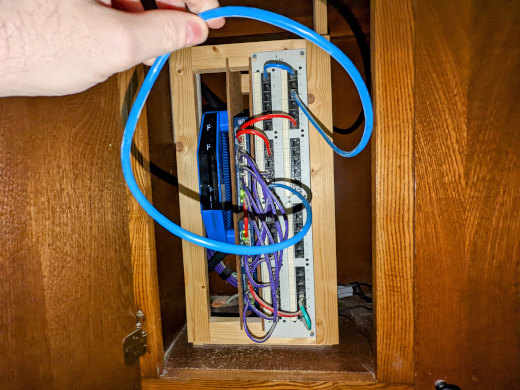
I figured out what this long ass cable is! It is bypassing the extra layer of switches there and connecting my office to the switch ports on the router. Maybe I should color code that and make a correct length cable!

I am pretty sure I said, “It sounds like everything would be easier if I just bought the house.” I didn’t have to go see all sorts of random houses. I didn’t have to put in any bids. I didn’t have to worry about what sort maintenance the previous owner had done. Best of all, I knew the quality of the workmanship that went into running cable to every room in the house.

Why did I wait five years to write an update on how the network cupboard is doing?!

I didn’t do much to the network cupboard when we moved in other than swap in my own router, and that doofy tube-shaped router of mine made the cupboard a mess! It didn’t even come close to fitting where the router is supposed to go, so I just had it dangling by a couple of patch cables back there, and the door to the cupboard wouldn’t even close!

Doofy D-Link DIR-860L

NOTE: The old D-Link DIR-860L running OpenWRT has a crack and some scratches!

My network cupboard just wasn’t photogenic for a long time.

What is in my network cupboard?

The heart of my network cupboard is a custom 17” rack that Brian and I built. The frame is made out of simple 1x2 lumber that is held together with half-lap joints and screws. The rack is rotated ninety degrees from the usual orientation so that it fits in the cupboard. It is hinged on the left and has a magnetic latch on the right, so it is easy to open things up to get to the back of the patch panel.

What is in the rack?

  • a used 48-port patch panel from eBay
  • two 8-port unmanaged gigabit Ethernet switches
  • a Linksys WRT3200ACM running the latest OpenWRT

What else is in the cupboard?

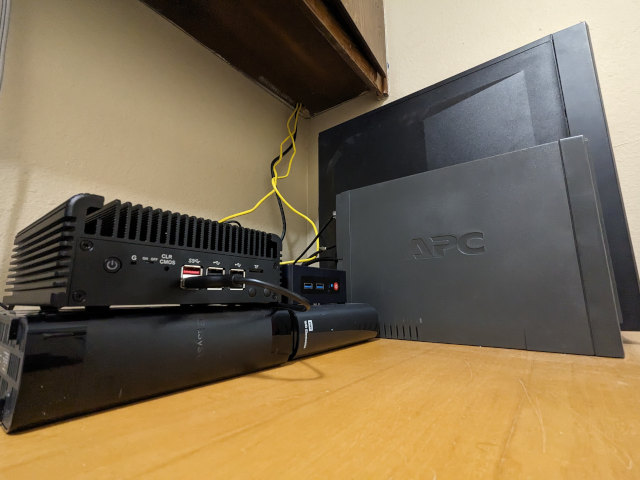
I had all of this connected to a CloudFree smart outlet for a few weeks, and I learned that the power usage is quite steady. The network gear and any extra overhead from the UPS uses precisely 0.45 kWh each day, which works out to an average of 18.75 watts. This tiny UPS doesn’t have any monitoring capabilities, but it should keep my network running for quite a few hours.

There are a pair of pegboard shelves slotted into the wood rack. The gigabit Ethernet switches are mounted to one shelf. It has been a decade since we put them in place, but I am fairly certain that those switches have keyhole slots for screws in the bottom. We used those slots to correctly mount the switches to the pegboard.

I was about to tell you that the Linksys router doesn’t have keyhole slots on the bottom, so I wound up running some zip ties through the pegboard to secure the router in place. That last part is true, but I just asked Google to show me pictures of the underside of the Linksys router. It does have keyhole slots on each of the feet. I just didn’t remember to use them!

What isn’t in my network cupboard?

The Frontier FiOS ONT is on the opposite side of the house. It gets power from a closet in one of our bedrooms. The FiOS gear is plugged into an identical UPS, and it uses a lot less power than the gear in the cupboard, so it should last even longer when the power goes out.

There are also two additional access points in the house, both of which are running OpenWRT. These two access points and the Linksys router in the network cupboard all in the same 802.11r roaming group.

AI Network Guy

I have an ancient D-Link DIR-860L, a.k.a. one of the tube routers, in my office. This access point runs a virtual serial port to connect my Prusa MK3S 3D printer to my Octoprint virtual machine on the other side of the house. The D-Link and Prusa share a UPS. There are also two cheap gigabit switches on opposite sides of my office.

A TP-Link Archer A7 is near the center of the house. This access point is really enough to cover the entire house, but I needed a router in the network cupboard, and I needed an OpenWRT device next to my 3D printer. Those two OpenWRT routers are at the far ends of the house. If I have to have them there, then I may as well use them to provide better WiFi coverage, right?!

The TP-Link in the living room is the only network device in the house with no UPS. Maybe that is worth correcting!

My homelab server now lives under my network cupboard

My homelab server and its NAS virtual machine used to be connected to my workstation using a 40-gigabit Infiniband network. That has required me to keep the two machines within about six feet of each other unless I want to install fiber in my walls. This is a bummer, because I have been using my office as a video studio, so I have been trying to cut down on noise.

I bought a few hard drives, set up some lvmcache, and made sure all my data was syncing in the background so I could eliminate the need for a lightning-fast network connection. Then I pulled the Infiniband cards, stuck a rolling media cart under my network cupboard, and hauled the homelab server across the house.

The server looked lonely out there, so I brought in a couple of ancient computers from the garage to fill up the cart. They aren’t plugged in. They are just taking up space.

This cart used to hold Brian Moses’s DIY NAS and his 3D printer. It was the home of my 3D printer for a few years. Now it lives in the laundry room under my network cupboard.

I figured the cart was a good idea. This way my homelab server won’t drown if there is ever a washing machine calamity! This is also approximately where Brian’s homebrew-beer Keezer used to live.

Is a room with so much water the best place for my gear?

I am sure we can all agree that water is bad, but I think the laundry room is the best spot in this house for my homelab server to live.

It is tucked in over by the garage. The room is big enough to walk around in, but not so big that anyone would ever want to spend some time there. The laundry room has its own door, and it is far enough away that no one will ever have to hear the hum of the fans and hard disks. There is also quite a bit of wasted floor space in there.

I have backups of everything. Rebuilding and restoring the server will be the least of my concerns if we spring a major leak in there.

That said, I certainly don’t expect to have some sort of localized flooding in the laundry room that manages to drench a server that is 30” above the ground.

What is next for my network cupboard?

For the moment I am in pretty good shape here! I can upgrade our FiOS Internet service to symmetric gigabit with a phone call, and I tested the Linksys WRT3200ACM to make sure it could route that fast before I even installed it.

I am more than a little tempted to upgrade some of my home network to 2.5 gigabit Ethernet. Switches have gotten down to around $20 per port, and 2.5 gigabit PCIe and USB network adapters can be had for less than $30 each. That would be an easy and reasonably priced upgrade!

I have done work over the past year or so to ween myself off of my requirement for a stupidly fast network. I have been saying that I would like to be able to be able to work with all my data without any slowdowns as long as my devices are connected with a 100 megabit per second connection.

Should you be doing the same thing in 2023?

I imagine that at least half of this question is really whether or not you should wire a house for data in 2023. The answer to that is most definitely no.

WiFi 5 and WiFi 6 are both fantastic. Our televisions are all on WiFi, and the streaming services only use a fraction of our WiFi bandwidth. My laptop can manage something near half a gigabit from any table or couch in the house. Our WiFi is doing a fantastic job. It helps that we live in a house. Every apartment complex I have lived in has been overflowing with WiFi networks, and that causes all sorts of bandwidth reductions and dropped packets.

1
2
3
4
5
6
7
8
pat@zaphod:~$ ping 10.42.254.1                                               2 
PING 10.42.254.1 (10.42.254.1) 56(84) bytes of data.
64 bytes from 10.42.254.1: icmp_seq=1 ttl=64 time=0.261 ms
64 bytes from 10.42.254.1: icmp_seq=2 ttl=64 time=0.277 ms
64 bytes from 10.42.254.1: icmp_seq=3 ttl=64 time=0.254 ms
64 bytes from 10.42.254.1: icmp_seq=4 ttl=64 time=0.259 ms
64 bytes from 10.42.254.1: icmp_seq=5 ttl=64 time=0.254 ms
64 bytes from 10.42.254.1: icmp_seq=6 ttl=64 time=0.262 ms

Even in our house, we still need at least a few cables. Our WiFi worked just fine when we only had one access point in the middle of the house, but we needed a cable in the wall to get the access point to that location.

I also prefer to have wired connections at every desk. My wife works from home, so she should have a reliable, low latency connection at her desk. I have a handful of things with Ethernet ports in my office aside from my workstation.

I enjoy playing multiplayer video games. I appreciate that the connection from my gaming computer to my router only fluctuates by the smallest fraction of a millisecond. If I am going to miss a shot that causes me to lose, I want it to be my fault. I don’t want to miss because my WiFi latency decides to shoot up to 20 or 30 milliseconds at the exactly the wrong moment.

You might be able to avoid running wires!

Do you want a solid, reliable, low-latency connection at your desk? Just make sure you have your Internet provider install their gear near your desk. Then you can wire up everything at your desk, and use WiFi where the latency and reliability isn’t a problem.

Our offices are at extreme ends of the house. We needed to run cables through the walls no matter what.

How much would it cost to build a network cupboard?

The heart of my network cupboard is that DIY wood frame that we are using as a 19” rack and the 48-port patch panel. It isn’t something you can just buy, but two unskilled yahoos were able to turn a few dollars in 1x2 lumber into a network rack in an afternoon.

We didn’t need a 48 ports, but used 48-port patch panels are always nearly free on eBay. Just make sure you pick one that still has the jacks installed!

I bet you can buy the lumber, hinges, a fully loaded patch panel, and a 16-port gigabit Ethernet switch for a total of less than $100.

Why didn’t we use rack-mount switches?

Putting rack-mount switches into a 19” rack seems like the obvious choice, doesn’t it? Brian bought a pair of 8-port switches because they were cheaper, offered some redundancy, and they definitely didn’t have fans.

I am sure the past decade has changed things, but when we were shopping, all the used 19” rack-mount gigabit Ethernet switches had fans and used quite a bit more electricity. This was going to be closed in a wood cabinet, so hotter gear wasn’t going to be ideal.

If Brian bought a used rack-mount gigabit switch ten years ago, do you think the fans all still be spinning today?

Conclusion

I feel like I may have accidentally written two blogs in one. Writing anything about whether we need to wire an entire house for Ethernet in 2023 could probably be a blog of its own, but I am not so sure it would be an interesting one.

Brian and I built my network cupboard more than a decade ago. I remember some of our ideas, but that is long enough ago that I don’t know who came up with each part of the plan. I am definitely glad that we came up with a plan, because I am still enjoying our work today, and I will be continuing to make use of it for years to come!

Oh No! I Bought A GPU! The AMD RX 6700 XT

| Comments

This is hugely unexciting. I replaced my Nvidia GTX 970 with a lower end GPU that was launched two years ago. Isn’t that boring?

It is only in the last two or three years that I have really felt like I was limping along with my old GPU. I feel like AMD’s FSR and Proton-GE’s ability to enable it in nearly any game was what let me get by for at least this last year.

Rootin' Tootin' Cowboy Shootin'

I hit my first game that wouldn’t run properly just a few months ago. DEATHLOOP was included in Humble Choice, and after finishing Prey, I was excited about trying DEATHLOOP. My 4 gigabytes of VRAM just wasn’t enough, and the game was barely able to manage 15 frames per second.

Everybody says AMD GPUs are fantastic on Linux

I don’t believe them. The last time I used an AMD GPU was shortly after AMD had acquired ATI. I had an ATI X1400 in Dell laptop running Linux. AMD’s proprietary Linux drivers were atrocious, but they promised things would get better. They didn’t get better in the years that I owned that laptop. Every computer I have owned since has had an Nvidia GPU, except for my current 2-in-1 laptop with integrated graphics.

I am running Ubuntu 22.04 LTS. If I swap my GTX 970 for an RTX 4090, everything will just work using the drivers I am already using that were installed via apt. I wouldn’t have to make any configuration changes.

If I bought an AMD 7900 XT, and that is what I very nearly did, this wouldn’t be the case. The kernel that ships with Ubuntu 22.04 is too old, and I believe I would also need all sorts of newer libraries that just don’t ship with the current Ubuntu LTS.

It is fantastic that we can run AMD cards with open source drivers and libraries. It is a huge bummer that the support is interwoven so tightly into the Linux distribution.

What has been stopping me from upgrading?!

I am sure are aware of how expensive video cards have been over the last several years. I wanted to upgrade two years ago, but I just couldn’t stomach paying $1,000 for a GPU that is only twice as fast as the GPU I bought at its launch in 2014.

GPU prices have dropped a lot, but I had another problem. My old and still surprisingly nice QNIX QX2710 monitors require dual-link DVI connections. You just can’t buy a modern video card with a DVI port. That’s another expense, and it is a bummer that the upgrade I wound up making was more sideways that it was upwards.

I was hoping that the prices on 38” ultrawide 3840x1600 monitors would drop more before I needed to upgrade. They didn’t, so I wound up buying a Gigabyte G34WQC 34” ultrawide 3440x1440 monitor.

I figured I would get the monitor upgrade out of the way first. Then I could wait a few months to see what happens. Maybe there would be an AMD 7800 XT available by then that would be a better fit for me. That didn’t work out. I made it five days before ordering a new GPU.

How did I land on the AMD 6700 XT?

I really did have my heart set on the AMD 7900 XT. I have more than a slight concern that I would have trouble fitting that card in my case, and I wasn’t excited about jumping off the Ubuntu LTS train onto the other train where I would be dealing with an operating system upgrade every six months.

NOTE: This shouldn’t have been a big concern. There is a PPA with nightly builds of Mesa 23. I have been trying it out with my 6700 XT, and the updated drivers nearly doubled frame rates in Control with ray tracing enabled.

Not only that, but it doesn’t sound like full support for the 7900 XT exists anywhere on Linux. It seems that there is no overclocking support, and we don’t have hardware AV1 encoding yet. I bet Ubuntu will be six months behind everyone else on that front.

Severed Steel

There were some good deals this week on both 6800 XT and 6900 XT cards. I want to say they were at $580 and $650 respectively. Both have 16 GB of VRAM, and the price increase was close to proportional with the increase in performance. Either sounded like a good value, but I was definitely planning on going with the 6900 XT.

So how did I wind up with the 6700 XT? The 6700 XT was $520 when I started shopping. It made no sense to buy such a slow card with only 12 GB of VRAM while only saving $50. That would have been terrible.

Then a 6700 XT went on sale for $370. That easily made it competitive on the price-to-performance graph. Then I saw that the 6700 XT is about 1.5” shorter than the 6900 XT. That was enough to get me to place my order immediately.

I saved money. The RX 6700 XT should be more than enough GPU for my needs. I won’t have to upgrade my Linux distro every six month. Best of all, I won’t have to hope the card fits in my case without the eight 3.5” hard drive bays getting in the way. Less money and less work seemed smart to me!

Will the RX 6700 XT really be enough GPU for me?

I sure hope so! I decided last year that my minimum viable upgrade would be an Nvidia RTX 3070. I made that decision when an RTX 3070 would cost something like $1,200. They’re down to $550 or so today.

The 6700 XT is comparable enough. The 6700 XT does better in some games, while the RTX 3070 does better in others. The 6700 XT does support ray tracing, but AMD cards always do a lot worse with ray tracing enabled. Even so, the 6700 XT cost nearly $200 less, so it seems like a good value.

I don’t expect that the 6700 XT will keep me going for eight years like the GTX 970 did. If it keeps me going until I can get a 7900 XT on sale for $600 or so, then I will be really pleased.

Things were a mess during the first few hours with the 6700 XT!

I swapped in my new 850-watt power supply, removed my GTX 970, and installed my MSI RX 6700 XT. I just turned on the computer, opened Steam, and fired up Borderlands 3. I had working drivers, variable refresh rate Freesync was working, and the game was running so well. I wound up turning the knob up to Badass, which is one click above Ultra, and I set FSR at 75% resolution for my 3440x1440 monitor. I wandered around, and my frame rates were usually between 80 and 100. Running the benchmark landed at about 77 frames per second.

Then I fired up Davinci Resolve, and learned that I had no OpenCL support. Don’t do what I did. I followed the advice of using AMD’s own amdgpu-install to install their graphics, ROCm, and OpenCL drivers. That got Resolve working, but it was really slow. It also obliterated my frame rates in the games I had already tested.

AI Image

I ran amdgpu-uninstall to clear out all the damage I had done. Once I verified that gaming was fast again, I followed this advice and ran apt install rocm-opencl-runtime. You do have to need the amdgpu-install Debian package installed for this to work. It will install AMD’s OpenCL libraries alongside your existing open-source drivers.

I also need OBS Studio for my workflow. I was surprised that it offered AV1 as an option for encoding with the GPU. I tried it, and it left me with a zero-byte file. Then I tried h.264, and that worked great. That is all I need!

Davinci Resolve on Linux is missing features without CUDA

I messed around a bit in an old project to make sure Resolve will still be able to get the job done. I set up a Magic Mask to cut myself out of a short clip, and that seemed to work well. Scrubbing around the timeline seems fine.

The trouble came in when I decided to export a video. My own 2160p YouTube settings use h.265 at something like 120 megabits per second. The options for h.264 and h.265 are gone.

I am left with an extremely simplified option labeled MPEG4. I can’t specify a bitrate. I can only chose between good, better, or best quality.

I don’t know exactly what I will do next time I have to upload to YouTube. I am expecting to have to use DNxHR.

Was AMD a good choice?

I can’t say for certain. The AMD 6700 XT has only been in my computer for one full day. As far as gaming goes, I will definitely say it was a good value. As long as you aren’t using ray tracing, and we will talk about that very soon, the 6700 XT is a bit faster and has more VRAM than an RTX 3070. Even better, you can get a 6900 XT with 16 GB of VRAM for not much more than the price of that RTX 3070 with only 8 GB of VRAM.

Stable Diffusion Dude

All the AMD cards fall behind when it comes to ray tracing. The 7900 XTX costs less than an RTX 4080, and the 7900 XTX performance sits somewhere between the RTX 4080 and RTX 4090. Until you turn ray tracing on. That’s when the AMD cards fall way behind.

I will play some games, try out the bleeding-edge Mesa libraries, and then report back on how things are going!

Ray tracing with an RX 6700 on Linux

I wanted to play Control with ray tracing. With the open-source driver, the option isn’t available. During the short time when I ran AMD’s driver using amdgpu-install, I was able to turn on ray tracing in Control, but the game was super slow and jittery. It didn’t matter if ray tracing was turned on. That driver was just terrible.

Control Ultimate Edition Ray Tracing

I also wanted to play Severed Steel with ray tracing enabled. You don’t turn ray tracing on in the game. It either launches with DX12, DX12 with ray tracing, or DX11. At first I couldn’t tell the difference. There are a lot of environmental reflections baked into the reflective floors, walls, and ceilings.

Once I figured out the difference, it was easy to see that ray tracing was working just fine. First I noticed the sniper’s laser scopes were reflecting on the ceiling and floor. Then I noticed the streaks of glowing bullets flying through the air were being reflected everywhere.

I also tried turning ray tracing on in DEATHLOOP. It was not an option.

I am a little disappointed here, but I don’t feel let down. I didn’t expect to be able to use ray tracing in many games with the $370 GPU that I chose. Ray tracing works in Severed Steel, and the fact that it works in other games with AMD’s driver bodes well for the future.

NOTE: To enable ray tracing with Ubuntu’s Mesa libraries you have to add RADV_PERFTEST=rt to your game’s startup options. It might look like this in Steam:

1
RADV_PERFTEST='rt,gpl' %command%

This upgrade was inspired by DEATHLOOP

DEATHLOOP ran like a slideshow on my GTX 970, so I didn’t get to play it. I finished the first mission last night, and it was buttery smooth. I don’t know if it is a good game yet, but I look forward to finding out this week!

I turned almost everything up to the max, but I enabled some of the FSR-related settings to get some extra performance. The game looks fantastic, and it is usually staying above 100 frames per second.

UPDATE: DEATHLOOP does not run great. As soon as I got to the town, my FPS dropped below 60. Even turning the settings down rather low and setting a much lower resolution drops me into the 60-FPS range all the time. I asked Google about this, and I found a bunch of people on Reddit wondering why they can’t stay above 60 FPS with their Ryzen 5950X and Nvidia RTX 3090 machines.

Conclusion

I think I made a good choice, but I think the 7900 XT would have also been great. I am already enjoying buttery, smooth games with nearly maxed out settings. I expect I would be underutilizing a 7900 XT for at least a couple of years.

FidelityFX Super Resolution (FSR) got me a few extra years out of my GTX 970, and I think I am going to continue to rely on it with the 6700 XT. There just isn’t quite enough grunt here to get to 144 frames per second with Ultra or Badass settings at 3440x1440, and I think that is alright.

I was hopeful that my GPU upgrade would get me to 100 Hz or 144 Hz in most games with the settings maxed out without having to enable FSR. I was also expecting to pay more than $1,000 for that upgrade, though, so I can’t complain about reaching that goal with a light sprinkling of FSR enabled.

The Topton N6005/N5105 and Jonsbo N1 Are An Awesome DIY NAS Combination!

| Comments

Am I trying to win Brian Moses’s DIY NAS 2023 giveaway?!

Brian Moses DIY NAS 2023 Edition

Have you seen this thing? It looks both amazing and adorable, and it packs so much hardware into quite a tiny, power-sipping package. I exiled my homelab server to a shelf under my network cupboard on the opposite side of the house. If I had Brian’s new build, I would definitely need to make room to show it off somewhere in my home office!

If I win the DIY NAS: 2023 Edition, what would I do with it? What sort of problems would it solve for me?

Well, duh, Brian! I would do everything I am doing today, but I would do it better and faster while using less power and generating more heat!

What do I have running on my homelab server today?

I still call that first VM a NAS. I don’t actually run Samba or NFS on there anymore, but I just don’t have a better name. It runs a Seafile client to pull down an additional copy of all my data from my Seafile server at Brian Moses’s house. That extra copy is stored on an encrypted btrfs partition that takes automatic hourly, daily, weekly, and monthly snapshots.

We are generating well over a terabyte of video footage every year, and I am starting to run out of space!

What is wrong with my old homelab server?

I want to say that nothing is wrong with my old homelab server. It is doing a fine job, but it is getting quite old. I only have two mechanical hard disks connected to my server, and it still idles at more than 70 watts. That old FX-8350 is a real pig of a CPU.

DIY NAS Cartoon

In most ways, that old FX-8350 is faster than the Celeron N5105 in Brian’s new NAS build. They benchmark about the same when it comes to single-core performance, but my FX-8350 has twice as many cores, so it pulls way ahead when fully loaded. The problem is that my homelab starts pulling more than 250 watts of electricity at the power outlet when it is under full load.

That awesome new Celeron has a TDP of 15 watts. It isn’t going to be heating up the room when it is thinking really hard.

Those 2.5 gigabit Ethernet ports are awesome

I pass almost all my personal data through my Tailscale network now. That means everything I move around is encrypted, which also means that I eat a lot of CPU cycles encrypting and decrypting data. My FX-8350 tops out at around 900 megabits per second when passing data through Tailscale’s encryption.

The N5105 in Brian’s DIY NAS build for 2023 has much more modern AES instructions, and it easily beats my FX-8350. I believe the N5105 can manage nearly 1.3 gigabits per second when pushing data through Tailscale.

That is fast enough to need more than my homelab server’ss gigabit Ethernet port. Do you know what the best part is? My FX-8350 has to pull more than 200 watts from the power outlet to push 900 megabits per second through Tailscale. I bet Brian’s N5105 doesn’t even make the room warmer.

Those 2.5 gigabit Ethernet ports will cost me a lot of money!

I don’t have any 2.5 gigabit Ethernet gear in my house, but the prices are getting really competitive!

I would have to spend $30 putting a 2.5 gigabit Ethernet PCIe card in my workstation. I would need to spend $110 to add a 5-port 2.5 gigabit Ethernet switch to my office. Then I would need to buy a second switch to put in my network cupboard.

Winning Brian’s giveaway will cost me at least $250 in network gear!

Why you should want to win Brian’s DIY NAS 2023 giveaway!

This year’s NAS build is delightful. I have seen it. I have held it in my hands. I am envious of whoever manages to win this year.

That Jonsbo N1 Mini-ITX case is diminutive, looks awesome, and is packed as full as it can be with hard drives and other components. You can’t fit much else in there, and it would look absolutely amazing in my office.

Excited to win the DIY NAS

I have already written about how excited I am about the Toptop N5105 motherboard. Topton has packed so many amazing features into such a tiny package. That power-sipping Celeron packs a lot of punch for 15 watts. It has six SATA ports and a pair of M.2 NVMe slots, so you can pack in a ton of storage. I am probably most surprised by the FOUR 2.5 gigabit Ethernet ports. I am impressed that you can get so much from such a tiny motherboard for under $300.

It is an amazing, power-sipping, compact NAS build this year.

Conclusion

It doesn’t specifically state in the rules of the giveaway that I am not allowed to win the giveaway. It says right there in the rules that ANYBODY can win. I count as an anybody, don’t I?!

I didn’t discover the Topton N5105 motherboard or the Jonsbo N1 case, but I definitely encouraged Brian to build this year’s DIY NAS around these components. I know that Brian would agree with me that it wouldn’t be fair for me to win the NAS. He doesn’t even have to feel bad about it, because I am doing my best these days to own and operate less server gear and fewer hard disks. I would have to have to buy a stack of disks that I don’t need to fill the Jonsbo N1 to the brim!

I hope my entry into the contest encourages you to enter as well. This year’s DIY NAS build is quite badass, and I think anyone would be proud to display it among their homelab gear!

https://www.ebay.com/str/briancmosesdotcom/ “Topton N5105 NAS Motherboard on eBay”

My New Monitor: The Gigabyte G34WQC A Ultrawide

| Comments

I have been avoiding a monitor upgrade for as long as I could. I have been running a pair of QNIX QX2710 monitors at my desk for nearly a decade. These have served me well, and were a tremendous value. I have had these IPS panels overclocked to 102 Hz almost the entire time, and I only paid $325 for each monitor in 2013. At the time I bought them, you couldn’t get a name brand 27” 2560x1440 monitor for less than $900.

The QNIX monitors weren’t perfect. Their color reproduction didn’t look all that far off from my new Gigabyte monitor in sRGB mode, but there was more than a bit of backlight bleed around the edges. I knew it was there, but it wasn’t so bad that I couldn’t live with it.

Placeholder Photo

NOTE: This photo needs to be replaced. I am rearranging video lights, camera mounts, computers, and monitors all around my office. Everything is a mess right now. If I knew I was going to use this photo in the blog, I would have turned on more lights and used a better camera!

I am staring at my new monitor while writing this, and I can say for sure that the old monitors looked just fine. Upgrades are always fun, and swapping in this nice new Gigabyte monitor has been an enjoyable experience, but this is kind of a sideways move for me. Going from two 2560x1440 monitors to a single 3440x1440 is both an upgrade and a downgrade.

There is a very specific problem with the QNIX monitors that has been holding me back. They only have a single dual-link DVI port on the back. My Nvidia GTX 970 was probably one of the last few GPUs to sport a pair of DVI ports.

Active DisplayPort to dual-link DVI adapters can be a bit janky. Some are really inexpensive, but a pair of good adapters that might actually work might cost me $50 or $60. That’s almost 20% of the cost of a new monitor.

I am in need of a GPU upgrade, so upgrading my monitor first made a lot of sense.

Are we already too far in for a tl;dr?!

I am quite happy with my purchase. I believe the Gigabyte G34WQC is the best 34” ultrawide monitor you can buy for under $400.

The G34WQC has excellent dynamic range, low latency and a rather fast 144 Hz refresh rate for gaming, FreeSync Premium support, and quite good sRGB color accuracy.

This is definitely the best monitor for me. You can keep reading if you want to find out why!

Why didn’t I buy a 38” 3840x1600 monitor?

I have been drooling over these monitors ever since the first one was announced. These would be a proper upgrade for me!

I should probably say here that my old 27” 2560x1440 monitors, 34” ultrawide 3440x1440 monitors, and 38” ultrawide 3840x1600 monitors all have the same exact pixel density. They all have about 110 pixels per inch. The size of each of their pixels are precisely the same. The bigger monitors just have more of exactly the same thing.

There are only a few models of 38” ultrawide monitors on the market. They usually cost between $1,150 and $1,300, though you can sometimes find one for $999.99.

I would be willing to pay that much for a monitor. That is about what my old 20” Triniton monitor cost me if you adjust for inflation, and that monitor was both used and physically damaged!

All the 38” ultrawide monitors are premium products. You can find 34” ultrawide monitors from brands like Sceptre for under $300.

The premium you have to pay for the extra 4” is high, and I am hopeful that someone like Sceptre will add a 38” ultrawide monitor to their lineup in two or three years.

It seemed like a wise move to save $600 or more today. Do you think I made the right decision? Maybe I will be able to add a 38” monitor to my desk in a few years with that $600 that I saved!

Why the Gigabyte G34WQC A?

I can’t believe how much effort I put into shopping for a monitor. I figured that all of the 1440p ultrawide monitors under $400 would be full of compromises, and I assumed those compromises would be pretty equivalent.

At first I had my sights set on the AOC CU34G2X. It usually sells for $340 on Amazon, but it was priced up at $400 on the day I was shopping. I immediately added it to my wishlist, and I said I would shop around until the price dropped back to $340.

Tom’s Hardware has a great review of this monitor. They tested the latency, and it scored pretty well. They said its HDR support was basically phoned in. Overall, though, I was pleased with the test results at the $400 price point.

Then I noticed the AOC CU34G3S, and it was also priced at $400. It seems to be an update to the CU34G2X. They both have similar quality 34” 3440x1440 VA panels. The cheaper CU34G2X supports up to 144 Hz and has a curve of 1500R, while the newer CU34G3S goes up to 165 Hz and has a curve of 1000R.

This is when I stopped, blinked a few times, and said, “Oh, poop!” How much of a curve do I want? That tight 1000R curve sounded like too much curve!

I would gladly pay $400 for the 165 Hz monitor, especially since it means I could order it immediately and have it on my desk in two days. I was worried more than a little about that more extreme curve.

I clicked on a lot more monitors, but most of them didn’t have reviews that included latency testing like Tom’s Hardware. There was an Acer Nitro for $360 that looked good on paper, but I couldn’t find a single technical review.

Then I stumbled upon the Gigabyte G34WQC for $380. Tom’s Hardware has a really good review, and all the graphs in the review included the AOC monitors that I was already interested in.

The Gigabyte monitor can only reach 144 Hz, but it still manages to match the latency of the 165 Hz AOC monitor. The Gigabyte has higher maximum brightness, and it has really good dynamic range. Not as much dynamic range as an OLED monitor, but 34” 1440p OLED monitors cost four or five times as much.

All of that data was fantastic, but I was most excited that the Gigabyte G34WQC only has a curve of 1500R.

Is 1000R really too much curve?

I have no first-hand experience with a 1000R monitor. I hit up Google, used my protractor, and did some math. I believe I correctly calculated that my two monitors were set at an angle equivalent to around 650R.

Two flat monitors with an angle in between is probably not directly comparable to a continuous curve, but coming up with such an extreme number makes me think that 1000R wouldn’t be as extreme as I feared.

I feel like 1000R would be amazing for first-person shooters. I worried that it would be awkward when I have Emacs in the middle of the screen and some terminal windows off to either side.

I am staring at a 1500R monitor while writing this. It hasn’t even been on my desk for a full 24 hours, and it is already making me think I would have been perfectly happy if I bought a 1000R monitor.

I do feel that you need to have some amount of curve on a monitor this size. My friend Brian Moses has two desks in his office. Both have 34” ultrawide monitors. One has a curve, the other doesn’t. I bet you can guess which one he prefers sitting at.

Why did I settle for a VA monitor?

I was already using IPS monitors, so you might assume that a VA monitor would be a downgrade. My IPS monitors were made with LCD panels rejected by the folks at Dell or Apple. Those LCD panels came off the same assembly line as the very best LCD panels of the time, and they were intended to be used in the most expensive monitors. There was just something they didn’t like about these batches, so they ended up in cheap monitors.

That leads to the other point that this VA monitor has 10 years of technological and manufacturing improvements on my old IPS monitors.

Of course I did check the prices on 34” IPS monitors. There was one oddball down at $450, but I couldn’t find any reviews on that one. The majority of 34” IPS monitors were priced at $750 and above, so they cost twice as much as any of the VA monitors.

If I were going to spend more than $750, I would most definitely have waited for a sale on one of the premium 38” monitors. They are all very nice IPS monitors, and sometimes you can find one on sale for $1,000.

Can you believe I am only using one monitor?

I have had at least two monitors on my desk for a long, long time. I used to have two Riva TNT2 graphics cards installed in my dual-Celeron ABIT BP6 machine connected to a pair of 19” CRT SVGA monitors from Sam’s Club. I believe this would have been right around Y2K. Do you remember CRT monitors and Y2K?!

My old 27” monitors are just about as tall as they need to be. I tried mounting a third monitor above the other two once, and that was way too far to be leaning my neck back. It was uncomfortable even just looking at a small terminal window at the bottom of the screen. I know the 38” ultrawide monitors would be 160 pixels taller, but that’s really only 80 more on top and 80 more on bottom. That would still be reasonable.

The most important thing I learned from using a pair of 27” monitors is that I can really only see about one third of the second monitor without turning my head. I know that I will continue to miss some of that extra screen, but a 34” ultrawide is roughly one third wider than one of my old 27” monitors. That is pretty close to the perfect width.

I was a bit worried that a 38” ultrawide might be too wide. Especially when playing full-screen games. I am much less concerned about this after having the 34” ultrawide on my desk, and I should have figured that out with math. A 38” monitor is only 400 pixels wider than a 34” monitor. That is only 200 more pixels to the right and 200 more pixels to the left!

Don’t let me talk you out of spending three times as much on a 38” ultrawide! I would certainly be excited to have one on my desk.

Let’s get back to the Gigabyte W34WQC A!

I was trying to find a compromise that is good for gaming, good for productivity, and easy on my wallet. I think the Gigabyte was a good choice, and it ticked almost all the right boxes for me.

You already know I was shopping for something reasonably priced. All the monitors I was looking at were $400 or less.

Productivity would steer most people towards something with a much higher DPI. 32” widescreen 3840x2160 monitors are quite common. My wife has a very nice 32” Dell 4K IPS monitor on her desk. It looks great, and it is around 140 DPI.

I could write 2,000 words about why I would prefer to stick to the same DPI. The short answer is that Wayland isn’t ready for me, and X11 doesn’t support fractional scaling. Everything is easier for me if I stay at 110 DPI, and I don’t think there are any high-DPI ultrawide monitors.

The 34” ultrawide is working out well so far. I have my screen divided up into three equal columns. Firefox is on my left with the awesome PPI Calculator open. My Emacs window is in the middle with the font enlarged slightly, giving me a little over 90 columns. To my right are a pair of terminal windows that are about 125 columns wide.

Davinci Resolve Ultrawide

It should definitely be noted that Davinci Resolve is just a little more comfortable with an ultrawide display. You can comfortably fit two widescreen viewers, the inspector tab, and the media pool on the screen at the same time. I used to have to scroll my media pool from side to side to see timecodes and clip lengths. I won’t have to do that anymore!

I have been firing up older first-person shooters that I am confident will keep up with the Gigabyte’s 144 Hz refresh rate. I wandered around for a bit in Borderlands 2, I played through a level of Severed Steel, and I have also been just generally farting around in Just Cause 3.

I ran the UFO ghosting test, and the W34WQC definitely has some ghosting. If I were smart, I would have run the test on my old monitors before putting them in the closet!

I can most definitely tell that the Gigabyte monitor at 144 Hz feels smoother than my old QNIX monitors at 102 Hz. Part of that is certainly due to the extra 42 Hz, but I suspect both monitors have roughly the same number of frames of ghosting. That probably means that the Gigabyte VA panel’s ghost frames fade away more quickly.

I have no science to back that up. This is how I feel playing the same games with each monitor.

I do have some complaints!

Can I start the complaints with a bit of praise? The W34WQC stand is pretty nice. It feels solid, it can tilt, and the height is easily adjustable. I removed the stand as soon as I made sure my long DisplayPort cable could manage 144 Hz at native resolution, because I always use monitor arms. I was excited to see that the Gigabyte stand is attached using the VESA mounting screws. That means I can attach it to any other monitor. I may wind up using it on one of the old QNIX monitors, since I have no idea where the stock legs went to.

Zip Tied Power Cable Cheat

NOTE: Is snipping away ½” of strain relief and zip-tying a 90° bend in the cable cheating? Is it still cheating if it works?

My first complaint is the location of the ports. They all point downwards, and they are all rather close to the bottom. I had to search through my box of power cables to find the one with the smallest end, and I had to get creative with a zip tie to attach the power cable in such a way that it wasn’t hanging below the frame. Who wants to see cables dangling below their monitor?!

I need a long DisplayPort cable to reach my computer, so I am using my own. It has a fairly compact end, and I can still just barely see the cable from where I am sitting. I do have to duck my head down to see, but I shouldn’t be able to see it from my chair at all. The included DisplayPort cable has even longer ends than the one I am using.

The monitor is too vibrant with the default settings

Everything is rather bright, and the reds are crazy vibrant with the monitor set to the standard profile. Reds are bright. Browns look a bit orange. Everything is eye catching, but not in a good way.

I just set it to the sRGB profile, and I think it looks great. I did bump up the brightness a bit to fit better with the lighting in the room. I am assuming Gigabyte’s sRGB profile is calibrated fairly well. I am excited to learn that the color profile I have been using for years on my QNIX monitors wasn’t all that far off!

Conclusion

I believe I made a good decision, but I also don’t feel like there was a wrong choice to be made here. The Sceptre is probably a decent value at $300. Either of the AOC monitors seem fine both on the spec sheet and in the technical reviews on Tom’s Hardware. I don’t expect I would have regretted buying any of them, but I do think the Gigabyte was a better value for me.

I do have some regret that I didn’t splurge on a 38” ultrawide. For productivity work, like writing this blog, the 34” monitor just feels like a bigger monitor. Being 400 pixels wider would almost definitely make the 38” ultrawide feel much like two monitors without a bezel. Then I remember that I can nearly buy an AMD 7900 XT with the money I saved buy staying one size smaller.

What do you think? Did I make the right choice with the Gigabyte W43WQC A? Why does every monitor have a terrible name? Are you already using one of those 38” ultrawide monitors? Do you think I should have spent three times as much for those extra four inches? Let me know in the comments, or stop by the Butter, What?! Discord server to chat with me about it!