My journey into the world of quadcopters started in December when my friends participated in a quadcopter build weekend at TheLab.ms makerspace. I watched, and I helped them build 450mm drones, but I didn’t build my own quadcopter—I felt like I had too many other unfinished projects going on at the time.
My friend Brian must have gotten sick of me not participating, because he gave me a Spektrum DX6 transmitter for Christmas. I immediately ordered a Blade Nano QX micro drone to practice with, and I had it for less than a week before I started upgrading it. I was crashing a lot, and as soon as the frame started getting roughed up, I started designing a parametric brushed motor quadcopter frame.
I knew I didn’t want something as large as a 450mm drone, and being able to fly around inside the house has been a great way to practice. I wanted to build something small, fast, and nimble. Something I could fly around the house, but still take out to the park to fly with my friends. Something that could survive a crash.
The first drone I found in my research was the RS90 quadcopter at Thingiverse. It seems to fit all criteria: It is small, nimble, and durable. Then I discovered the DJ105 drone. It’s only a little bigger, uses bigger motors and propellers, and generates a lot more thrust than the RS90. It is also a simpler design—flat parts are easy to 3D-print!
The DJ105 requires low-profile motors and fancy, more costly 2.5” propellers from RotorX. This drives up the cost of the drone and limits your choice of parts. Scaling the quadcopter up to allow for taller motors and 3” props brings the cost down a little, and it opens up a wider selection of suitable motors and propellers.
- PH145 FPV Quadcopter at Thingiverse
- I Built a Quadcopter! at Brian’s Blog
tl;dr How did I do?
I managed to design a parametric quadcopter model. It can be easily scaled from 2.5” propellers and a 105mm wingspan all the way up to at least 5” propellers and a 230mm wingspan. I’m not sure how practical the sandwich-style design is at larger sizes, but I’d definitely like to try printing a frame that can accommodate 4” propellers!
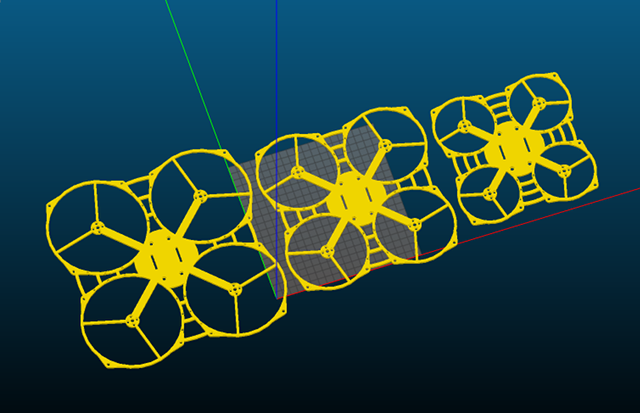
The PH145 drone weighs in at 234 grams with the camera, and its all-up-weight is 411 grams with my 1500mAh 4S LiPo battery. I don’t have the equipment to measure top speed and acceleration. All I can say is that it is fast! I enjoy punching the throttle for a couple seconds and watching it quickly ascend into the sky—it sounds like an angry swarm of bees!
My friend Alex has a rather fancy-looking FPV racing drone—a Blade Vortex 250 with 5” props, and he runs a 1300mAh 4S LiPo. His racing drone is much faster than the PH145. My 3” props are probably my biggest limiting factor. I have an 850mAh 4S LiPo en route, and that will give me a 20% weight reduction. I can hardly wait to see what that feels like with the smaller battery!
My Venom 850mAh 4S LiPo battery is amazing. It can keep my little drone in the air for nearly six minutes of spirited flying, and the weight reduction compared to the 1300mAh or 1500mAh 4S batteries makes the drone feel so much more nimble and quick! The 850mAh 4S is by far my favorite. As soon as I finished running the battery down for the first time, I ran inside and immediately ordered a four pack!
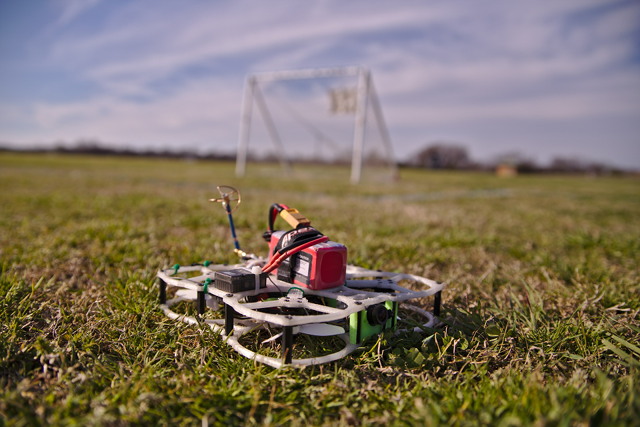
The PH145 frame is durable. I’ve managed to crack two of the prop guards on the original prototype frame. One crack is at the exact point of a design flaw in the model—I’ve since repaired it in OpenSCAD. The other break is near the center of a prop guard. I changed the model and made all the guards 50% thicker. It took high speed-crashes into asphalt to break the prototype frame. I won’t be surprised if the new nylon frame is effectively indestructible—only time will tell!
UPDATE: I finally crashed hard enough to break the nylon frame! It snapped right at two adjacent zip tie slots on the top frame. I knew these would be weak points, but I thought they were far enough inside the frame that it wouldn’t matter. I was wrong. The bottom also broke in the same area. It cracked at one of the thickest points right next to a screw. I assume this area was under more stress due to the two broken points directly above.
It still flies fine, so I’m not in a hurry to print a new frame. I’ve eliminated the zip tie slots, and I have made several other minor improvements to the model. I’m sure I’ll be printing a new frame in a few weeks.
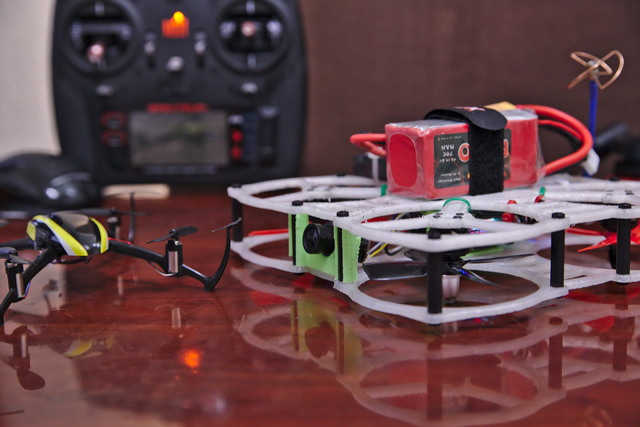
I’ve only been flying the newer, stronger frame for a couple of days. I don’t crash as often as I did even a week ago, but I’ve hit the ground pretty hard a couple of times. The new frame shows no signs of breaking yet, but I am popping the heads off nylon screws much more easily now, since there is less flex in the frame.
I completely missed one of my goals. I won’t be flying the PH145 indoors. It is heavy enough to do real damage to furniture, televisions, and our cats. It also generates way too much wind and noise! Other than that, I’m elated with how this design and build turned out!
The full parts list is near the bottom of this blog post.
UPDATE: I’ve learned how to read the blackbox flight recorder data. I need to do more science, but I’ve been scanning the logs. The PH145 manages 3.1g to 3.2g of acceleration on the Z-axis with the Gemfan 4-blade props. I need to order another set of RotorX RX3040 props to test!
- PH145 FPV Quadcopter at Thingiverse
- Blade Vortex 250 FPV Racing Drone at Amazon
Motors and props
I’m going to start by saying that I have no idea what I’m doing. This is the first drone I’ve ever built, so some of my assumptions may end up being wildly inaccurate. That said, the parts I chose are working well together.
Since I’m using 3” props, I need a motor that can spin fast. That means I need to use a motor with a high KV rating. I was hoping to use 2205 or 2206 brushless motors, but they’re only available at around 2300KV.
I decided to use the DYS BX1306 4000KV motors. They’re available everywhere and reasonably priced. My only complaint is the bullet shaped prop nuts. They’re long enough to extend past my frame. I’ve ordered a simple set of prop nuts, but they haven’t arrived yet. I’m still landing and taking off bullet-shaped motor nuts!
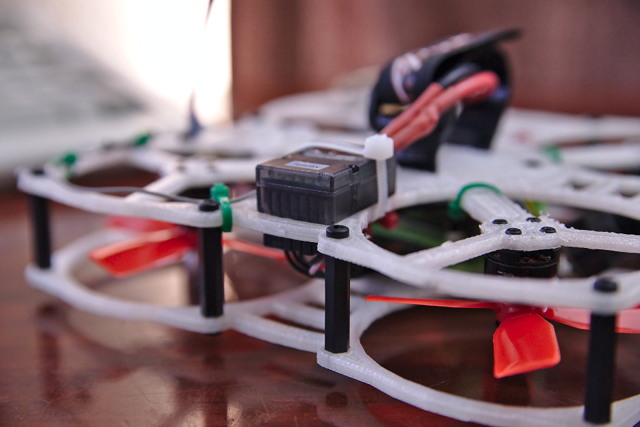
There are other 1306 4000KV motors available at Amazon, like the Crazepony EMAX RS1306 motors, and they ship with shorter nuts. I bet they’d work just as well.
So far, I’ve tried two-blade and four-blade 3030 bullnose props. The two-blade props have been a disappointment. They make the PH145 feel completely gutless when paired with either my 1500mAh or 1300mAh 4S batteries, and they didn’t even provide an increase in flight time. I plan to try some three-blade props. I’ve read some amazing things about the RotorX RX3030T props—I have a set on the way right now!
My set of RotorX RX3030T propellers have arrived, and they are amazing! I went outside to test them, and I was in the air for 9:45 with my 1500mAh 4S LiPo. That’s more time than I’ve ever been in the air on a single charge! While I was out there, I also tried one of my 1300mAh 3S LiPo batteries. It was in the air more than a full minute longer than I’ve ever seen from one of these 3S batteries.
The RX3030T props don’t just keep the PH145 in the air a little longer. They feel like they have at least as much thrust as the cheap 4-blade bullnose props, and they sound a lot quieter, too! As soon as I came back in the house, I ordered two more sets.
Forget all the other propellers. Just get the RotorX RX3040T props. They may cost twice as much, but they’re definitely worth it!
UPDATE: The RotorX RX3040T props perform better than any other prop I’ve tried, but I’ve broken a lot of them. I’ve been running a set of Gemfan 4-blade 3035 props for a couple of weeks. I like them nearly as much as the RotorX props, but the Gemfan props are much less fragile. I managed to break nearly two full sets of RotorX props in a week, but it has taken me two or three weeks to break my first Gemfan. I doubt they’re as sturdy as DAL props, but they’re also not as heavy!
- DYS BX1306 4000Kv motor set at Amazon
- RotorX RX3030T Props at Amazon
- Gemfan 4-blade 3035 Props at Amazon
Should I use a 4-in-1 ESC?
You can most definitely save a few dollars if you use four separate ESCs, but I like how easy it was to fit the 4-in-1 ESC unit into my design. It is the same size and uses the same mounting holes as the Naze32, and I didn’t have to figure out where to fit four separate boards. This alone is worth the extra cost of a 4-in-1 unit.
The 4-in-1 ESC board I’m using claims to have four 30-amp units on a single board, but I’m dubious of this claim. It is working just fine so far, though, so I can’t complain!
The biggest potential downside will be having to spend $60 to replace four ESCs if I ever fry one. It would be easier and cheaper to replace a single ESC. If I ever blow out an ESC, I will revisit this situation.
Naze32 and Cleanflight vs Betaflight
The Naze32 flight controller seemed like the way to go. They’re inexpensive, and they work quite well. I had no idea what I was doing, and ended up ordering an older revision 5 board. The revision 6 boards are available for about the same price, and it looks like they have a more convenient pin layout. The revision 5 board is working just fine, but don’t make my mistake—just buy a revision 6 board!
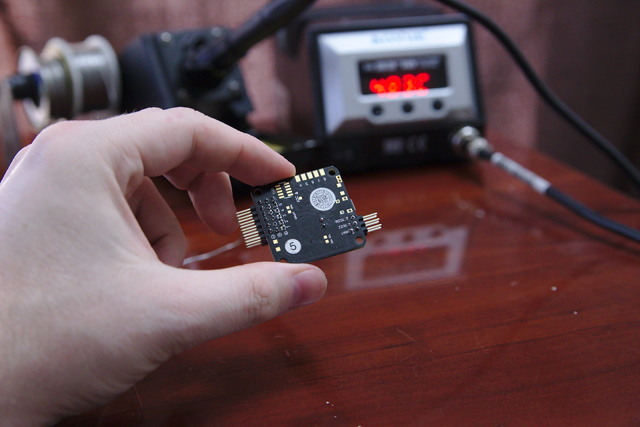
I ran the Cleanflight firmware for my first week of flying. Cleanflight had me up and running with a stable quadcopter, but the default PID settings were sluggish and unresponsive. I tweaked the PID settings over the course of a few days, but I never managed to get things feeling great.
Betaflight was much better out of the box—better than I ever managed to get out of Cleanflight. My advice is to skip Cleanflight.
3D-printing with Taulman 910 nylon filament
The Taulman 910 nylon is the most amazing filament I’ve ever printed with, but at the same time, it is one of the least friendly materials for 3D printing. The parts it produces are nothing short of amazing. They’re extremely flexible and amazingly sturdy.
Taulman 910 is so flexible that I was worried my drone wouldn’t be rigid enough, but once you screw the two pieces of the frame together with the nylon spacers, it becomes quite solid.
I say the Taulman 910 is unfriendly, but it is actually quite easy to print. It sticks just fine to a 40C heated glass bed with a coat of Elmer’s glue stick applied. The only problem is that it oozes like crazy. I had to scale up all my screw holes, and there’s always a ton of nylon whiskers to clean up after the print.
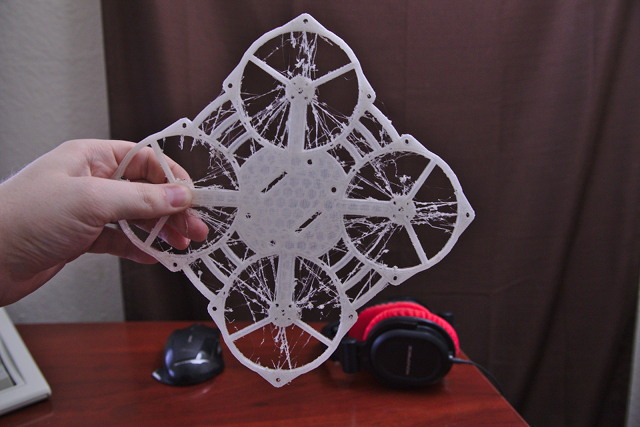
You can print Taulman 910 at temperatures as low as 260C, but you get better layer adhesion at 275C. The higher temperatures don’t help with the ooze.
In the end, it is worth the trouble. A drone frame 3D-printed with Taulman 910 filament can take a beating, and it just bounces back for more!
FPV camera and goggles
I know so little about FPV cameras and goggles. The first thing I did was add just about the cheapest FPV camera, transmitter, and goggles to my Amazon cart. Then I thought it would be nice to have an on-screen display with battery information, so I removed the camera and goggles from my cart and started shopping for fancier stuff.
I quickly realized that I had no idea how any of this stuff worked, so I added the cheapest goggles and camera I could find back into my cart. I’m using an Eachine 700TVL camera and transmitter combo along with Eachine EV800 goggles. They work just fine, but I’m terrible at flying FPV so far. I’m going to need lots of practice!
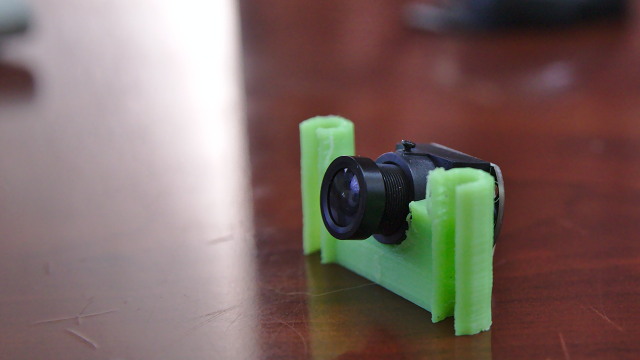
The camera, transmitter, and goggles are less expensive than I would have guessed. Everything I needed to start flying FPV only cost me an extra $110 or so. For some reason, I thought it would cost a lot more!
The Eachine camera is available with 110- and 170-degree lenses. I opted for the 110-degree lens, because that is close enough to what I use in first-person-shooter games. It still has enough of a fish-eye effect to be disorienting to me, but I think I’ll be able to learn to adjust.
There is one caveat when using this Eachine camera and transmitter. It comes with a connector that plugs into a 3S LiPo battery’s balance plug. That won’t work with my 4S batteries, so I cut that connector off and wired it directly into the 5-volt BEC. I prefer this solution anyway, because it leaves me with fewer cables to plug in when I attach a battery.
The camera, transmitter, and antenna added about 30 grams to my drone. Flight times with my 1300mAh and 1500mAh 4S batteries each dropped by about 30 seconds when I mounted these parts to the drone. The camera’s power consumption is quite low, so I’m attributing the lower flight times more to the 8% increase in weight.
I already modified my Eachine EV800 goggles to add an inexpensive little DVR device! I added an Eachine ProDVR. I included my first test recording a little ways above this paragraph. It is some gentle flying right outside my apartment—I didn’t want to scare the neighbors too much!
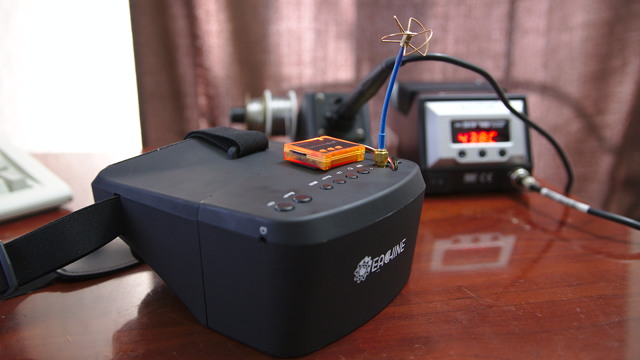
Adding the DVR definitely isn’t a plug-and-play operation, but if you’ve ever used a soldering iron, it should be a piece of cake for you. You only have to solder three wires to a set of rather large pads. I was already reassembling the goggles in less than five minutes.
You can solder a few more wires and add a switch if you’d like to have access to the DVR’s on-screen display, but I didn’t bother with that. I just plugged the DVR into the AV input to format the microSD card and configure the device. I don’t expect to ever use the OSD again.
Choosing a battery
When I ordered the parts to build the first PH145 quadcopter, I ordered a CrazePony 1300mAh graphene 4S LiPo battery. It was good for about 8 or 9 minutes of gentle but spirited flight time. I was happy with the performance, so I ordered a pair of cheaper 1500mAh 4S LiPo batteries. They’re working quite well, too. They’re a bit heavier, but they cost less and provide more flight time.
I’m currently waiting for a Venom 50C 850mAh 4S LiPo battery to arrive. There’s also a 75C version of the Venom 850mAh battery, but I don’t think my drone can consume power that quickly! I have a feeling that this will be the optimal battery for the PH145. The lighter weight should make the PH145 accelerate better, and I’m hoping for flight times near 6 minutes. I’ll update this post as soon as the new battery arrives!
I have tried a handful of 3S LiPo batteries. I borrowed a 2200mAh 3S battery from my friend Brian. He uses it to power his 450mm drone with 10” props. I also bought four used 1300mAh 3S batteries from another friend.
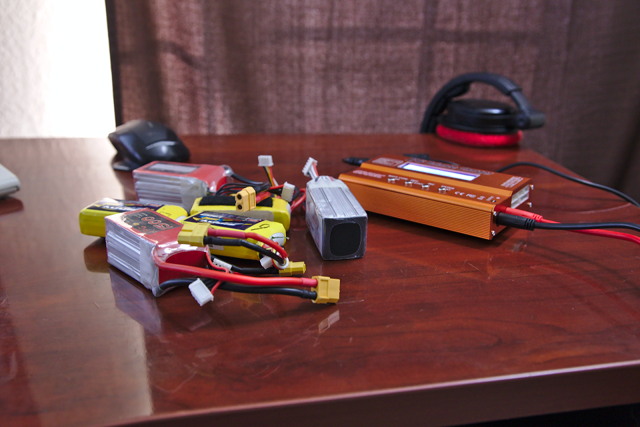
The 2200 mAh 3S battery works, but it is a little too heavy—it weighs more than either of my 4S batteries!. It flies for about 9 minutes, and it is much easier for my inexperienced hands to control compared to the 4S batteries.
The 1300 mAh 3S batteries are great—especially with the two-blade props. The weight savings compared to the 2200mAh battery makes a difference you can easily feel.
The 1500mAh 4S batteries are my favorite so far, but I’m using the 1300mAh 3S batteries every time I fly FPV—the PH145 is just too fast and responsive for me to control in FPV with the 4S batteries!
If you’re new to flying, you should definitely have some 3S batteries on hand. Something in the 1300mAh range is probably ideal. If you already know what you’re doing, just go straight to the 4S LiPo batteries!
- GARTT 1500mAh 4S – 9+ minutes, 172g
- CrazePony Graphene 1300mAh 4S – 8+ minutes, 154g
- Floureon 2200mAh 3S – 9+ minutes, 194g
- 1300mAh 3S – 5 to 6 minutes, 101g
Nylon vs steel vs aluminum screws
The sandwich of the PH145’s two 3D-printed nylon plates are held together by 25mm nylon spacers and 10mm m3 nylon screws. When I crash hard, I often pop the head off one or more nylon screws. I crash a lot. When using the thinner prototype frame one day, I went through almost a dozen full batteries, and I crashed enough times to loose seven screws. The PH145 flies fine with lots of missing screws, but it doesn’t take a crash nearly as well!
The current version of the frame with thicker prop guards puts a lot more stress on the nylon screws when I crash. I broke six or seven nylon screws and lost a spacer the first day I flew the new frame. I crashed a few times that day, but I’ve crashed much harder before!

I have plenty of black steel m3 screws here, but I don’t want to use them. Replacing the 30 nylon 10mm screws with steel 8mm screws will increase the weight of my quadcopter by about 17 grams. That’s a 4% increase in weight when I’m running the 1500mAh battery, and all that weight would be at the edges.
UPDATE: I got tired of replacing broken nylon screws. I ordered a set of supposedly aluminum screws, and I started using steel pan head m3 screws from an assortment I had on hand. The steel screws won’t break. That means I moved the weak spot, and I’ve been waiting for something new to break. This finally stressed the zip tie holes on the top frame, and one pair of holes finally broke.
The aluminum screw I ordered were actually just expensive steel screws. They weighed just as much as my cheap screws. I’m waiting for another set of aluminum screws to arrive.
If you want your drone to look snazzy, there are all sorts of brightly colored aluminum screws you can choose from. I’m boring, though, and I prefer the plain black screws.
- 10mm Nylon Screws – These break a lot
- 8mm Aluminum m3 Screws at eBay (light, slow shipping)
- 8mm Steel m3 Screws at Amazon (heavier, 2-day shipping)
- M3 25mm Nylon Standoffs
Transport your drone in style
I stopped by my local Harbor Freight and picked up a foam-filled, faux-aluminum carrying case. The foam is perforated, so it’s easy to cut out a square that perfectly fits your drone and transmitter.
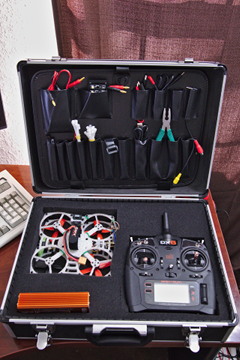
Just in case you don’t have a Harbor Freight in your neighborhood, I found what looks like an identical case at Amazon. It claims to be an inch longer and wider, but it has the exact same tool holder in the lid.
- Vestil Aluminum Tool Case with Foam at Amazon
Enough with all the stupid words! Where’s the parts list?
- 28 M3 screws 8mm Aluminum or 8mm Steel m3
- M3 25mm Nylon Standoffs
- LittleBee 30Ax4 4-in-1 ESC
- Afro Naze32 Flight Controller
- DYS BX1306 4000Kv motor set
- Male XT60 battery connector
- 3030 4-blade propellers
You’ll have to 3D-print the frame using Taulman 910 nylon filament. I’m working on the logistics of selling the frames myself in my Tindie store, but nylon leaves a pretty messy print, and I’m not sure about how I feel about selling something that requires so much cleanup.
I’m also running this FPV camera and transmitter:
These are other batteries I’ve tried so far:
- Venom 50C 850mAh 4S – 5+ minutes, 103g
- GARTT 1500mAh 4S – 9+ minutes, 172g
- CrazePony Graphene 1300mAh 4S – 8+ minutes, 154g
- Floureon 2200mAh 3S – 9+ minutes, 194g
- 1300mAh 3S – 5 to 6 minutes, 101g
The 1300mAh 3S batteries I’m using is a different brand. They are Zippy 1300mAh batteries. I bought them from a friend, and he used up a healthy percentage of their life already—my charger can’t put much more than 1000mAh into them.
I am NOT suggesting that you buy 3S batteries! If you already have some, you can definitely use them to operate my quadcopter. This quadcopter runs much better on 4S batteries, and the smaller 850mAh size battery is ideal.
UPDATE: The Venom 850mAh 4S is DEFINITELY the battery to buy. Mine just arrived. I ran outside to try it out as soon as it was finished charging, and it is awesome! The drone felt so nimble and quick—it weighs in at 347 grams! I can’t wait to see that number again when I replace the steel screws with aluminum!
I was in the air for 5:49 of rather spirited flying just outside the house. I’ve only just learned how to do flips, so I was doing quite a few of those. I zipped back and forth in a straight line quite a bit—that’s all I have room for out there. I need to take it back out to Samuell Garland Park to really open it up. I can’t wait to see how fast it is now!
Should I build or buy a drone?
As far as I’m concerned, building a drone is the way to go. It is always good to understand how things work. If you build your own drone, and something goes wrong in the field, you’ll already know how to fix it.
I build the PH145 from scratch, because there isn’t anything quite like it on the market. At this point, I’m quite confident that the PH145 frame will survive any crash I can put it through—I’ve hit concrete quite hard on several occasions so far.
There are plenty of quadcopter frames on the market to choose from. Most of them are quite inexpensive. When my friend Brian crashes his 450mm drone, he usually breaks one of the arms. A set of four arms costs only $12. He’s managed to also break a motor once, and that cost him another $10. Do-it-yourself drones tend to be inexpensive and easy to repair.
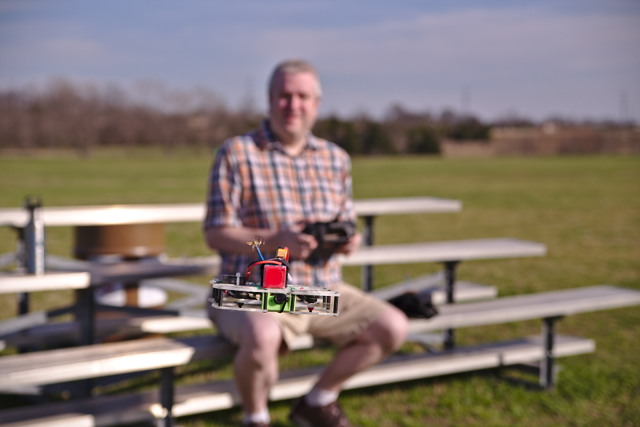
That said, my friends at Gearbest.com have sent me an FPV racing drone that I feel is good competition for the PH145. It is the Holybro Shuriken 180 Pro. It isn’t a kit. It arrives at your door fully assembled. Just attach the antenna, pop in a battery, bind it to your existing controller, and you’ll be in the air in no time!
You’re probably looking at the Shuriken 180 Pro and thinking that it looks absolutely nothing like the PH145. The Shuriken has bigger, exposed propellers, more powerful motors, and a carbon fiber frame. You’re absolutely correct—this is much different than the PH145!
I chose the Shuriken, because it is fast, and the price is comparable to the PH145. It is exactly the sort of thing I might have bought if I didn’t design the PH145.
I’ve been flying the Shuriken 180 Pro from Gearbest for a few days. It is a fantastic quadcopter—fast, maneuverable, and very sturdy! It is a significantly more powerful than my PH145. The open props on the Shuriken survived some pretty hard crashes into the grass, but it doesn’t fare as well on asphalt. I had a very minor crash in the parking lot at TheLab.ms, and I had to replace three propellers.
I hit that same parking lot at full speed with the PH145 all the time, and it is rare that I break a prop when doing so. That said, the Shuriken 180 Pro is a good bit faster than the PH145, costs about the same, and is fully assembled and ready to go out of the box. You can read my review of the Shuriken 180 Pro for more details.
I’ve been learning to fly FPV with both the PH145 and the Shuriken 180 Pro. I can manage flying the Shuriken, but I do a much better job with the PH145. If I didn’t have the PH145, I’m sure I’d be more comfortable with the Shuriken. I’m just not good at handling the extra thrust yet.
- Holybro Shuriken 180 Pro FPV Racing Drone at Gearbest ($215 with code Shuriken181)
- My Review of the Shuriken 180 Pro
What’s next for the PH145?!
I have some minor upgrades on the way. Things like a lighter battery, better propellers, and aluminum screws. The PH145 is already faster than a novice like me can handle. I still can’t wait to see how fast it will be after these upgrades, even if I’m only capable of flying it fast in a straight line!
In the near future, I plan to continue to learn to fly my quadcopter. So far, I’m doing a bad job learning how to fly in first-person view. Learning is going to be a lot of fun, and the best part is that I’ll be crashing a lot. I think the latest iteration of the PH145 frame is close to bulletproof, but I look forward to trying to prove myself wrong!
- PH145 FPV Quadcopter at Thingiverse
- I Built a Quadcopter! at Brian’s Blog