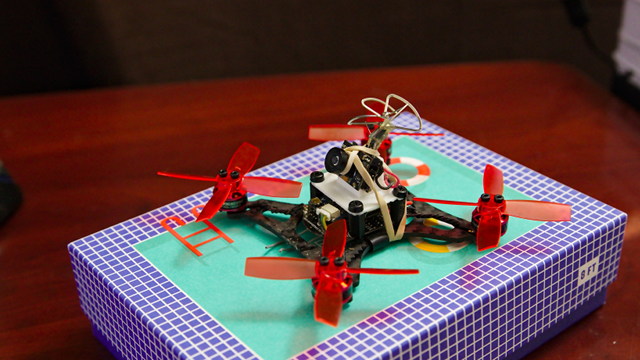
NOTE: If you already have a KingKong 90GT, these upgrades are a big improvement. If you’re thinking about buying a KingKong 90GT, your money can be better spent elsewhere. It has been almost a year since I bought my 90GT, and more than six months since I did these upgrades. Newer, better, faster, cheaper micro quads are now available. You should read about my experiences with the Leader 120. It is a much faster, more durable quad. It has a better camera, more powerful motors, and it costs a lot less than a 90GT!
I’ve been flying my KingKong 90GT for more than two months. It is a fantastic little quadcopter—it truly is bananas to fly! I have crashed often enough that I’ve damaged my video transmitter antenna—if you follow the advice in my previous blog, you should be able to avoid this! I’m also running low on propellers. These issues seemed like a good excuse for some upgrades!

I made two minor upgrades, and I am thrilled with the results! Flight times are up 30%, thrust is up almost 50%, video transmission range is probably tripled, and my KingKong 90GT feels more stable than ever.
Removing the prop guards and increasing the thrust have made my KingKong 90GT much less safe for indoor use, but I don’t mind one bit. It is just too much fun outdoors now!
- The KingKong 90GT is Bananas
- Leader 120 Micro FPV Quad: Amazing Performance on a Budget
- KingKong 90GT with DSM2 receiver at Gearbest
- KingKong 90GT with FrySky receiver at Gearbest
- 2 pack of 350mAh 2S 7.4v LiPo batteries at Amazon
Upgrading the VTX
We broke the tip off my KingKong 90GT’s VTX antenna in the first week. If you read my previous blog post about the 90GT, you have probably already avoided this problem by strengthening the antenna with some simple heat shrink tubing.
My repairs were never ideal, and I’m pretty sure my solder work has come loose. I could have taken everything apart or soldered a new antenna on, but instead I shopped for higher power VTX units.
The stock video transmitter operates at 25mw. In all honesty, this is good enough most of the time. It doesn’t cost much more to upgrade to a 200mw transmitter, though, and I figured more range is better!
I also wanted to upgrade from the stock dipole antenna to a polarized cloverleaf antenna. It is my understanding that you lose 3 dbi when you have a dipole on one end and a polarized cloverleaf on the other. Cloverleaf antennas get better reception than dipole antennas, and I already have a cloverleaf on my goggles. I think it is a good idea to match both ends with the better antenna!
I was hoping to find a small, high-power VTX that I could wire in to the stock camera. I like the stock camera’s placement, and I wanted to keep the KingKong 90GT looking sleek. Unfortunately, all the VTX units I found that operate at anything over 50mw come with a camera built in. I supposed I could take out my soldering iron and remove the camera from one of these units, but it is much easier to just strap the new camera on top of the KingKong 90GT.
I settled on the Wolfwhoop 25mw/50mw/200mw switchable VTX unit. It weighs about 6 grams, it has a cloverleaf antenna, and I had no trouble fashioning a 3D printed mount to attach it to the roof of the KingKong 90GT.
The performance of the new VTX
I ran my first test flight at 50mw. Everything looked great. The camera is probably an upgrade over the stock 90GT camera, but it isn’t a huge upgrade. It has been a while since I flew the stock VTX with a good antenna, so it is tough to say if the 50mw is a proper upgrade. My gut says it is.
When I cranked it all the way to 200mw, I expected a noticeable drop in battery life. I was pleasantly surprised that I was able to stay in the air just about as long as I expected. At 200mw, the KingKong 90GT had no trouble flying out about 950’ away in an open field.
I’m sure I could have gone farther, but that’s where the trees start. That’s also much farther than I want to walk to hunt for a lost drone. The KingKong 90GT is tiny, so it is difficult to spot even in freshly cut grass!
How did you mount the VTX?
I designed a 3D printed bracket to swap in place of the carbon fiber plate on top of the KingKong 90GT. I’m using my original prototype part for now. I designed it before the camera module arrived, and it doesn’t fit perfectly.
The VTX unit has a seven segment LED, and I didn’t account for how much thicker that makes the right side of the module. I corrected the issue with my prototype by cutting a big notch out of the corner.
I have some ideas to improve the mount, and it should be easier to implement those ideas now that the camera is in my hands! Just in case anyone needs it before I’ve completed my design, I uploaded my prototype camera mount to Thingiverse.
I’m disappointed that I had to move the camera to the top of the drone. The 90GT looks a lot more sleek with the camera in the factory location. The props are barely visible in the video feed now, so I can’t complain too much!
- KingKong 90GT Camera Mount at Thingiverse
- Wolfwhoop 25mw/50mw/200mw VTX with Camera at Amazon
Ditching the prop guards
I took the prop guards off last week. That dropped the weight of the drone to 50 grams from 58 grams. That’s about a 15% savings in weight, and it seemed to make the 90GT feel more nimble and agile. I didn’t get to test this weight reduction as much as I’d have liked to, because my VTX antenna was quite broken. I only had a chance to fly two batteries without the prop guards, and I was disappointed that I didn’t see improved flight times.
However, this experiment did get me wondering if I could fit larger propellers on this frame.
- 2 pack of 350mAh 2S 7.4v LiPo batteries at Amazon
- Wolfwhoop 25mw/50mw/200mw VTX with Camera at Amazon
- KingKong 90GT Camera Mount at Thingiverse
Upgrading to larger propellers
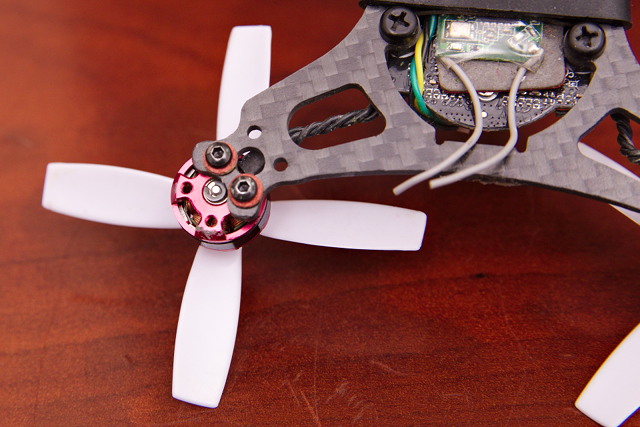
I cheated. I moved the motors out past the frame, and I am now only able to use two screws to mount the motors. This gave me quite a bit of extra space between the props and the frame. How much more propeller could I fit?
I started searching, and I decided to try a set of 4-blade 2435 props. They’re about 25% longer than the 1935 props that come with the KingKong 90GT, and they have an extra blade. If they worked, I was expecting to see quite a bit more thrust!
I wasn’t disappointed. The larger props just barely fit, and they generate quite a bit more thrust than the stock props. According to my blackbox data, the stock props generate 2.3G of thrust in a punch out. The 2435 props hit a massive 3.6G in a punch out—almost a 50% increase in thrust!
This would be exciting news on its own, but I’m also seeing much longer flight times. With the stock props, I’ve been getting a little over three minutes of flight time out of my 350 mAh 2S batteries. With the weight reduction and larger props, I’m getting an extra 60 to 90 seconds in the air. I would switch to the bigger props just for the longer battery life!
I want to say that the bigger props make it as fast as my Holybro Shuriken X1, but that would be a lie. I will say that I’m confident that my KingKong 90GT could probably almost keep up with my Shuriken X1 through the tight trees at Breckinridge Park. If I go much faster than that with the X1, I have a lot of trouble maintaining control!
- 2435 propellers at Amazon
- 350mAh 2S LiPo 2-pack at Amazon
How do you fit bigger props on the KingKong 90GT?!
All you have to do is move the motors. The 90GT only comes with eight screws and washers that fit the prop guards—that’s only two screws per motor! I moved the motors slightly outside the frame. Only the outer two screw holes line up now. This is one of those instances where a picture is worth a thousand words.

This moves the motors out by about ¼”, and the upgraded props are about ½” larger. This makes for an almost perfect fit!
Conclusion
The other day, I handed the controls of my KingKong 90GT to my friend Brian. He flies his KingKong 90GT every time we go to the park, and he’s been listening to me talking about my upgrades all week. He’s not terribly articulate while he’s flying—not many of us are! He muttered things like, “This is awesome!” and, “It feels so smooth!”
This was the first time I had seen my upgraded KingKong 90GT flying fast without my head in the FPV goggles. I watch Brian fly his all the time, and it was obvious how much faster he was going with the upgraded drone!
I’d say the VTX upgrade is optional. It is worthwhile if you want to get a little more range, but I was happy enough with the 25mw VTX until I broke my antenna. That said, having 1,000’ of range is a nice bonus!
I’ve said before that I feel the KingKong 90GT already has the has just the right balance of cost, performance, and durability. The KingKong 90GT is already bananas from the factory. There are faster brushless micro drones out there, but they usually cost quite a bit more—enough that I’d prefer to buy another 5” racer!
Without the prop guards in place, you’ll lose the ability to comfortably fly indoors. That said, I still highly recommend the propeller upgrade. My KingKong 90GT feels like a brand new drone now. It is effectively a free upgrade—especially if you’re already running low on propellers! The prop upgrade makes the 90GT a more direct competitor to ARFUN 90 or the ridiculously powerful micro drones like the Airblade Creampuff.
Do you fly a KingKong 90GT? What do you think of it? Have you upgraded yours? Leave a comment below. I’d love to hear your opinion!
- The KingKong 90GT is Bananas
- Leader 120 Micro FPV Quad: Amazing Performance on a Budget
- KingKong 90GT with DSM2 receiver at Gearbest
- KingKong 90GT with FrySky receiver at Gearbest
- 2 pack of 350mAh 2S 7.4v LiPo batteries at Amazon
- Wolfwhoop 25mw/50mw/200mw VTX with Camera at Amazon
- KingKong 90GT Camera Mount at Thingiverse