Almost everything regarding my new frame design has been working out better than I expected. Using the Shapeoko XXL is easy. Cutting carbon fiber was even easier than I expected. The first prototype fit together quite well, and it flew almost perfectly. I mostly just needed to tune the PIDs on the pitch axis, because of that long fuselage on the Kestrel.
I’m slightly exaggerating. The first test cuts of the earliest prototype didn’t go perfectly. The bottom and side plates came out great, but the arms broke free of the carbon fiber before the motor holes were drilled. It wasn’t a big deal, and I learned from my mistakes. It also gave me a chance to test fit all the parts of the fuselage before cutting again.

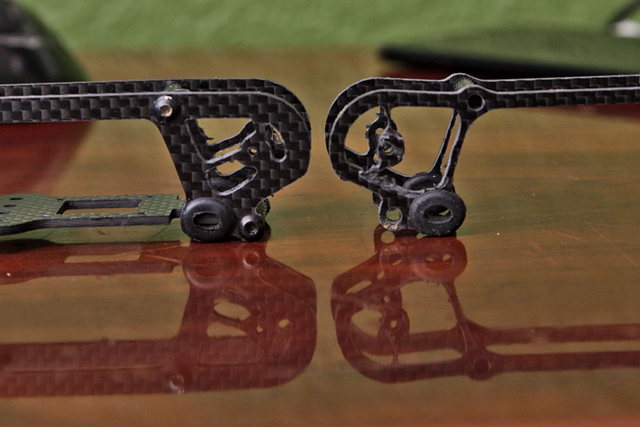
That first fuselage was beefy. Much too beefy. The side plates are cut out of 3 mm carbon fiber sheets, and I believe I made the length of the side plates 6 or 7 mm thick. It didn’t need to be that sturdy. I’ve dialed that back quite a bit.
All my holes for M2 and M3 screws were too tight, and the slots in the side plates for mounting the top plate were too snug. I managed to get that first fuselage assembled, but I had to widen all the M3 holes, and I had to tap the top plate into place with a hammer!
I was excited to see that my design was coming together, though. All I had to do was tweak three or four variables, run the SVG files through my CAM software, and cut the real prototype!
- I Bought a CNC Machine: I Have No Idea What I’m Doing
- I am Designing a Freestyle HD Micro Quad Frame!
- Kestrel HD Micro Quad Frame at Thingiverse
- My Open Source 3-inch HD Micro Quad Frame – The Kestrel at Patreon
The prototype flies great, but…
One of my major goals for this project is to build a lighter Acrobrat. Using those beefy 7 mm rails and having a beefy camera pod on the side plates may look nice and sturdy, but it adds quite a few grams.
I only know one way to figure out just how light, thin, and spindly you can make your quadcopter frame. That’s to make it thinner than you think you can get away with, then crash the heck out of it! Wherever it breaks is too thin, so that’s where it needs to be reinforced!
NOTE: Test flight before the Caddx Turtle V2 arrived. I wasn’t smart enough to update the name in the OSD!
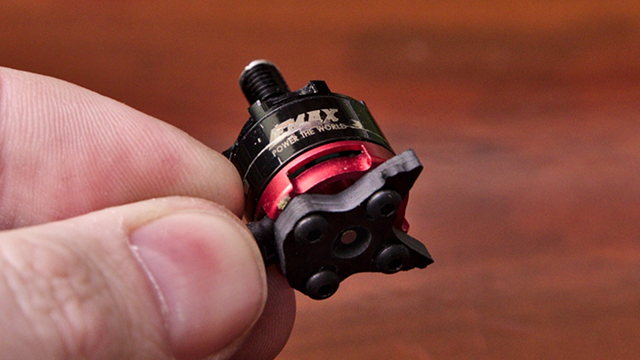
There are a few spots I’m still worried about. The tabs that slot into the vibration-dampening bushings of the side plates can only be so wide, and the bottom plate is only 2 mm thick. I’m expecting that to be the weak point in a crash, but I’m also worried that I’ll need to make those tabs even narrower to allow the bushings to float a little more freely. We’ll see how that goes.
If it is a freestyle frame, how light can it get?
I’m concerned about this. The Acrobrat is designed to use 1407 or 1408 motors, and everything that goes along with that can easily push your weight over 250 grams. I’m not personally worried about the 250-gram limit, but doesn’t it seem like an interesting target to design against?
Heavier quads are better for freestyle. My prototype Kestrel frame is using all the hardware from my Leader 3, including the tiny 1106 motors. A whole set of those 1106 motors weighs less than a pair of 1408 motors, by the way.
I’ve flown my Leader 3 quite a bit, and upgrading to the Kestrel frame and a Caddx Turtle hasn’t increased the weight all that much. Even with the new camera and heavier frame, I believe I’m still lighter than my friend Brian’s Diatone GT-M3!
Flying freestyle with a quad that weighs 160 grams with a battery is challenging. My 680 gram 5” quad is an entirely different beast. I can huck him over a tree, roll upside down before I even reach the tree, and then finish off the S-turn when I get past.

With the 160-gram Leader 3, I can’t do that. If I invert before I clear the tree, my quad will likely end up in the tree. I have to wait until I’m almost past the tree before inverting with the Leader 3 or my 1106 Kestrel.
My Kestrel build weighs in at about 185 grams with a 4S 450 mAh battery. It flies for 2.5 to 4 minutes on a charge, but most of the time I land at just barely over 3 minutes. I tend to get pretty close to 3.3 volts per cell, but they usually recover to 3.7 volts shortly after the flight.
I ordered a bunch of 4S 650 mAh packs, too. They should put my Kestrel at just over 200 grams. I think it will be interesting to see if the extra weight makes the quad a little more huckable, and I’d like to see how that influences my flight times.
UPDATE: On my current prototype frame, my 1106 Kestrel weighs 128 grams dry, 189 grams with a 450 mAh 4S, and 217 grams with a 650 mAh 4S.
My friend Brian transplanted his Diatone GT-M3 with HGLRC 1407 motors over to a Kestrel frame, and he added a Caddx Turtle. The Diatone frame must be heavy, because the weight is one gram lighter after the upgrade! His Kestrel with 1407 motors weighs 168 grams dry, and 253 grams with a 650 mAh 4S battery.
- Full Speed Leader 3 Micro FPV Racing Drone at patshead.com
If weight helps with freestyle, why keep the weight down?
In the end, it all comes down to cost. If I want to upgrade from 1106 to 1408 motors, I’m going to be carrying quite a bit more weight. That means my arms need to be sturdier, and that adds more weight. This extra weight starts to add up, and now I might need to upgrade to a bigger battery.
At this point, maybe the camera protection needs to get beefier, too. The bigger motors on the heavier quad will also be rougher on your batteries, and you’ll be more like to damage someone’s property when you crash.
Heavier quads are more likely to break, and they’re more likely to damage property. I can always make the frame tougher. That just adds more weight, and it doesn’t keep the other exposed components safe. A 180-gram quad is less likely to break a camera or battery than a 250-gram quad!
My perspective might also be a little different. In some parts of the world, that 250-gram weight limit is a real limitation. In those places, your only choice for freestyle might be a 250 gram drone!

For me, my HD micro drone is more of a backup; almost an afterthought. It is an extra piece of gear to keep in my bag alongside my 5” and 6” quads for those times when a bigger quad isn’t appropriate.
As I’m writing this, I realize that this sounds like a strange perspective for someone to have when they’re putting all this time and effort into designing a 3” HD micro quadcopter frame!
I know I’m not the only person interested in this sort of frame. I want something light, inexpensive, and relatively safe to keep in my bag. Adding an HD camera is a huge bonus for me. I’m sure I’ll miss my GoPro and superview when I fly my Kestrel, but I absolutely expect to fly my Kestrel in situations where I wouldn’t dare fly my 5” quad!
Of course, the Kestrel won’t just be for 1106 quads. I’m going to be making wider arms for 1408 motors, and I’m also going to try longer arms for 1806 or even 2204 motors with 4” props. My prototype will be for my specific use case.
- I am Designing a Freestyle HD Micro Quad Frame!
- Kestrel HD Micro Quad Frame at Thingiverse
- My Open Source 3-inch HD Micro Quad Frame – The Kestrel at Patreon
Rubber bushings don’t solve all problems!
My first day out flying with an HD camera on the prototype Kestrel was a disappointment. I had a flutter at full throttle, and my cruising footage wasn’t smooth at all—even with a fresh set of props!
When I got home, I noticed that my flight stack wasn’t secure. I was surprised, because I wiggled it around to make sure it was solid while I was installing the Caddx Turtle. Two standoffs between the flight controller and ESC were busted, and two standoffs between the frame and ESC were broken as well!
I took out all the old nylon standoffs and soft-mount standoffs, and I replaced them with fresh M2 nylon standoffs. It is too bad I couldn’t reuse the soft standoffs. A piece of a nylon standoff broke off inside, so I just replaced them all with regular standoffs.
NOTE: Sorry about the vibrating footage!
It was almost dark when I finished buttoning the Kestrel back up, so I just took it outside the house to give it a few punches. My full-throttle oscillation seems to be gone. I didn’t get to do much slow cruising, but I’m hopeful that the shakiness is gone there, too.
You also need clean props. I tried to make a pass under my car, and I forgot to flip the switch from air mode to rate mode, and I chewed up the tips of two props on the pavement. They didn’t look terrible, but that definitely added more vibration.
I’m hopeful that the rubber bushings will help silence some vibrations, but I know for sure that it will only reduce vibrations with low amplitudes. I think I’ll be changing props a lot more often with an HD camera!
You sure do talk a lot, Pat. You haven’t even told us what’s next!
Yeah. I’m doing a bad job of getting to the point of this blog post!
I’m quite pleased with the first prototype of the Kestrel. I will probably be flying my copy as it is for quite a while, but I plan to cut frames for some friends soon. The prototype isn’t without flaws, but I am thankful that they’re not show-stoppers!

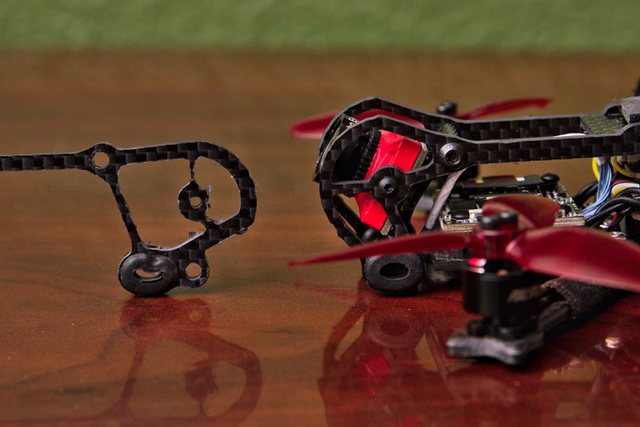
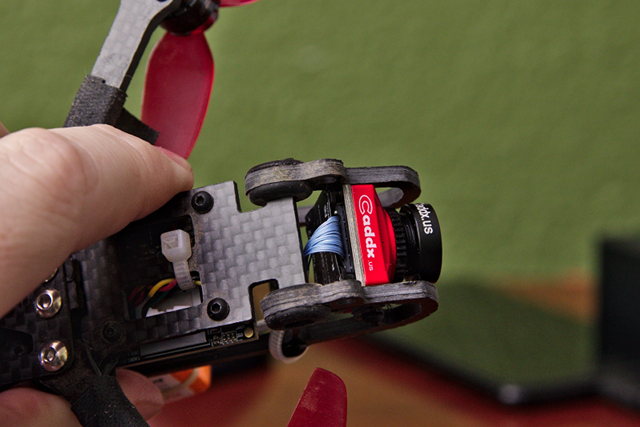
The most obvious problem is the camera protection. I based the radius of the curve on Caddx’s measurements for the Turtle. I’m guessing that those measurements don’t apply to the bigger lens on the newer Turtle cameras, because the lens sticks out nearly 2 mm past the front end of my quad!
That was easy enough to fix. I just had to adjust a variable. That’s why I love OpenSCAD.
I left the bottom standoff out of the build, but the holes are still there in the prototype. It turns out that I don’t need it for rigidity, and leaving it out saved more than 2 grams. I don’t know that I could put it back in place, either, because it would be awfully close to the camera.
It will just barely fit, and I’ll probably put it back in place before my test flights. The wiring harness for the Caddx Turtle is at the bottom, and on my current build, those wires will be exposed in a crash, and they are fragile wires.
I’ve already adjusted the model in an attempt to alleviate this issue. There’s plenty of room to bring the camera backwards. I moved the camera upwards by a few mm, and back far enough that the camera’s mounting screw is behind the center of the front bushing.
That should be back far enough that the frame’s bottom plate will protect the camera. In the worst case, I can extend the bottom plate forward far enough to keep those wires safe.
I also rearranged the various support pieces near the camera. I eliminated the vertical post connecting the front bushing to the front standoff. The camera is close enough, so I’m hopeful that the camera pod will be structurally sound enough to support the entirety of the front end. I also adjusted one of the camera’s braces so that it follows the direction of the carbon for strength.

Moving the camera back left the standoff a little too close to the camera. I’ve pushed that standoff back, so it shouldn’t interfere with uptilt.
While I was working with the side plate, I also decided to drop the deck by 3 mm. It should still be quite roomy. My stack is still using a set of tall standoffs to cap off the top, and those are a bit tall. I’ll probably still have just enough room even with those giant standoffs being used as screws, but I’ll just swap them out for proper M2 nylon nuts.
I’ve moved the camera back quite far. I think I’ll be OK, but there is a possibility that the props will be in view with the new design. If they are, I will adjust the angle of the arms to compensate!
- I am Designing a Freestyle HD Micro Quad Frame!
- Kestrel HD Micro Quad Frame at Thingiverse
- My Open Source 3-inch HD Micro Quad Frame – The Kestrel at Patreon
The Foxeer Mix camera
I was waiting for my Caddx Turtle to arrive before I started messing with the shape and location of the camera pod. I wanted to move the camera inward, but not so far that I might interfere with the Turtle’s circuit board. I wanted to see it in the real world. I didn’t quite trust my measurements!
It turns out I have plenty of room for the Turtle, so I moved the camera way back. I looked up the Foxeer Mix HD camera, and I couldn’t believe how big its circuit board is! It is 37 mm long and wide!
I’m not even going to attempt to accommodate it in my frame. At 37 mm, it will stick quite far out each side of my frame. Not only that, but I wouldn’t be able to push the camera back very far at all.
It is a good thing the Foxeer Mix didn’t wind up being the most amazing HD FPV camera, or I might be disappointed!
I’m going to need testers!
Designing the Kestrel has been a lot of fun. Almost as much fun as flying it! Weather, camera problems, and my own mistakes have greatly impacted my flight time, and I’m realizing that I don’t need to be doing all the test flying on my own!
I’m looking for help. I don’t have enough time, parts, or funding to test every configuration that I’d like to support with the Kestrel. I’m most interested in the 1106-scale version of the frame, so that is where I’m focusing my time.
I’m about to cut a frame for my friend Brian. He’s going to be transplanting his upgraded Diatone GT-M3, so I’ll be cutting him beefier arms with wider holes to support both 9 mm or 12 mm motor hole spacing. I expect he’ll be right at or just over the 250 gram limit. I’m excited about taking his heavier Kestrel for a spin!
I’m also extremely interested in seeing a Kestrel with 4” arms, especially if it squeezes in under 250 grams! I don’t expect to be building one of these any time soon. I think it’d be a very interesting build, but at this point, it’d be too much like my 5” quads for me to include it in my fleet.
So what do you want to build?
I want to hear about what you want to build. If you’re an experienced freestyle pilot, and you want a Kestrel frame customized for an interesting configuration, please contact me! Leave a comment, send me an email, or stop by our Discord server. I have no idea what kind of a response I’m going to get from my request for help, so I have no idea how this is going to go.
I expect I’ll be sending a freebie prototype to a few select pilots, but I’d like to get as many of these out into the world as I can manage. Even so, I’m limited by my production capacity.
I’m going to have to figure out a reasonable way to charge for my time and materials if enough people are actually interested in trying out my frame.
How much will a prototype frame cost?
I tend to be overly honest and forthcoming about my costs and processes. This is probably why I’m a terrible business-person.
I did some very naive math after my first successful cut of a frame. I measured about how much space I used on each sheet of carbon, then figured out approximately how many frames I could fit on each sheet. I’m using relatively expensive carbon fiber sheets from GetFPV.
My math says each frame consumes just shy of $14 worth of carbon fiber. I can probably cut that in half if I use cheaper carbon, but I’m quite pleased with how sturdy it is. The cheap 3mm carbon from the Leader 3 is much easier to flex!
Lazy 3-day shipping withing the United States is around $7. Lets just say it costs me $20 of actual cash out of my pocket to get a frame out the door.
I haven’t taken labor into account. Sure, the CNC machine does most of the work, but at this point, I have to babysit for an hour or more for each frame. So far, I’ve broken a $20 endmill while cutting frames. I don’t know how often I’ll be breaking stuff, but I’ll need to account for that.
Things will slowly get more efficient on my end. If I ever get to the point where I can mass-produce these, I’m certain my costs will go down, too!
But this is where we’re at today. I have to make them myself. If you have interesting plans for my frame, please let me know!
- I am Designing a Freestyle HD Micro Quad Frame!
- Kestrel HD Micro Quad Frame at Thingiverse
- My Open Source 3-inch HD Micro Quad Frame – The Kestrel at Patreon
How can I help support Pat?
I’ve set up an account on Patreon. I haven’t thought this through as well as I’d like, but here’s what I’m imagining so far. If you like what I’m doing, and you’d like to make sure I have access to the supplies and tools I need to keep doing these things, you can support me at Patreon.
I would prefer to provide a product or a more tangible service. Buying my frame would be a great way to support my future development, but I’m really not there yet. I’m going to be a huge production bottleneck for the time being.
There are Amazon affiliate links all over the place on my blog. You don’t have to buy what I’m linking to. Any purchase made shortly after clicking one of my links will earn me a small percentage, and every little bit helps!
This section could use a blog post or Patreon post of its own—maybe both! I need to put more thought into this.
The current specs of Pat’s personal Kestrel prototype
My Kestrel is built using the guts of a Full Speed Leader 3 and a Caddx Turtle. It is currently weighing in at 123 grams dry, and 183 grams with a 4S 450 mAh CNHL battery. I’m getting flight times ranging from 2.5 minutes to 4.5 minutes, but most of my somewhat aggressive freestyle flights come in at right around 3 minutes.
Here’s the laundry list:
- F4 Flight Controller
- 28 amp blheli_s 4-in-1 ESC
- 25-600 mw VTX (my smartaudio is busted!)
- 1106 4500 kv motors
- Caddx Turtle V2
- HQ 3x3x3 3-hole props
- Crappy dipole antenna
- 186 grams with CNHL 4S 450 mAh
- GPL licensed design
- Currently hosted on Thingiverse
Conclusion
I’ve already started cutting updated carbon. We’ll probably be transplanting Brian’s Diatone GT-M3 this weekend or early next week. I can’t wait to see how that flies.
I’m excited. I’m tweaking designs, cutting frames, and slowly collecting some HD footage. I’m sure it won’t be long before the next update, especially if it stops being rainy and cloudy!
Are you looking for a lighter 3” freestyle frame with removable arms? Do you think I’m on the right track here? Are you interested in helping me test my design? Leave a comment, or stop by our Discord server and talk to me!